
 Please Note:
This article is written for users of the following Microsoft Word versions: 2007, 2010, 2013, 2016, 2019, and Word in Microsoft 365. If you are using an earlier version (Word 2003 or earlier), this tip may not work for you. For a version of this tip written specifically for earlier versions of Word, click here: Accepting All Formatting Changes.
![]()
Written by Allen Wyatt (last updated June 19, 2021)
This tip applies to Word 2007, 2010, 2013, 2016, 2019, and Word in Microsoft 365
Graciela has a huge document with many changes that were made with Track Changes turned on. Some of these changes are formatting changes and some of them are of other types, such as textual edits. Graciela would like to accept all the formatting changes but not the other types of changes. She is curious if there is an «accept all» command that will accept only the formatting changes.
It is relatively easy to accomplish this task. Just follow these steps:
- Make sure the Review tab of the ribbon is displayed.
- Click the Show Markup tool (in the Tracking group). Word displays some options that control what changes are shown.
- Clear all the checkmarks, except the Formatting checkmark. (You will need to repeat step 2 for each checkmark you need to remove.)
- Click the down-arrow under the Accept tool (in the Changes group). Word displays some different ways you can accept changes.
- Choose Accept All Changes Shown. All the formatting changes (which is all that are shown) are accepted. (Don’t select Accept All Changes in Document; that would accept all the changes whether they are shown or not.)
- Use the Show Markup tool to select which changes you want Word to show.
If you find yourself getting rid of the formatting changes quite a bit, you can instruct Word to not track formatting changes at all. Follow these steps if you are using Word 2007 or Word 2010:
- Make sure the Review tab of the ribbon is displayed.
- Click the down-arrow under the Track Changes tool (in the Tracking group) and then click Change Tracking Options. Word displays the Track Changes Options dialog box. (See Figure 1.)
- Clear the Track Formatting check box.
- Click OK.
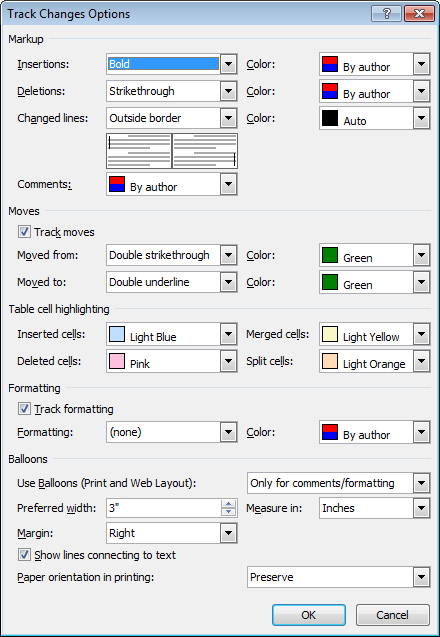
Figure 1. The Track Changes Options dialog box.
If you are using Word 2013 or a later version, follow these steps instead:
- Make sure the Review tab of the ribbon is displayed.
- Click the small icon at the lower-right corner of the Tracking group. Word displays the Track Changes Options dialog box.
- Click the Advanced Options button. Word displays the Advanced Track Changes Options dialog box. (See Figure 2.)
- Clear the Track Formatting check box.
- Click OK to close the Advanced Track Changes Options dialog box.
- Click OK to close the Track Changes Options dialog box.
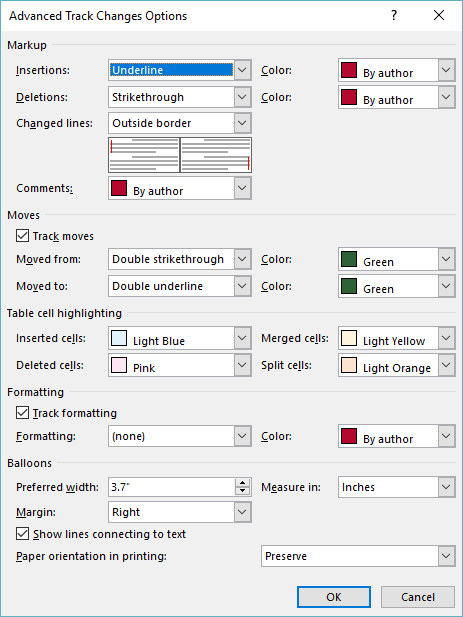
Figure 2. The Advanced Track Changes Options dialog box.
Now Word won’t track any of the formatting changes you make in the document. If you find that the setting is not persistent from one Word session to another, you can create a small macro to run whenever a document is opened. Simply add this single line to the macro:
ActiveDocument.TrackFormatting = False
WordTips is your source for cost-effective Microsoft Word training.
(Microsoft Word is the most popular word processing software in the world.)
This tip (8834) applies to Microsoft Word 2007, 2010, 2013, 2016, 2019, and Word in Microsoft 365. You can find a version of this tip for the older menu interface of Word here: Accepting All Formatting Changes.
Author Bio
With more than 50 non-fiction books and numerous magazine articles to his credit, Allen Wyatt is an internationally recognized author. He is president of Sharon Parq Associates, a computer and publishing services company. Learn more about Allen…
MORE FROM ALLEN
Creating Thin Spaces
Thin spaces are a typographic device that allows you add a bit of space between elements of a document. There are no thin …
Discover More
Functions that Can Access Closed Workbooks
When creating a workbook, you can include formulas that reference data stored in other workbooks. Some functions will …
Discover More
Preventing Straggling Heads
Undoubtedly you will want to format your document so that headings stay with the paragraph that follows the heading. …
Discover More
More WordTips (ribbon)
Displaying Edits by Date
Track Changes is a great tool; it allows you to see what changes were made in a document and then determine whether you …
Discover More
Setting Default Options for Track Changes
The Track changes feature in Word is a great help in editing documents, particularly if you are working with others or …
Discover More
Examining Tracked Changes in a Macro
The Track Changes feature in Word is very handy when you need to see what edits are made to a document. Using a macro, …
Discover More
This article tells you how to view just one reviewer’s changes in Track Changes in Word (the screenshots are for Word 2010 and Word 2013 separately but this works for all version of Word, including Word 2003 and Word 2007). Once you can see the changes made by one editor or reviewer, you can delete the changes made by that one reviewer, leaving only the changes made by the other reviewers.
Why would I want to accept only one reviewer’s changes in Track Changes?
Recently, I worked on a document where I made all of my usual changes or comments, then the author responded and sent it back to me for re-checking. They hadn’t accepted my initial changes, but had told me in the email that they were OK. Because the document looked really messy and confusing, I wanted to accept all of my changes and just work with the author’s additions and amendments. Here’s how I did it.
Note, it looks slightly different in Word 2007/2010 and Word 2013, with subtly different terminology, so we’ll look at 2007-2010 first and then 2013
How do I see and accept one reviewer’s changes in Word 2007 and Word 2010?
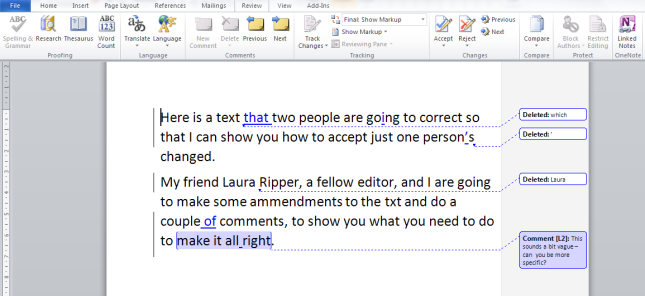
Here’s our text, with comments and corrections by two reviewers, shown in two colours. What I want to do is accept the changes made in blue and just end up with the ones in red to review.

First of all, we need to show only one reviewer’s corrections. We do this in the Review tab, Track Changes area. Click on the arrow next to Show Markup and then Reviewers on the drop-down menu. This allows you to tick or un-tick by different names. IN this case, I want to interact with just the changes made in blue – the ones I want to accept. So I click on the tick box by the LB initials, to un-tick that box and only see Laura’s corrections:

Once I’ve done that, I can only see the blue corrections. Note that the red comment box has also disappeared. We only see comments and corrections by Laura, but the ones made by LB will still be there behind the scenes.
Now I want to accept these blue changes. In the Review tab, Track Changes, I click on the arrow at the bottom of the Accept button and click Accept All Changes Shown (it’s important to pick this one – if I chose Accept All Changes in Document, all of the changes, hidden and visible, would be accepted).

Now all of the blue changes have been accepted and only the comment by L[aura] is visible.

Just to prove that my corrections are still there, and in case I want to review those, we can view all reviewers by going back to Review – Track Changes – Show Markup – Reviewers and clicking in the box to tick LB:

Now I can see the corrections in red and all of the comment boxes, and review them happily.

How do I see and accept one reviewer’s changes in Word 2013?
Here is our text commented on and corrected by two people. I want to view and accept the red changes made by Laura, then view my own ones in blue to review them (Yes, if you’re reading this all the way through, Word 2010 and Word 2013 chose the opposite colours for the two reviewers).

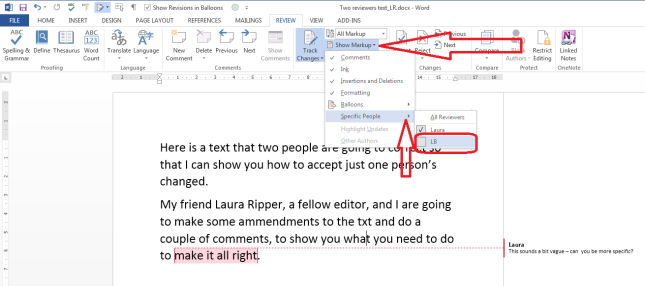
First we need to view only the blue corrections in order to accept only those ones. In the Review tab, Track Changes area, click on Show Markup then Reviewers. This gives us the option to tick or untick by each individual reviewer. Here, I’m going to untick LB.

Now we can just see Laura’s changes in red.

We can accept these changes by choosing Review tab – Track Changes area and clicking on the arrow at the bottom of the Accept button. Then, we choose Accept All Changes Shown (note, Accept All Changes will accept all of the changes, red or blue, visible or hidden: we don’t want that):

Now all of the insertions and deletions have been accepted and we’re left with just the comment balloon:

To see and review the suggestions made in blue by me, we go back to Review tab – Track Changes area – Show Markup – Reviewers and re-tick by the LB:
Now we can see all of the changes suggested by LB as well as the comments by both people.

This is another one written when I had a specific need and had to go hunting around, so I hope you’ve found it useful. If so, please share using the buttons below or pop a comment on!
Please note, these hints work with versions of Microsoft Word currently in use – Word 2007, Word 2010 and Word 2013 all for PC. Mac compatible versions of Word should have similar options. Always save a copy of your document before manipulating it. I bear no responsibility for any pickles you might get yourself into!
This is part of my series on how to avoid time-consuming “short cuts” and use Word in the right way to maximise your time and improve the look of your documents. Find all the short cuts here …
Related posts on this blog:
Track changes 1 – why use it, where can you find it, what can you do with it?
Track changes 2 – customising Track Changes
Track changes 3 – working with a document with tracked changes
Formatting comments balloons – everything you have ever wanted to know!
What to do if your comment boxes go tiny in Word – A common problem, hard to find the answer!
What to do if your comment box text runs right to left – Useful if you edit texts from Arabic authors
Changing the language in your comment balloons – From US to UK English and beyond …
This tutorial shows how to use Track Changes in Microsoft Word. Track Changes helps us edit documents by tracking insertions, deletions, replacements, and format changes. Word calls these edits markups.
This tutorial also includes an overview of Word’s new Modern comment tool.
We will cover twelve topics:
- How to Turn Track Changes On and Off
- How to Show and Hide Track Changes
- How to Delete Text with Track Changes
- How to Insert Text with Track Changes
- How to Replace Text with Track Changes
- How to Change Formatting with Track Changes
- How to Accept or Reject Track Changes
- How to Insert Comments
- How to Reply to Comments
- How to Resolve Comments
- How to Delete Comments
- How to Open and Close the Reviewing Pane
Watch all the steps shown here in real time!
Explore more than 200 writing-related software tutorials on my YouTube channel.
Let’s dive in…
How to Turn Track Changes On and Off
- Select the Review tab in the ribbon.

- Select the Track Changes button in the Tracking group. The button will appear darker than the rest of the ribbon when Track Changes is turned on.

- Select the Track Changes button (see figure 2) again to turn off tracking.
How to Show and Hide Track Changes
You can control how comments and edits appear by using the Display for Review and Show Markup menus in the Tracking group in the ribbon.
- Select the Display for Review drop-down menu to choose how edits and comments are displayed. The options are (A) Simple Markup, (B) All Markup, (C) No Markup, and (D) Original.

(A) Simple Markup displays the edited version of the document without visible in-line edits. However, edits are indicated by a vertical line in the left margin.
For example, if you delete a sentence, that sentence won’t appear on screen. Instead, a vertical line will appear in the left margin showing that a change was made in that location.
If you want to see the edit, select the vertical line to switch to All Markup.

Comments will be visible on the right side of the screen when in Simple Markup.
(B) All Markup displays all edits and comments.
A vertical line, like the one shown in Simple Markup (see figure 4), will appear on the left side of the screen indicating that a change was made in that location.
Select that line to switch to Simple Markup.
(C) No Markup displays the edited version of the document without any visible edits or comments.
(D) Original displays the original version of the document without any edits or comments.
- Select the Show Markup drop-down menu to choose what features Track Changes displays. (Note that this menu is called Markup Options in Word for Mac.)
I recommend showing markups for Insertions and Deletions and Formatting as well as choosing Show Only Formatting in Balloons so that your insertions and deletions will appear in the text and formatting changes will appear next to the text.

Be default, comments will appear in balloons on the right side of the text.
Important note: The remaining sections show Track Changes in the All Markup view.
How to Delete Text with Track Changes
- Select the text you want to delete.
- Select the Delete key on your keyboard. The deleted text will appear with a strikethrough in the All Markup view.

How to Insert Text with Track Changes
- Place your cursor where you want to insert new text.
- Type the new text. The insertion will appear with an underline in the All Markup view.

How to Replace Text with Track Changes
- Select the text you want to replace.
- Type the replacement text. The original text will appear with a strikethrough, and the replacement text will appear with an underline in the All Markup view.

How to Change Formatting with Track Changes
Formatting includes the font style, font size, font color, italics, bold font, underlining, superscripting and subscripting, indentations, alignment, and margins.
- Select the text you want to reformat.
- Change the format. Track Changes will automatically display the change with your other markup if you have selected formatting in the Show Markup section of the Tracking group.

How to Accept or Reject Track Changes
Edits created with Track Changes must be accepted before they become part of your document. You can accept or reject edits individually or all at once.
Accept or Reject Edits Individually
- Click on or select the insertion, deletion, or replacement text.
- Select the Accept or Reject button in the Changes group.

Pro Tip: Use the Previous and Next buttons to navigate through all the edits in the document.

Accept or Reject All Edits
Unless you are very confident in your reviewers’ expertise, I strongly caution against accepting or rejecting all edits without first checking the accuracy of each one.
- Select the Accept or Reject menu arrow in the Changes group.
- Select your preferred option: Accept/Reject All Changes or Accept/Reject All Changes and Stop Tracking.

This section covers the basics of using comments in Word. For a more in-depth look, please see my previous tutorial “How to Use Comments in Microsoft Word (Modern Comments).”
You can use the Comment tool with Track Changes turned on or turned off.
- Place your cursor near the text you want to comment on or select the text.
- Select the Review tab in the ribbon (see figure 1).
- Select the New Comment button in the Comments group.

- Type your comment into the comment text box on the right side of the screen.
If you are part of an organization, you may be able to @ mention other users in your comments.
- Select the Post button or type the keyboard shortcut Ctrl + Enter (PC) or Command + Return (Mac) to post the comment.

- If you need to edit your comment, select the Edit button (PC users see figure 15; Mac users see figure 16).


- Type your reply into the Reply text box in the other person’s comment.
- Select the Post button or type the keyboard shortcut Ctrl + Enter (PC) or Command + Return (Mac) to post the reply.

You can mark a comment as “Resolved” to tell other people (or remind yourself) that an issue has been taken care of. However, you can also reopen a resolved comment, thereby turning it back to a regular comment.
- Select the three-dot menu in the comment.
- Select Resolve thread from the drop-down menu.

The comment will no longer be visible in the contextual view on the right side of the screen.
How to Reopen Resolved Comments
- Select the Review tab (see figure 1).
- Select the Show Comments menu arrow.
- Select List from the drop-down menu.

- Select the Reopen button in the comment.

Here are two ways to delete comments.
Method 1: Select the three-dot menu in the comment and then select Delete thread from the drop-down menu.

Method 2: Place your cursor in the comment or the text connected to the comment and then select the Delete menu arrow in the Review tab.
From there, choose Delete to delete the current comment, or Delete All Comments Shown, Delete All Comments in Document, or Delete All Resolved Comments (PC only).

How to Open and Close the Reviewing Pane
The Reviewing Pane (labeled Revisions) shows all the comments and edits selected in the Show Markup drop-down menu in the Tracking group in the ribbon, along with the total number of those comments and markups in the document.
The Reviewing Pane isn’t necessary for using Track Changes, but it can be helpful when you need to find a specific edit or want to see how many edits or comments are in the document.
- Select the Review tab (see figure 1).
- Select the Reviewing Pane button in the Tracking group.
The Reviewing Pane will appear, normally on the left side of your screen.

- Reselect the Reviewing Pane button to close the Reviewing Pane.
Related Resources
How to Copy and Paste Text with Comments and Track Changes in Word
How to Remove User Names from Existing Track Changes in Microsoft Word
How to Change Your User Name for Track Changes in Microsoft Word
How to Stop Microsoft Word from Calling You “Author” in Track Changes
How to Change the Color of Track Changes in Microsoft Word
Updated January 16, 2023