
Word 2016 is designed to help you create professional-quality documents. Word can also help you organize and write documents more efficiently.
When you create a document in Word, you can choose to start from a blank document or let a template do much of the work for you. From then on, the basic steps in creating and sharing documents are the same. And Word’s powerful editing and reviewing tools can help you work with others to make your document great.
Start a document
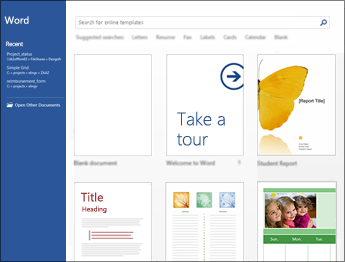
It’s often easier to create a new document using a template instead of starting with a blank page. Word templates come ready-to-use with pre-set themes and styles. All you need to do is add your content.
Each time you start Word, you can choose a template from the gallery, click a category to see more templates, or search for more templates online.
For a closer look at any template, click it to open a large preview.
If you’d rather not use a template, click Blank document.
Open a document
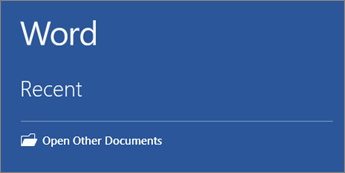
Every time you start Word, you’ll see a list of your most recently used documents in the left column. If the document you’re looking for isn’t there, click Open Other Documents.
If you’re already in Word, click File > Open and then browse to the file’s location.
When you open a document that was created in earlier versions of Word, you see Compatibility Mode in the title bar of the document window. You can work in compatibility more or you can upgrade the document to use Word 2016.
Save a document
To save a document for the first time, do the following:
-
On the File tab, click Save As.
-
Browse to the location where you’d like to save your document.
Note: To save the document on your computer, choose a folder under This PC or click Browse. To save your document online, choose an online location under Save As or click Add a Place. When your files are online, you can share, give feedback and work together on them in real time.
-
Click Save.
Note: Word automatically saves files in the .docx file format. To save your document in a format other than .docx, click the Save as type list, and then select the file format that you want.
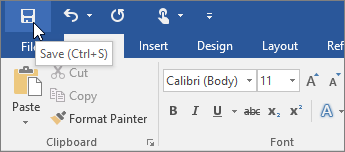
To save your document as you continue to work on it, click Save in the Quick Access Toolbar.
Read documents
Open your document in Read Mode to hide most of the buttons and tools so you can get absorbed in your reading without distractions.
-
Open the document you want to read.
Note: Some documents open in Read Mode automatically, such as protected documents or attachments.
-
Click View > Read Mode.
-
To move from page to page in a document, do one of the following:
-
Click the arrows on the left and right sides of the pages.
-
Press page down and page up or the spacebar and backspace on the keyboard. You can also use the arrow keys or the scroll wheel on your mouse.
-
If you’re on a touch device, swipe left or right with your finger.
Tip: Click View > Edit Document to edit the document again.
-
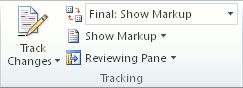
Track changes
When you’re working on a document with other people or editing a document yourself, turn on Track Changes to see every change. Word marks all additions, deletions, moves, and formatting changes.
-
Open the document to be reviewed.
-
Click Review and then on the Track Changes button, select Track Changes.

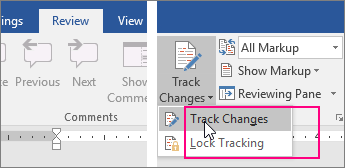
Read Track changes to learn more.
Print your document
All in one place, you can see how your document will look when printed, set your print options, and print the file.
-
On the File tab, click Print.
-
Do the following:
-
Under Print, in the Copies box, enter the number of copies you want.
-
Under Printer, make sure the printer you want is selected.
-
Under Settings, the default print settings for your printer are selected for you. If you want to change a setting, just click the setting you want to change and then select a new setting.
-
-
When you’re satisfied with the settings, click Print.
For details, see Print a document.
Beyond the basics
For more on the fundamentals of using Word, see What’s new in Word 2016.
Top of Page
With Word for the web, you use your web browser to create, view, and edit the personal documents that you store on OneDrive. If your organization or college has a Microsoft 365 plan or SharePoint site, start using Word for the web by creating or storing documents in libraries on your site.Save changes
Word saves your changes automatically. Look on the status bar at the bottom left corner of Word for the web. It will either show Saved or Saving.
Share documents online
Because your document is online, you can share it by sending a link instead of an email attachment. People can read it in their web browser or mobile device.
Click File > Share > Share with People.

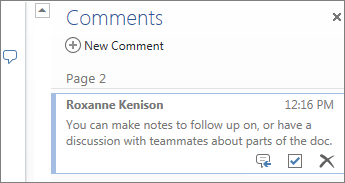
Comment in the browser
A comment balloon shows where comments have been made in the doc.

Reply to comments, and check off items you’ve addressed.
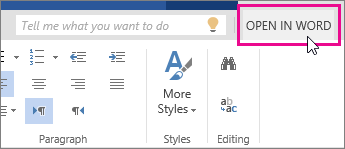
Edit in the browser
If you try to type in the document and nothing happens, you’re probably in Reading view. Switch to Editing view: click Edit Document > Edit in Word for the web.

Type and format text, add pictures, adjust the layout of the page, and more. For more advanced editing, click Open in Word.
Work together on the same doc
To work together in Word for the web, you edit a document as you normally would. If others are also editing it, Word for the web alerts you to their presence. You can see everyone who is currently working in the document by clicking in the ribbon.

Clicking on an author’s name jumps you to where they’re working in the doc. And you’ll see the changes they make as they’re happening. They can be working in Word for the web, Word 2010 or later, or Word for Mac 2011.
Add a header or footer
Go to Insert > Header & Footer to add headers and footers to your document.
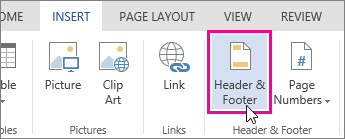
Click Options to choose how you’d like them to appear.

Add page numbers
Click Insert > Page Numbers and then choose from the gallery where you’d like the page numbers to appear.
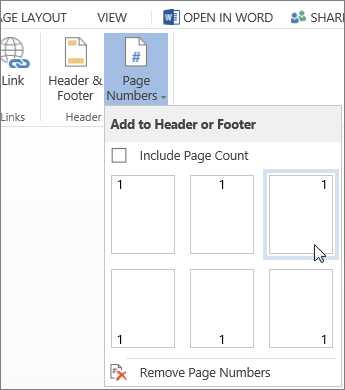
Select Include Page Count to show the current page number along with the total number of pages (page X of Y).
Find and replace text
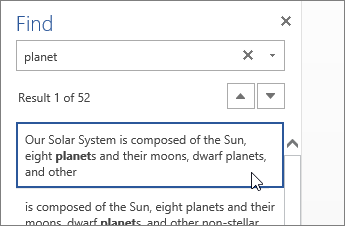
Quickly search for every occurrence of a specific word or phrase in your document by clicking Home > Find (or type Ctrl+F). Results appear next to your document so you can see the term in context. Clicking on a search result jumps you to that occurrence.
Click Replace (or type Ctrl+H) to find and replace text.
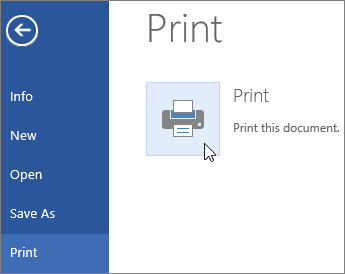
Print in Word for the web
Go to File > Print. Word for the web creates a PDF preview of your document that keeps all the layout and formatting of your document. Send the PDF to your printer and it will print the way you expect.
Microsoft Word 2013 is a word-processing program designed to help you create professional-quality documents. Word helps you organize and write your documents more efficiently.
Your first step in creating a document in Word 2013 is to choose whether to start from a blank document or to let a template do much of the work for you. From then on, the basic steps in creating and sharing documents are the same. Powerful editing and reviewing tools help you work with others to make your document perfect.
Choose a template
It’s often easier to create a new document using a template instead of starting with a blank page. Word templates are ready to use with themes and styles. All you need to do is add your content.
Each time you start Word 2013, you can choose a template from the gallery, click a category to see the templates it contains, or search for more templates online. (If you’d rather not use a template, just click the Blank document.)
For a closer look at any template, just click it to open a large preview.
Top of Page
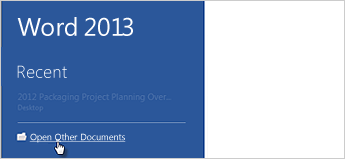
Open a document
Every time you start Word, you’ll see a list of your most recently used documents in the left column. If the document you’re looking for isn’t there, click Open Other Documents.
If you’re already in Word, click File > Open and then browse to the file’s location.
When you open a document that was created in earlier versions of Word, you see Compatibility Mode in the title bar of the document window. You can work in compatibility more or you can upgrade the document to use features that are new or enhanced in Word 2013.
Top of Page
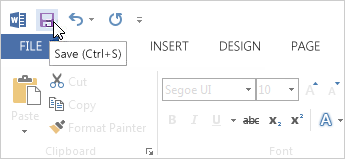
Save a document
To save a document for the first time, do the following:
-
Click the File tab.
-
Click Save As.
-
Browse to the location where you’d like to save your document.
Note: To save the document on your computer, choose a folder under Computer or click Browse. To save your document online, choose a location under Places or Add a Location. When your files are online, you can share, give feedback and work together on them in real time.
-
Click Save.
Note: Word automatically saves files in the .docx file format. To save your document in a format other than .docx, click the Save as type list, and then select the file format that you want.
To save your document as you continue to work on it, click Save in the Quick Access Toolbar.
Top of Page
Read documents
Open your document in Read Mode to hide most of the buttons and tools so you can get absorbed in your reading without distractions.
-
Open the document you want to read.
Note: Some documents open in Read Mode automatically, such as protected documents or attachments.
-
Click View > Read Mode.
-
To move from page to page in a document, do one of the following:
-
Click the arrows on the left and right sides of the pages.
-
Press page down and page up or the spacebar and backspace on the keyboard. You can also use the arrow keys or the scroll wheel on your mouse.
-
If you’re on a touch device, swipe left or right with your finger.
Tip: Click View > Edit Document to edit the document again.
-
Top of Page
Track changes
When you’re working on a document with other people or editing a document yourself, turn on Track Changes to see every change. Word marks all additions, deletions, moves, and formatting changes.
-
Open the document to be reviewed.
-
Click Review and then on the Track Changes button, select Track Changes.

Read Track changes to learn more.
Top of Page
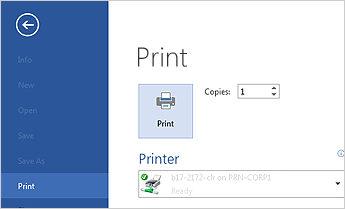
Print your document
All in one place, you can see how your document will look when printed, set your print options, and print the file.
-
Click the File tab and then click Print.
-
Do the following:
-
Under Print, in the Copies box, enter the number of copies you want.
-
Under Printer, make sure the printer you want is selected.
-
Under Settings, the default print settings for your printer are selected for you. If you want to change a setting, just click the setting you want to change and then select a new setting.
-
-
When you’re satisfied with the settings, click Print.
For details, see Print and preview documents.
Beyond the basics
Go beyond the basics with your documents by creating a table of contents or saving a document as a template.
Top of Page
Important:
Office 2010 is no longer supported. Upgrade to Microsoft 365 to work anywhere from any device and continue to receive support.
Upgrade now
In this article
-
What is Word?
-
Find and apply a template
-
Create a new document
-
Open a document
-
Save a document
-
Read documents
-
Track changes and insert comments
-
Print your document
What is Word?
Microsoft Word 2010 is a word-processing program, designed to help you create professional-quality documents. With the finest document-formatting tools, Word helps you organize and write your documents more efficiently. Word also includes powerful editing and revising tools so that you can collaborate with others easily.
Top of Page
Find and apply a template
Word 2010 allows you to apply built-in templates, to apply your own custom templates, and to search from a variety of templates available on the web.
To find and apply a template in Word, do the following:
-
On the File tab, click New.
-
Under Available Templates, do one of the following:
-
To use one of the built-in templates, click Sample Templates, click the template that you want, and then click Create.
-
To reuse a template that you’ve recently used, click Recent Templates, click the template that you want, and then click Create.
-
To use your own template that you previously created, click My Templates, click the template that you want, and then click OK.
-
To find a template on Office.com, under Office.com Templates, click the template category that you want, click the template that you want, and click Download to download the template from Office.com to your computer.
-
Note: You can also search for templates on Office.com from within Word. In the Search Office.com for templates box, type one or more search terms, and then click the arrow button to search.
Top of Page
Create a new document
-
Click the File tab and then click New.
-
Under Available Templates, click Blank Document.
-
Click Create.
For more information about how to create a new document, see Create a document.
Top of Page
Open a document
-
Click the File tab, and then click Open.
-
In the left pane of the Open dialog box, click the drive or folder that contains the document.
-
In the right pane of the Open dialog box, open the folder that contains the drawing that you want.
-
Click the document and then click Open.
Top of Page
Save a document
To save a document in the format used by Word 2010 and Word 2007, do the following:
-
Click the File tab.
-
Click Save As.
-
In the File name box, enter a name for your document.
-
Click Save.
To save a document so that it is compatible with Word 2003 or earlier, do the following:
-
Open the document that you want to be used in Word 2003 or earlier.
-
Click the File tab.
-
Click Save As.
-
In the Save as type list, click Word 97-2003 Document. This changes the file format to .doc.
-
In the File name box, type a name for the document.
-
Click Save.
For more information about how to create a document that is compatible with Word 2003 or earlier versions, see Create a document to be used by previous versions of Word.
Top of Page
Read documents
-
Open the document that you want to read.
-
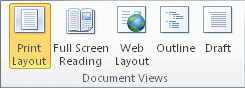
On the View tab, in the Document Views group, click Full Screen Reading
-
To move from page to page in a document, do one of the following:
-
Click the arrows in the lower corners of the pages.
-
Press PAGE DOWN and PAGE UP or SPACEBAR and BACKSPACE on the keyboard.
-
Click the navigation arrows at the top center of the screen.
Tip: Click View Options, and then click Show Two Pages
to view two pages, or screens, at a time.
-
 to view two pages, or screens, at a time.
For more information about how to view documents, see Read documents in Word.
Top of Page
Track changes and insert comments
-
To turn on change tracking, on the Review tab, in the Tracking group, click Track Changes.
-
To insert a comment, on the Review tab, in the Comments group, click New Comment.
For more information about how to track changes made while revising, see Track changes and insert comments.
Top of Page
Print your document
-
Click the File tab and then click Print.
-
Do the following:
-
Under Print, in the Copies box, enter the number of copies that you want to print.
-
Under Printer, make sure that the printer that you want is selected.
-
Under Settings, the default print settings for your printer are selected for you. If you want to change a setting, click the setting you want to change and then select the setting that you want.
-
-
When you are satisfied with the settings, click Print.
For more information about how to print a file, see Preview and print a file.
Top of Page
Зачем знать все функции MS Word
Все возможности текстового редактора Microsoft знать и использовать необязательно. Вы можете успешно решать рабочие задачи, изредка переключаясь между вкладками «Главная» и «Вставка». Но вы будете работать еще эффективнее, если вооружитесь даже несколькими трюками из этого обзора.
Вот простой пример, знакомый вебмастерам. Некоторые специалисты перед переносом текста из документа Word в редактор CMS копируют контент в «Блокнот». Это очищает текст от форматирования Word, которое может конфликтовать с шаблонными форматами «движка». Так вот, «Блокнот» вам не нужен. Чтобы решить проблему, достаточно выделить текст в Word и нажать кнопку «Удалить все форматирование».

Форматирование можно удалить без «Блокнота»
Обратите внимание, обзор написан для версии Word’а 2013 года. Актуальной стабильной версией программы является MS Word 2016, выпущенная в сентябре 2015 года. Однако эта версия программы пока не стала основной.

Без претензии на репрезентативность: версия 2013 года самая популярная
Как создать и сохранить документ MS Word
Чтобы создать документ, откройте рабочую папку. Нажмите правую кнопку мыши и выберите опцию «Создать — Microsoft Word Document».

Создаем документ MS Word в папке
Чтобы легко находить документ, назовите его.

Называем документ сразу после создания
Также вы можете запустить MS Word через меню «Пуск». Обратите внимание на иллюстрацию.

Запускаем Word через меню «Пуск»
При запуске через меню пуск вы создали новый документ с названием по умолчанию. Назовите его и сохраните в выбранную папку, чтобы не потерять. Для этого нажмите на значок «Сохранить» или воспользуйтесь комбинацией клавиш Shift+F12.

Сохраняем документ в рабочую папку
Нажмите кнопку «Компьютер», чтобы сохранить документ на компьютере. Также вы можете поместить его на облачный диск OneDrive.

Выбираем место сохранения документа
Назовите документ и сохраните его в выбранную папку.

Называем и сохраняем документ. Теперь он не потеряется
Вы создали и сохранили документ. Приступайте к работе.
Как использовать возможности вкладки «Главная»
Инструменты на панели управления MS Word объединяются с помощью тематических вкладок. Такой тип интерфейса называется лентой. По умолчанию открывается основной набор инструментов, выделенный на вкладке «Главная».

Вкладка «Главная» на панели инструментов MS Word
Ниже описаны задачи, которые можно решать с помощью инструментов вкладки «Главная».
Блок инструментов «Буфер обмена»
Вы можете копировать, вырезать и вставлять контент. Чтобы воспользоваться опциями «Вырезать» и «Копировать», выделите нужный фрагмент текста.

Вырезаем, копируем и вставляем текст
Обратите внимание на варианты вставки. Вы можете сохранить исходное форматирование, объединить форматы или сохранить текст без форматирования. Также вы можете воспользоваться специальными режимами вставки.

Выбираем режим вставки
Зачем нужна специальная вставка? Например, представьте, что вам необходимо работать с текстом, скопированным из другого документа или с сайта. Исходное форматирование может не совпадать с форматированием вашего документа.

Форматирование не совпадает
Эта проблема решается с помощью специальной вставки. Воспользуйтесь соответствующим меню. В открывшемся окне выберите вариант «Неформатированный текст».

Выбираем опцию «Неформатированный текст»
Теперь вам будет удобнее форматировать скопированный контент.

Скопированный контент удобно форматировать
С помощью меню «Буфер обмена» вы можете выбрать скопированный ранее контент и вставить его в документ. Чтобы открыть буфер обмена, нажмите на отмеченную на иллюстрации стрелку. Выберите нужный элемент. С помощью выпадающего меню выберите опцию «Вставить». Также вы можете удалить скопированный элемент из буфера.

Пользуемся буфером обмена
Вы можете настраивать параметры вставки по умолчанию. Для этого воспользуйтесь меню «Вставить – Вставка по умолчанию».

Настраиваем параметры вставки по умолчанию
Укажите подходящие настройки и сохраните изменения. Обратите внимание на параметры вставки в другой документ. Большинство пользователей может заменить дефолтное значение «Сохранять исходное форматирование» на «Сохранить только текст».

Настраиваем параметры вставки по умолчанию
Блок инструментов «Шрифт»
Чтобы изменить шрифт по умолчанию, воспользуйтесь отмеченным на иллюстрации выпадающим меню. Обратите внимание, чтобы изменить существующий текст, фрагмент необходимо выделить перед выбором шрифта.

Меняем шрифт
С помощью соответствующего меню вы можете выбрать подходящий размер шрифта. Обратите внимание на возможность увеличить или уменьшить шрифт выделенного фрагмента. Отметьте текст и воспользуйтесь кнопками, отмеченными на иллюстрации.

Меняем размер шрифта
Выбрать подходящий регистр можно с помощью соответствующего меню. Выделите нужный фрагмент текста, воспользуйтесь отмеченной на иллюстрации кнопкой и выберите нужный вариант.

Меняем регистр
Вы можете выделить фрагмент текста полужирным, курсивом или подчеркиванием. Для этого выделите контент и воспользуйтесь отмеченными кнопками. С помощью выпадающего меню вы можете выбрать способ подчеркивания текста.

Выделяем текст полужирным, курсивом или подчеркиванием
Чтобы зачеркнуть фрагмент текста, выделите его и воспользуйтесь соответствующей кнопкой.

Зачеркиваем фрагмент текста
С помощью кнопок X2 и X2 можно добавить подстрочный и надстрочный текст.

Добавляем подстрочный и надстрочный текст
С помощью отмеченных кнопок можно изменить цвет, выделить текст маркером или применить к нему эффекты.

Выделяем текст с помощью цвета, маркера или эффектов
Обратите внимание на возможность настройки расширенных параметров шрифта. Чтобы войти в меню, нажмите отмеченную на иллюстрации кнопку.

Входим в меню настроек расширенных параметров шрифта
На вкладке «Шрифт» укажите подходящие параметры основного текста и заголовков. С помощью кнопки «По умолчанию» вы можете вернуть дефолтные настройки, а с помощью кнопки «Текстовые эффекты» выбрать дополнительные эффекты.
Блок инструментов «Абзац»
Чтобы создать маркированный, нумерованный или многоуровневый список, воспользуйтесь показанными на иллюстрации выпадающими меню.

Создаем списки
Чтобы создать маркированный или нумерованный список, установите курсор на новую строку и нажмите на соответствующую кнопку. С помощью выпадающего меню выберите подходящий знак маркера.

Выбираем знак маркера
С помощью меню «Определить новый маркер» вы можете использовать дополнительные знаки.

Маркер может выглядеть по-разному
Чтобы создать многоуровневый список, в соответствующем выпадающем меню выберите опцию «Изменить уровень списка».

Выбираем нужный уровень списка
Выбрать подходящий стиль списка можно в библиотеке. А меню «Определить новый многоуровневый список» и «Определить новый стиль списка» помогут вам создать собственный шаблон списка.

Выбираем готовый или создаем новый шаблон
Вы можете выбрать подходящий способ выравнивания текста с помощью соответствующего меню. Чтобы обеспечить читабельность текста, используйте выравнивание по левому краю.

Выравниваем текст
При необходимости измените междустрочный интервал. В большинстве случаев вам подойдет стандартный интервал 1,15. Если вы готовите документ для детей или пожилых людей, увеличьте интервал до 1,5 или 2,0. Дальнейшее увеличение интервала снизит читабельность текста.

В большинстве случаев используйте стандартный интервал. Для детей его можно увеличить
С помощью заливки можно выделить фрагмент текста цветом. Например, вы можете выделить абзац или ячейку таблицы. Чтобы добавить фон, выделите фрагмент текста и выберите с помощью выпадающего меню «Заливка» подходящий цвет.

Выбираем цвет фона
С помощью меню «Границы» можно управлять границами ячеек в таблицах. Выделите интересующие вас ячейки. С помощью выпадающего меню выберите подходящее действие.

Управляем границами ячеек в таблице
Блок инструментов «Стили»
С помощью меню «Стили» выберите подходящий стиль оформления текста. Если хотите применить его к существующему контенту, выделите соответствующий фрагмент и определите стиль. Чтобы использовать стиль для создаваемого контента, установите курсор на чистую строку и выберите подходящий вариант оформления. Например, вы можете использовать соответствующий стиль для заголовков.

Используем стиль «Заголовок 1»
Блок инструментов «Редактирование»
С помощью меню «Найти» вы можете быстро искать интересующий вас контент. Обратите внимание на доступ с помощью выпадающего меню к расширенным настройкам поиска.

Ищем потерявшийся контент
Функцию «Заменить» удобно использовать во время редактирования текста. Например, можно автоматически заменить в тексте слово «копирайт» на «копирайтинг». Для этого воспользуйтесь меню «Заменить», укажите нужные слова в полях «Найти» и «Заменить на».

Указываем нужные значения
Нажмите кнопку «Заменить все». После обработки запроса программа сообщит число выполненных замен.

Автоматически заменили четыре слова
Используйте функцию «Выделить» для быстрого выделения контента. Например, вы можете в два клика выделить весь текст, выбрать произвольные объекты или выделить фрагменты с одинаковым форматированием.

Быстро выделяем весь текст
С помощью функции «Свернуть ленту» вы можете спрятать инструменты управления программой. На панели останутся только вкладки.

Сворачиваем ленту
Чтобы вернуть инструменты на панель, раскройте любую вкладку и воспользуйтесь опцией «Закрепить ленту».

Закрепляем ленту
Как использовать возможности вкладки «Вставка»
На вкладке «Вставка» находятся инструменты, с помощью которых можно вставлять различные объекты в документ MS Word.
Блок инструментов «Страницы»
В меню «Титульная страница» можно выбрать шаблон титульной страницы для документа.

При необходимости добавляем к документу титульную страницу
С помощью функций «Пустая страница» и «Разрыв страницы» можно создать пустую страницу или перейти к новой странице. Например, если вам необходимо вставить пустую страницу между абзацами, установите между ними курсор и воспользуйтесь функцией «Пустая страница».

Создаем пустую страницу
Блок инструментов «Таблицы»
С помощью выпадающего меню «Таблица» вы можете вставить или нарисовать в документе таблицу. Это можно сделать несколькими способами.
Чтобы быстро добавить таблицу, воспользуйтесь графическим инструментом. Выделите с помощью курсора мыши необходимое количество ячеек в таблице. После этого установите курсор на выделенную область и нажмите левую кнопку мыши.

Создаем таблицу с помощью графического меню
Функция «Вставить таблицу» позволяет указать вручную число строк и столбцов. Также вы можете выбрать способ определения ширины столбцов.

Указываем количество столбцов и строк вручную
Функция «Нарисовать таблицу» позволяет выполнить соответствующее действие. Используйте ее для создания нестандартные таблиц. Например, вы можете нарисовать таблицу с разным числом ячеек в строках.

Рисуем таблицу
Чтобы определить свойства нарисованной таблицы, воспользуйтесь соответствующим меню.

Определяем свойства таблицы
С помощью меню «Таблицы Excel» можно вставить в документ MS Word таблицы из MS Excel. В меню «Экспресс-таблицы» вы найдете шаблоны таблиц.

Пользуемся шаблонами таблиц
Блок инструментов «Иллюстрации»
С помощью функции «Рисунки» вы можете вставить в документ изображение с жесткого диска компьютера. Меню «Изображения из интернета» позволяет найти подходящие фото в Сети.

Ищем фотографии в интернете
В результатах поиска приоритет отдается фото, распространяемым по лицензии Creative Commons.
Функция «Фигуры» поможет добавить в документ шаблонную фигуру, например, сердечко, звездочку или стрелку. Чтобы воспользоваться инструментом, с помощью выпадающего меню откройте каталог и выберите подходящую фигуру.

Выбираем подходящую фигуру
С помощью курсора мыши определите размер и расположение фигуры в документе.

Выбираем расположение и размер фигуры
Оформите фигуру с помощью функций «Заливка», «Контур», «Эффекты».

Выбираем цвет заливки
Функция SmartArt позволяет вставить в документ графические объекты. С помощью выпадающего меню выберите тип и подходящий рисунок.

Выбираем тип объекта SmartArt
Установите курсор на элементы рисунка и добавьте текст.

Добавляем текст
Обратите внимание на возможность менять цвет объектов SmartArt.

Меняем цвет объектов
С помощью меню «Диаграмма» в документ можно добавить диаграммы. Обратите внимание на возможность выбора типа графика.

Выбираем тип диаграммы
Вставьте необходимые значения в таблицу данных.

Редактируем таблицу данных
С помощью меню «Снимок» вы можете сделать снимок области экрана и вставить его в документ. Для этого с помощью выпадающего меню выберите опцию «Вырезка экрана», а с помощью курсора мыши выберите область, которую хотите снять.

Быстро вставляем в документ снимок экрана
Блок инструментов «Надстройки»
В надстройках вы найдете магазин приложений Office. В нем есть платные и бесплатные инструменты для решения специальных задач. Чтобы выбрать подходящее приложение, нажмите на кнопку «Магазин» и воспользуйтесь поиском. Также вы можете просматривать инструменты по категориям.

Ищем приложения в магазине
Например, с помощью приложения MailChimp for MS Word вы можете создавать Email-кампании прямо в документе. Чтобы воспользоваться приложением, нажмите кнопку «Доверять». Возможности инструмента станут доступными после авторизации.

Авторизуемся в приложении MailChimp for MS Word
В меню «Мои приложения» отображается список установленных приложений. Вы можете удалить неиспользуемые и добавить новые инструменты.

Просматриваем установленные приложения
Функция «Википедия» позволяет искать информацию на соответствующем ресурсе непосредственно из документа MS Word. Также вы можете быстро вставить изображения из «Википедии» в документ.
Чтобы воспользоваться инструментом, нажмите отмеченную на иллюстрации кнопку и выделите слово или термин, значение которого хотите найти. Для работы инструмента необходим доступ к интернету.

Ищем определение в «Википедии»
Чтобы вставить изображение, нажмите на знак «плюс», отмеченный на иллюстрации.

Вставляем в документ изображение
Также можно вставить в документ текстовую цитату из «Википедии». Для этого выделите нужный фрагмент и нажмите знак «плюс».

Выделяем текст и вставляем в документ Word
Инструменты мультимедиа
С помощью инструмента «Видео из интернета» вы можете вставить в документ соответствующие объекты. Чтобы воспользоваться функцией, нажмите кнопку «Видео из интернета», найдите видео с помощью поиска на YouTube или в Bing, выделите и вставьте объект.

Вставляем видео в документ
Теперь видео можно просмотреть в документе MS Word. Для этого понадобится доступ к интернету.

В Word’е можно смотреть видео
Функция «Ссылки»
С помощью выпадающего меню «Ссылки» можно вставлять в документ гиперссылки, закладки и перекрестные ссылки. Чтобы вставить гиперссылку, скопируйте URL веб-страницы в буфер обмена. Затем выделите фрагмент текста, который станет анкором ссылки.

Копируем URL и выделяем анкор
В выпадающем меню «Ссылки» выберите опцию «Гиперссылка». Вставьте скопированный URL и нажмите кнопку «ОК».

Вставляем URL и сохраняем ссылку
Функция «Закладка» позволяет быстро переходить к отмеченным разделам текста. Чтобы добавить закладку, выделите нужный фрагмент текста, а в выпадающем меню «Ссылки» выберите опцию «Закладки». Назовите закладку и нажмите «Добавить».

Добавляем закладку
Чтобы быстро перейти к заложенному контенту, выберите меню «Закладка», выберите нужную закладку и нажмите «Перейти».

Переходим к закладке
Функция «Примечание»
Функцию «Примечания» удобно использовать при групповой работе с документом. Чтобы добавить к тексту примечание, выделите фрагмент текста и нажмите отмеченную кнопку.

Добавляем примечание
Чтобы изменить, удалить или пометить примечание готовым, установите на него курсор и откройте контекстное меню с помощью правой кнопки мыши. Выберите необходимую опцию.

Помечаем, изменяем или удаляем примечание
Блок инструментов «Колонтитулы»
С помощью инструментов группы «Колонтитулы» можно добавить на страницы верхние и нижние колонтитулы, а также пронумеровать страницы документа.
Чтобы добавить верхний колонтитул, воспользуйтесь соответствующим меню. Выберите шаблон колонтитула.

Выбираем шаблон колонтитула
Введите текст. Для сохранения изменений закройте окно колонтитулов.

Вводим текст и сохраняем изменения
Чтобы удалить или изменить колонтитул, воспользуйтесь соответствующими опциями в меню «Верхний колонтитул».

Изменяем или удаляем колонтитул
Аналогичным способом можно работать с нижним колонтитулом.
С помощью функции «Номер страницы» можно пронумеровать страницы документа. Для этого с помощью выпадающего меню выберите расположение и шаблон нумерации.

Нумеруем страницы
Блок инструментов «Текст»
С помощью функции «Текстовое поле» можно выделить фрагмент текста в документе. Используйте его, если нужно оформить врезку, цитату, определение. Чтобы воспользоваться инструментом, с помощью выпадающего меню выберите шаблон текстового поля.

Выбираем шаблон текстового поля
Добавьте текст и сохраните изменения.

Добавляем текст
Функция «Просмотреть экспресс-блоки» позволяет вставить автотекст, свойства документа или поле. Например, вы можете вставить дату публикации, название, адрес и телефон организации и другие данные.

Вставляем в документ дату публикации
С помощью меню «Добавить объект WordArt» можно добавить в документ визуально привлекательную надпись. Для этого воспользуйтесь отмеченным на иллюстрации меню. Выберите подходящий объект и добавьте текст.

Используем объект WordArt
Функция «Добавить буквицу» позволяет оформить абзацы с помощью выделяющейся заглавной буквы. Установите курсор в начале абзаца. С помощью соответствующего меню выберите расположение заглавной буквы. Обратите внимание на возможность изменять параметры буквицы. Вы можете выбрать шрифт, высоту и расстояние от текста.

Выделяем заглавную букву
Добавьте в документ строку для цифровой подписи. Для этого воспользуйтесь отмеченным на иллюстрации меню. В открывшемся окне укажите необходимую информацию и сохраните изменения.

Вставляем поле для цифровой подписи
Функция «Дата и время» поможет добавить в документ актуальную дату и время. Нажмите на соответствующую кнопку, выберите формат отображения даты и нажмите кнопку «ОК».
Функция «Объект» позволяет вставить в документ объекты или текст из файла. Чтобы вставить текст из файла, выберите соответствующую опцию в выпадающем меню. Найдите на жестком диске файл, текст которого хотите вставить в документ, и нажмите «Вставить».

Вставляем в документ объект или текст из файла
Блок инструментов «Символы»
Функция «Уравнение» поможет вставить в документ математическую формулу. С помощью выпадающего меню выберите стандартную формулу или перейдите к конструктору. Добавьте необходимые значения и сохраните изменения.

Используем конструктор формул
С помощью меню «Символ» в документ можно вставить отсутствующие на клавиатуре символы. Обратите внимание на возможность вставить дополнительные символы из диалогового окна.

Вставляем в документ специальные символы
Как использовать возможности вкладки «Дизайн»
С помощью инструментов вкладки «Дизайн» вы можете изменить оформление документа. Если хотите изменить стандартные настройки, начните с выбора темы.

Выбираем тему документа
Чтобы отменить изменения, воспользуйтесь опцией «Восстановить тему шаблона» или выберите тему «Стандартная».
В меню стили выберите подходящий по вашему мнению стиль.

Меняем стиль документа
Функция «Цвета» позволяет вручную настроить цвет шрифта основного текста, заголовков и гиперссылок. Вы можете выбрать стандартный набор цветов или указать цвета для разных элементов стиля самостоятельно.

Настраиваем цвета
С помощью меню шрифты можно быстро настроить шрифт для заголовков и основного текста. Вы можете выбрать стандартные пары или указать шрифт вручную.

Настраиваем шрифты
Меню «Интервал между абзацами» можно использовать для изменения соответствующих настроек. Есть возможность удалить интервал, выбрать стандартные или задать собственные значения.

Настраиваем интервал между абзацами
С помощью меню «Эффекты» можно выбрать дополнительные эффекты оформления. Функция «По умолчанию» будет полезна, если вы хотите применять настройки дизайна к новым документам.
Блок инструментов «Фон страницы»
Функция «Подложка» позволяет выбрать стандартную или настроить пользовательскую подложку. Чтобы задать параметры вручную, воспользуйтесь опцией «Настраиваемая подложка».

Настраиваем подложку
С помощью функции «Цвет страницы» можно изменить соответствующую настройку. Обратите внимание на опцию «Способы заливки». С ее помощью вы можете добавить на страницы текстуру, узор и рисунок.

Меняем цвет страницы
Функция «Границы страницы» позволяет добавлять на страницы границы. Используйте шаблонные или собственные настройки.
Как пользоваться возможностями вкладки «Разметка страницы»
Инструменты вкладки позволяют менять разметку страниц документа.
Блок инструментов «Параметры страницы»
Функция «Поля» позволяет выбрать стандартные или указать собственные параметры полей. Чтобы задать пользовательские значения, воспользуйтесь опцией «Настраиваемые поля».

Настраиваем поля
Функция «Ориентация» дает возможность выбрать книжную или альбомную ориентацию листов документа. С помощью меню «Размер» можно менять размеры листов. По умолчанию используется размер A4.

Меняем размер документа
В меню «Колонки» вы можете указать число колонок на листе. Функции «Разрывы» и «Номера строк» позволяют настроить разрывы страниц и добавить нумерацию строк соответственно. Меню «Расстановка переносов» дает возможность включить перенос слов со строки на строку по слогам. По умолчанию эта функция выключена. Не меняйте эту настройку без необходимости.

При необходимости включаем переносы
Блок инструментов «Абзац»
С помощью функции «Отступ» вы можете регулировать отступ от левого или правого края до абзаца. Чтобы воспользоваться функцией, установите курсор в начале выбранного абзаца и задайте значение отступа.

Уменьшаем отступ от левого края
С помощью функции «Интервал» можно изменить интервал между выбранными абзацами. Для этого установите курсор перед выбранным абзацем и установите значения.

Меняем интервал между выбранными абзацами
Блок инструментов «Упорядочение»
Функция «Положение» позволяет задать расположение объекта в тексте. Чтобы воспользоваться инструментом, выделите выбранный рисунок и воспользуйтесь выпадающим меню.

Выбираем расположение объекта
Функция «Обтекание текстом» дает возможность выбрать способ обтекания объекта текстом. Чтобы протестировать инструмент, выделите рисунок и воспользуйтесь выпадающим меню.

Выбираем способ обтекания рисунка текстом
С помощью кнопки «Область выделения» вы можете вывести в область задач список объектов. С помощью функций «Выровнять», «Группировать» и «Повернуть» можно выполнить соответствующие действия с выделенными объектами.
Как использовать возможности вкладки «Ссылки»
С помощью инструментов на вкладке «Ссылки» вы можете управлять сносками, ссылками, добавлять оглавление, предметный указатель и таблицу ссылок.
Блок инструментов «Оглавление»
Функция «Оглавление» позволяет создать в документе оглавление. Чтобы воспользоваться инструментом, с помощью выпадающего меню выберите опцию «Автособираемое оглавление». Программа включит в оглавление заголовки всех уровней. Если выбрать опцию «Ручное оглавление», придется указывать названия разделов самостоятельно.

Добавляем в документ оглавление
Функция «Добавить текст» позволяет добавить или удалить из таблицы текущий заголовок. Функция «Обновить таблицу» дает возможность включить в оглавление новые разделы.
Блок инструментов «Сноски»
С помощью меню «Вставить сноску» вы можете добавить соответствующий элемент. Выделите фрагмент текста, к которому относится сноска, и нажмите отмеченную на иллюстрации кнопку.

Вставляем сноску
С помощью функции «Вставить концевую сноску» можно добавить сноску в конец документа. Используйте выпадающее меню «Следующая сноска» и функция «Показать сноски» для быстрого перехода между сносками.
Блок инструментов «Ссылки и списки литературы»
С помощью меню «Вставить ссылку» вы можете сослаться на источник информации, например, на книгу. Установите курсор рядом с фрагментов текста, к которому относится ссылка. Нажмите соответствующую кнопку, в открывшемся окне укажите необходимую информацию и сохраните изменения.

Ссылаемся на источник
С помощью функции «Управление источниками» можно редактировать список, сортировать и удалять источники.

Редактируем список источников
Выпадающее меню «Стиль» позволяет выбрать стиль ссылок. С помощью функции «Список литературы» в документ можно вставить соответствующую информацию.

Вставляем в документ список литературы
Блок инструментов «Названия»
Функция «Вставить название» позволяет добавить название или подпись к изображениям, таблицам и формулам в документе. Чтобы воспользоваться инструментом, выделите нужный объект и нажмите отмеченную на иллюстрации кнопку. Добавьте информацию и сохраните изменения.

Добавляем подпись к изображению
С помощью функции «Список иллюстраций» вы можете добавить в документ соответствующую информацию.

Добавляем в документ список иллюстраций
С помощью меню «Перекрестная ссылка» добавьте в текст перекрестные ссылки на абзацы, рисунки и другие объекты.
Блок инструментов «Предметный указатель»
Функция «Пометить элемент» позволяет добавлять объекты в предметный указатель. Чтобы использовать инструмент, выделите объект, например, фрагмент текста или рисунок, воспользуйтесь соответствующим меню и заполните информацию.

Добавляем элемент в предметный указатель
С помощью меню «Предметный указатель» настройте отображение предметного указателя в документе.
Блок инструментов «Таблица ссылок»
С помощью функции «Пометить ссылку» можно включить соответствующий элемент в таблицу. А функция «Таблица ссылок» позволяет вставить в документ список ссылок.

Помечаем ссылки и строим таблицу
Как использовать возможности вкладки «Рассылки»
Инструменты вкладки помогут организовать физическую и электронную рассылки.
Блок инструментов «Создать»
Функция «Конверты» позволяет корректно добавить информацию на бумажные конверты. Чтобы воспользоваться инструментом, нажмите отмеченную кнопку и добавьте необходимую информацию. Теперь можете напечатать данные на конверте. Обратите внимание на поле «Подача». Здесь указан способ подачи конверта в принтер.

Печатаем информацию на конверте
Функция «Наклейки» поможет корректно напечатать информацию на наклейках для посылок, конвертов, CD.
Блоки инструментов «Начало слияния», «Составление документа и списка полей», «Просмотр результатов» и «Завершение»
Функция «Начать слияние» позволяет отправить сообщение нескольким получателям. Например, можете отправить письмо или электронное сообщение. Для этого нажмите кнопку «Начать слияние» и выберите опцию «Пошаговый мастер слияния». Следуйте подсказкам в области задач.
«Пошаговый мастер слияния» объединяет инструменты групп «Начало слияния», «Составление документа и списка полей», «Просмотр результатов» и «Завершение».

Используем «Пошаговый мастер слияния» с помощью подсказок в области задач
Выберите тип документа и нажмите «Далее».

Выбираем тип документа
Выберите основу для создания письма: текущий документ, шаблон или существующий документ. Создайте список получателей. Для этого выберите опции «Создание списка – создать» и введите данные.

Создаем список получателей
Напишите сообщение, просмотрите его и завершите работу с мастером. Теперь можете напечатать объединенный документ или отправить его в виде электронного сообщения.

Завершаем слияние
Как использовать возможности вкладки «Рецензирование»
Используйте вкладку «Рецензирование» для правок и оценки документа.
Блок инструментов «Правописание»
С помощью отмеченной на иллюстрации кнопки можете запустить штатное средство MS Word для поиска ошибок и опечаток. Обратите внимание, программа «видит» не все ошибки, а также иногда предлагает исправления там, где ошибок нет.

Проверяем правописание с помощью штатного инструмента MS Word
Функция «Определить» поможет определять значение неизвестных слов. Обратите внимание, для использования инструмента необходимо выбрать в магазине приложений словарь и установить его. Меню «Тезаурус» позволяет подобрать синонимы к выделенным словам. Функция «Статистика» показывает число слов, знаков, абзацев и строк в документе или его фрагменте.

С помощью тезауруса ищем синонимы
Блок инструментов «Язык»
Меню «Перевод» позволяет автоматически перевести выделенное слово или фразу. Выделите интересующий вас контент и воспользуйтесь отмеченной на иллюстрации кнопкой.

Автоматически переводим слово на английский язык
Функция «Язык» позволяет выбрать язык проверки правописания, а также настроить языковые параметры.
Блок инструментов «Примечание»
С помощью инструментов блока можно добавлять, просматривать, редактировать и удалять примечания. Обратите внимание, примечания можно создавать также с вкладки «Вставка».

Работаем с примечаниями
Блоки инструментов «Запись исправлений» и «Изменения»
С помощью функции «Исправления» можно отслеживать внесенные в документ изменения. Обратите внимание на меню «Область проверки». Оно позволяет выбрать способ отображения списка изменений: внизу или сбоку от документа.

Отслеживаем внесенные изменения
Инструменты блока «Изменения» позволяют принимать или отклонять изменения, а также переходить к предыдущему или следующему исправлению.
Функция «Сравнить» дает возможность сравнивать версии документов и объединять исправления нескольких пользователей. Функции «Блокировать авторов» и «Ограничить редактирование» защищают документ от нежелательных для вас действий других пользователей.
Как использовать возможности вкладки «Вид»
Инструменты вкладки «Вид» позволяют настроить отображение документа.
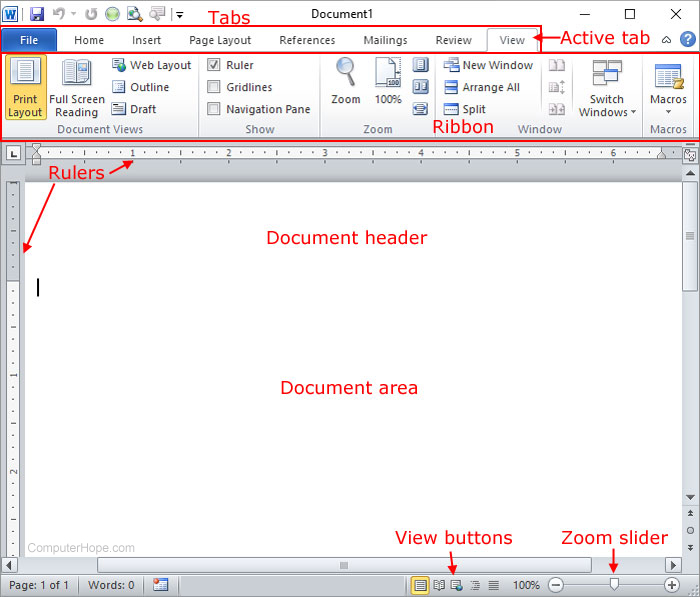
Блок инструментов «Режимы просмотра»
С помощью инструментов блока можно выбрать режим просмотра страницы. Например, вы можете просмотреть структуру документа.

Просматриваем структуру документа
Блок инструментов «Показ»
С помощью инструментов группы можно включить отображение линейки, сетки и области навигации. Последняя функция позволяет быстро переходить к нужному разделу документа.

Включаем отображение линейки, сетки и области навигации
Блок инструментов «Масштаб»
Функция «Масштаб» помогает выбрать произвольный масштаб отображения документа. Функция «100 %» позволяет вернуться к стандартному масштабу в один клик.

Меняем масштаб и возвращаемся к стандартному режиму
Функции «Одна страница» и «Несколько страниц» настраивают отображение на экране одной или нескольких страниц соответственно. Меню «По ширине странице» увеличивает ширину страницы до ширины окна.

Увеличиваем ширину страницы
Функция «Новое окно» открывает текущий документ в новом окне. Это удобно, если вы редактируете контент и хотите сверяться с оригиналом. Функция «Упорядочить все» объединяет несколько документов в одном окне. Функция «Разделить» необходима, чтобы в одном окне работать с разными частями документа.
С помощью функции «Рядом» вы можете расположить два документа в одном окне рядом друг с другом. Это удобно при необходимости сравнить содержание.

Сравниваем содержание документов
С помощью функции «Перейти в другое окно» можно быстро переходить в другие открытые документы.
Функция «Макросы» автоматизирует часто выполняемые задачи. Чтобы воспользоваться инструментом, необходимо создать макрос. Например, представьте, что вам часто приходится выделять фрагменты текста полужирным курсивом. Чтобы выполнять это действие автоматически, создайте макрос. Действуйте так:
- Выделите произвольный фрагмент текста. В выпадающем меню «Макросы» выберите опцию «Запись макроса».

Создаем макрос
- Выберите способ запуска макроса: с помощью кнопки на панели инструментов или сочетания клавиш на клавиатуре.
- Задайте сочетание клавиш для активации макроса.

Задаем сочетание клавиш
- Нажмите кнопку «Назначить» и выполните команды, которые необходимо включить в макрос. Для этого перейдите на вкладку «Главная», выберите выделение полужирным и курсивом.
- Вернитесь в меню «Макросы» и остановите запись.
- Проверьте работу макроса. Для этого выделите фрагмент текста и нажмите заданное сочетание клавиш.

Проверяем работу макроса
Дополнительные трюки для повышения эффективности работы с MS Word
Ниже вы найдете список лайфхаков, с помощью которых можно быстро решать стандартные задачи при работе с MS Word:
- Используйте контекстное меню. Оно вызывается щелчком правой кнопки мыши.

Вызываем контекстное меню
Чтобы выделить абзац, трижды щелкните левой кнопкой мыши по любому слову.
Чтобы вставить на страницу текст-заполнитель, напишите следующие символы: =lorem(2,2). С помощью цифр в скобках определите количество абзацев и строк заполнителя. Если заменить «lorem» на «rand», в качестве заполнителя будет использован случайный текст.

Вставляем текст-заполнитель
- Чтобы быстро создать надстрочную или подстрочную надпись, выделите нужное слово и нажмите сочетание клавиш «Ctrl +» или «Ctrl Shift +» соответственно.
- Чтобы выделить предложение, нажмите Ctrl и установите курсор на любом слове.
- Выбирайте тип сохраняемого файла. Например, вы можете сохранить данные в формате PDF. Для этого выберите опцию «Сохранить как» и выберите нужный тип файла.

Выбираем тип файла при сохранении
- Чтобы создать горизонтальную линию, введите три дефиса подряд и нажмите клавишу Enter.
- Чтобы напечатать тире, воспользуйтесь сочетанием клавиш Alt + 0151.
- Чтобы быстро переместить фрагмент текста, выделите его, нажмите F2, установите курсор на место вставки и нажмите Enter.
Источник: Texterra
Updated: 11/06/2021 by

Sometimes called Winword, MS Word, or Word, Microsoft Word is a word processor published by Microsoft. It is one of the office productivity applications included in the Microsoft Office suite. Originally developed by Charles Simonyi and Richard Brodie, it was first released in 1983.
Microsoft Word is available for Microsoft Windows, Apple macOS, Android, and Apple iOS. It can also run on the Linux operating system using WINE.
What is Microsoft Word used for?
Microsoft Word lets you create professional-quality documents, reports, letters, and résumés. Unlike a plain text editor, Microsoft Word has features including spell check, grammar check, text and font formatting, HTML support, image support, advanced page layout, and more.
What does the Microsoft Word editor look like?
Below is an overview of a Microsoft Word 2010 document.
Where do you find or start Microsoft Word?
If you have Microsoft Word or the entire Microsoft Office package installed on Microsoft Windows, you can access Microsoft Word in your Start menu.
Keep in mind that new computers do not include Microsoft Word. It must be purchased and installed before running it on your computer. If you do not want (or cannot afford) to purchase Microsoft Word, you can use a limited version for free at the Microsoft Office website.
If Microsoft Word is installed on your computer, but you can’t find it in your Start menu, use the following steps to launch Microsoft Word manually.
- Open My Computer or File Explorer.
- Click or select the C: drive. If Microsoft Office is installed on a drive other than the C: drive, select that drive instead.
- Find and open the Program Files (x86) or Program Files folder.
- Open the Microsoft Office folder.
- In the Microsoft Office folder, open the root folder. Then open the OfficeXX folder, where XX is the version of Microsoft Office (e.g., Office16 for Microsoft Office 2016) installed on your computer.
Tip
If there is no root folder, look for and open the folder with Office in the folder name.
- Find and double-click the file named WINWORD.EXE to start the Microsoft Word program.
How to open Microsoft Word without using a mouse
- Press the Windows key.
- Type Word and select the Microsoft Word entry in the search results.
- If Microsoft Word does not open after selecting it in the search results, press Enter to launch it.
What are the uses of Microsoft Word?
Microsoft Word is a word processor, and, like other word processors, it’s capable of helping users create a variety of different types of documents. For example, users can create a résumé, business contract, instruction document, or a letter to another person. We’ve included a list of the top uses of a word processor on our word processor page.
How many lines are there on a page in Microsoft Word?
By default, there are 29 lines on one page in Microsoft Word.
What type of files can Microsoft Word create and use?
Early versions of Microsoft Word primarily created and used the .doc file extension, while newer versions of Word create and use the .docx file extension.
More recent versions of Microsoft Word support the creation and opening of these types of files:
- .doc, .docm, .docx
- .dot, .dotm, .dotx
- .htm, .html
- .mht, .mhtml
- .odt
- .rtf
- .txt
- .wps
- .xps
- .xml
Example of a Microsoft Word .doc file
We created a Microsoft Word document that you can download and open in most word processor programs, including Microsoft Word. Click the link below to download the example Word document and experiment more with a word processing document.
- Download example.doc
Why use Word instead of a plain-text editor?
Microsoft Word offers many features not found in a traditional text editor or a plain-text file. Some advantages include changing the formatting (e.g., center), editing the font type, size, and color, inserting pictures, and more.
Tip
The features above are also available in a rich-text editor, such as WordPad, which is included with Microsoft Windows.
Why use Word instead of a WordPad?
A rich-text editor, like WordPad, offers many of the same basic features as Microsoft Word. Where Microsoft Word differs is the ability to do more advanced features. The advanced features include mail merges, spellchecker, styles, tables, headers & footers, WordArt, columns, margins, and more.
What are the different versions of Microsoft Word?
Microsoft Word has had several versions throughout its history. The different releases with release dates are listed below.
Windows versions

- Word 2019, released in 2018
- Office 365 and Word 2016, released in 2016
- Word 2013, released in 2013
- Word 2010, released in 2010
- Word 2007, released in 2006
- Word 2003, released in 2003
- Word 2002, released in 2001
- Word 2000, released in 1999
- Word 98, released in 1998
- Word 97, released in 1997
- Word 95, released in 1995
- Word 6.0, released in 1993
- Word 2.0, released in 1991
- Word 1.1, released in 1990
- Word 1.0, originally invented for MS-DOS and Xenix in 1983 by Charles Simonyi and Richard Brodie, working for Bill Gates and Paul Allen. Word was released in the Windows OS in 1989
Mac versions
- Word 2019, released in 2018
- Word 2016, released in 2015
- Word 2011, released in 2010
- Word 2008, released in 2008
- Word 2004, released in 2004
- Word v. X, released in 2001
- Word 2001, released in 2000
- Word 98, released in 1998
- Word 6, released in 1993
- Word 5.1, released in 1992
- Word 5, released in 1991
- Word 4, released in 1989
- Word 3, released in 1987
- Word 1, released in 1985
Desktop publishing, Editor, Google Docs, Office, Office 365, Office Online, Software terms, WordPad, Word processor, Word processor terms
 |
|

Microsoft Office 365 version of Microsoft Word, with the new redesign applied |
|
| Developer(s) | Microsoft |
|---|---|
| Initial release | October 25, 1983; 39 years ago (as Multi-Tool Word) |
| Stable release |
2209 (16.0.15629.20208) |
| Repository | none |
| Written in | C++ (back-end)[2] |
| Operating system |
|
| Platform | IA-32, x64, ARM, ARM64 |
| Type | Word processor |
| License | Trialware |
| Website | microsoft.com/en-us/microsoft-365/word |

Word for Mac running on macOS Ventura (13.2) |
|
| Developer(s) | Microsoft |
|---|---|
| Stable release |
16.64 (Build 22081401) |
| Repository | none |
| Written in | C++ (back-end), Objective-C (API/UI)[2] |
| Operating system | macOS |
| Type | Word processor |
| License | Proprietary software plus services |
| Website | products.office.com/word |

Screenshot of Microsoft Word for Android 13 |
|
| Original author(s) | Microsoft Corporation |
|---|---|
| Developer(s) | Microsoft Corporation |
| Initial release | January 29, 2015; 8 years ago[5] |
| Stable release |
16.0.15427.20090 |
| Repository | none |
| Operating system | Android Pie and later |
| License | Proprietary commercial software |
| Website | products.office.com/word |
| Developer(s) | Microsoft Corporation |
|---|---|
| Initial release | March 27, 2014; 9 years ago[7] |
| Stable release |
2.63.2 |
| Repository | none |
| Operating system | iOS 14 or later IPadOS 14 or later |
| License | Proprietary commercial software |
| Website | products.office.com/word |
| Developer(s) | Microsoft |
|---|---|
| Repository | none |
| Operating system | Windows 10 and later, Windows 10 Mobile |
| Type | Word processor |
| License | Freemium |
| Website | www.microsoft.com/store/productId/9WZDNCRFJB9S |
Microsoft Word is a word processor developed by Microsoft. It was first released on October 25, 1983,[9] under the name Multi-Tool Word for Xenix systems.[10][11][12] Subsequent versions were later written for several other platforms including: IBM PCs running DOS (1983), Apple Macintosh running the Classic Mac OS (1985), AT&T UNIX PC (1985), Atari ST (1988), OS/2 (1989), Microsoft Windows (1989), SCO Unix (1990), macOS (2001), Web browsers (2010), iOS (2014) and Android (2015). Using Wine, versions of Microsoft Word before 2013 can be run on Linux.
Commercial versions of Word are licensed as a standalone product or as a component of Microsoft Office suite of software, which can be purchased either with a perpetual license or as part of a Microsoft 365 subscription.
History[edit]
Origins[edit]
In 1981, Microsoft hired Charles Simonyi, the primary developer of Bravo, the first GUI word processor, which was developed at Xerox PARC.[13] Simonyi started work on a word processor called Multi-Tool Word and soon hired Richard Brodie, a former Xerox intern, who became the primary software engineer.[13][14][15]
Microsoft announced Multi-Tool Word for Xenix[13] and MS-DOS in 1983.[16] Its name was soon simplified to Microsoft Word.[10] Free demonstration copies of the application were bundled with the November 1983 issue of PC World, making it the first to be distributed on-disk with a magazine.[10][17] That year Microsoft demonstrated Word running on Windows.[18]
Unlike most MS-DOS programs at the time, Microsoft Word was designed to be used with a mouse.[16] Advertisements depicted the Microsoft Mouse and described Word as a WYSIWYG, windowed word processor with the ability to undo and display bold, italic, and underlined text,[19] although it could not render fonts.[10] It was not initially popular, since its user interface was different from the leading word processor at the time, WordStar.[20] However, Microsoft steadily improved the product, releasing versions 2.0 through 5.0 over the next six years. In 1985, Microsoft ported Word to the classic Mac OS (known as Macintosh System Software at the time). This was made easier by Word for DOS having been designed for use with high-resolution displays and laser printers, even though none were yet available to the general public.[21] It was also notable for its very fast cut-and-paste function and unlimited number of undo operations, which are due to its usage of the piece table data structure.[22]
Following the precedents of LisaWrite and MacWrite, Word for Mac OS added true WYSIWYG features. It fulfilled a need for a word processor that was more capable than MacWrite.[23] After its release, Word for Mac OS’s sales were higher than its MS-DOS counterpart for at least four years.[13]
The second release of Word for Mac OS, shipped in 1987, was named Word 3.0 to synchronize its version number with Word for DOS; this was Microsoft’s first attempt to synchronize version numbers across platforms. Word 3.0 included numerous internal enhancements and new features, including the first implementation of the Rich Text Format (RTF) specification, but was plagued with bugs. Within a few months, Word 3.0 was superseded by a more stable Word 3.01, which was mailed free to all registered users of 3.0.[21] After MacWrite Pro was discontinued in the mid-1990s, Word for Mac OS never had any serious rivals. Word 5.1 for Mac OS, released in 1992, was a very popular word processor owing to its elegance, relative ease of use, and feature set. Many users say it is the best version of Word for Mac OS ever created.[21][24]
In 1986, an agreement between Atari and Microsoft brought Word to the Atari ST[25] under the name Microsoft Write. The Atari ST version was a port of Word 1.05 for the Mac OS[26][27] and was never updated.
The first version of Word for Windows was released in 1989. With the release of Windows 3.0 the following year, sales began to pick up and Microsoft soon became the market leader for word processors for IBM PC-compatible computers.[13] In 1991, Microsoft capitalized on Word for Windows’ increasing popularity by releasing a version of Word for DOS, version 5.5, that replaced its unique user interface with an interface similar to a Windows application.[28][29] When Microsoft became aware of the Year 2000 problem, it made Microsoft Word 5.5 for DOS available for free downloads. As of February 2021, it is still available for download from Microsoft’s website.[30]
In 1991, Microsoft embarked on a project code-named Pyramid to completely rewrite Microsoft Word from the ground up. Both the Windows and Mac OS versions would start from the same code base. It was abandoned when it was determined that it would take the development team too long to rewrite and then catch up with all the new capabilities that could have been added at the same time without a rewrite. Instead, the next versions of Word for Windows and Mac OS, dubbed version 6.0, both started from the code base of Word for Windows 2.0.[24]
With the release of Word 6.0 in 1993, Microsoft again attempted to synchronize the version numbers and coordinate product naming across platforms, this time across DOS, Mac OS, and Windows (this was the last version of Word for DOS). It introduced AutoCorrect, which automatically fixed certain typing errors, and AutoFormat, which could reformat many parts of a document at once. While the Windows version received favorable reviews (e.g., from InfoWorld[31]), the Mac OS version was widely derided. Many accused it of being slow, clumsy, and memory intensive, and its user interface differed significantly from Word 5.1.[24] In response to user requests, Microsoft offered Word 5 again, after it had been discontinued.[32] Subsequent versions of Word for macOS are no longer direct ports of Word for Windows, instead featuring a mixture of ported code and native code.
Word for Windows[edit]

Word for Windows is available stand-alone or as part of the Microsoft Office suite. Word contains rudimentary desktop publishing capabilities and is the most widely used word processing program on the market. Word files are commonly used as the format for sending text documents via e-mail because almost every user with a computer can read a Word document by using the Word application, a Word viewer or a word processor that imports the Word format (see Microsoft Word Viewer).
Word 6 for Windows NT was the first 32-bit version of the product,[33] released with Microsoft Office for Windows NT around the same time as Windows 95. It was a straightforward port of Word 6.0. Starting with Word 95, each release of Word was named after the year of its release, instead of its version number.[34]
Word 2007 introduced a redesigned user interface that emphasized the most common controls, dividing them into tabs, and adding specific options depending on the context, such as selecting an image or editing a table.[35] This user interface, called Ribbon, was included in Excel, PowerPoint and Access 2007, and would be later introduced to other Office applications with Office 2010 and Windows applications such as Paint and WordPad with Windows 7, respectively.[36]
The redesigned interface also includes a toolbar that appears when selecting text, with options for formatting included.[37]
Word 2007 also included the option to save documents as Adobe Acrobat or XPS files,[37] and upload Word documents like blog posts on services such as WordPress.
Word 2010 allows the customization of the Ribbon,[38] adds a Backstage view for file management,[39] has improved document navigation, allows creation and embedding of screenshots,[40] and integrates with online services such as Microsoft OneDrive.[41]
Word 2019 added a dictation function.
Word 2021 added co-authoring, a visual refresh on the start experience and tabs, automatic cloud saving, dark mode, line focus, an updated draw tab, and support for ODF 1.3.
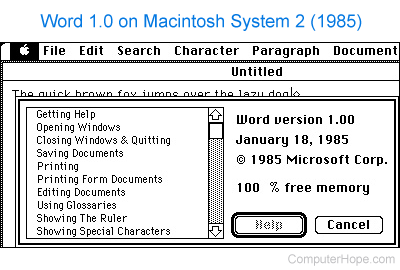
Word for Mac[edit]
The Mac was introduced on January 24, 1984, and Microsoft introduced Word 1.0 for Mac a year later, on January 18, 1985. The DOS, Mac, and Windows versions are quite different from each other. Only the Mac version was WYSIWYG and used a graphical user interface, far ahead of the other platforms. Each platform restarted its version numbering at «1.0».[42] There was no version 2 on the Mac, but version 3 came out on January 31, 1987, as described above. Word 4.0 came out on November 6, 1990, and added automatic linking with Excel, the ability to flow text around graphics, and a WYSIWYG page view editing mode. Word 5.1 for Mac, released in 1992 ran on the original 68000 CPU and was the last to be specifically designed as a Macintosh application. The later Word 6 was a Windows port and poorly received. Word 5.1 continued to run well until the last Classic MacOS. Many people continue to run Word 5.1 to this day under an emulated Mac classic system for some of its excellent features, such as document generation and renumbering, or to access their old files.

Microsoft Word 2011 running on OS X
In 1997, Microsoft formed the Macintosh Business Unit as an independent group within Microsoft focused on writing software for Mac OS. Its first version of Word, Word 98, was released with Office 98 Macintosh Edition. Document compatibility reached parity with Word 97,[32] and it included features from Word 97 for Windows, including spell and grammar checking with squiggles.[43] Users could choose the menus and keyboard shortcuts to be similar to either Word 97 for Windows or Word 5 for Mac OS.
Word 2001, released in 2000, added a few new features, including the Office Clipboard, which allowed users to copy and paste multiple items.[44] It was the last version to run on classic Mac OS and, on Mac OS X, it could only run within the Classic Environment. Word X, released in 2001, was the first version to run natively on, and required, Mac OS X,[43] and introduced non-contiguous text selection.[45]
Word 2004 was released in May 2004. It included a new Notebook Layout view for taking notes either by typing or by voice.[46] Other features, such as tracking changes, were made more similar with Office for Windows.[47]
Word 2008, released on January 15, 2008, included a Ribbon-like feature, called the Elements Gallery, that can be used to select page layouts and insert custom diagrams and images. It also included a new view focused on publishing layout, integrated bibliography management,[48] and native support for the new Office Open XML format. It was the first version to run natively on Intel-based Macs.[49]
Word 2011, released in October 2010, replaced the Elements Gallery in favor of a Ribbon user interface that is much more similar to Office for Windows,[50] and includes a full-screen mode that allows users to focus on reading and writing documents, and support for Office Web Apps.[51]
Word 2021 added real-time co-authoring, automatic cloud saving, dark mode, immersive reader enhancements, line focus, a visual refresh, the ability to save pictures in SVG format, and a new Sketched style outline.
File formats[edit]
| DOC | Legacy Word document |
|---|---|
| DOT | Legacy Word templates |
| WBK | Legacy Word document backup |
| DOCX | XML Word document |
| DOCM | XML Word macro-enabled document |
| DOTX | XML Word template |
| DOTM | XML Word macro-enabled template |
| DOCB | XML Word binary document |
Filename extensions[edit]
Microsoft Word’s native file formats are denoted either by a .doc or .docx filename extension.
Although the .doc extension has been used in many different versions of Word, it actually encompasses four distinct file formats:
- Word for DOS
- Word for Windows 1 and 2; Word 3 and 4 for Mac OS
- Word 6 and Word 95 for Windows; Word 6 for Mac OS
- Word 97 and later for Windows; Word 98 and later for Mac OS
(The classic Mac OS of the era did not use filename extensions.)[52]
The newer .docx extension signifies the Office Open XML international standard for Office documents and is used by default by Word 2007 and later for Windows as well as Word 2008 and later for macOS.[53]
Binary formats (Word 97–2007)[edit]
During the late 1990s and early 2000s, the default Word document format (.DOC) became a de facto standard of document file formats for Microsoft Office users.[citation needed] There are different versions of «Word Document Format» used by default in Word 97–2007.[54] Each binary word file is a Compound File,[55] a hierarchical file system within a file. According to Joel Spolsky, Word Binary File Format is extremely complex mainly because its developers had to accommodate an overwhelming number of features and prioritize performance over anything else.
As with all OLE Compound Files, Word Binary Format consists of «storages», which are analogous to computer folders and «streams», which are similar to computer files. Each storage may contain streams or other storage. Each Word Binary File must contain a stream called the «WordDocument» stream and this stream must start with a File Information Block (FIB).[57] FIB serves as the first point of reference for locating everything else, such as where the text in a Word document starts, ends, what version of Word created the document and other attributes.
Word 2007 and later continue to support the DOC file format, although it is no longer the default.
XML Document (Word 2003)[edit]
The .docx XML format introduced in Word 2003[58] was a simple, XML-based format called WordProcessingML or WordML.
The Microsoft Office XML formats are XML-based document formats (or XML schemas) introduced in versions of Microsoft Office prior to Office 2007. Microsoft Office XP introduced a new XML format for storing Excel spreadsheets and Office 2003 added an XML-based format for Word documents.
These formats were succeeded by Office Open XML (ECMA-376) in Microsoft Office 2007.
Cross-version compatibility[edit]
Opening a Word Document file in a version of Word other than the one with which it was created can cause an incorrect display of the document. The document formats of the various versions change in subtle and not-so-subtle ways (such as changing the font or the handling of more complex tasks like footnotes). Formatting created in newer versions does not always survive when viewed in older versions of the program, nearly always because that capability does not exist in the previous version.[59] Rich Text Format (RTF), an early effort to create a format for interchanging formatted text between applications, is an optional format for Word that retains most formatting and all content of the original document.
Third-party formats[edit]
Plugins permitting the Windows versions of Word to read and write formats it does not natively support, such as international standard OpenDocument format (ODF) (ISO/IEC 26300:2006), are available. Up until the release of Service Pack 2 (SP2) for Office 2007, Word did not natively support reading or writing ODF documents without a plugin, namely the SUN ODF Plugin or the OpenXML/ODF Translator. With SP2 installed, ODF format 1.1 documents can be read and saved like any other supported format in addition to those already available in Word 2007.[59][60][61][62][63] The implementation faces substantial criticism, and the ODF Alliance and others have claimed that the third-party plugins provide better support.[64] Microsoft later declared that the ODF support has some limitations.[65]
In October 2005, one year before the Microsoft Office 2007 suite was released, Microsoft declared that there was insufficient demand from Microsoft customers for the international standard OpenDocument format support and that therefore it would not be included in Microsoft Office 2007. This statement was repeated in the following months.[66][67][68][69] As an answer, on October 20, 2005, an online petition was created to demand ODF support from Microsoft.[70]
In May 2006, the ODF plugin for Microsoft Office was released by the OpenDocument Foundation.[71] Microsoft declared that it had no relationship with the developers of the plugin.[72]
In July 2006, Microsoft announced the creation of the Open XML Translator project – tools to build a technical bridge between the Microsoft Office Open XML Formats and the OpenDocument Format (ODF). This work was started in response to government requests for interoperability with ODF. The goal of the project was not to add ODF support to Microsoft Office, but only to create a plugin and an external toolset.[73][74] In February 2007, this project released a first version of the ODF plugin for Microsoft Word.[75]
In February 2007, Sun released an initial version of its ODF plugin for Microsoft Office.[76] Version 1.0 was released in July 2007.[77]
Microsoft Word 2007 (Service Pack 1) supports (for output only) PDF and XPS formats, but only after manual installation of the Microsoft ‘Save as PDF or XPS’ add-on.[78][79] On later releases, this was offered by default.
Features and flaws[edit]
Among its features, Word includes a built-in spell checker, a thesaurus, a dictionary, and utilities for manipulating and editing text. It supports creating tables. Depending on the version, it can perform simple calculations, and supports formatting formulas and equations.
The following are some aspects of its feature set.
Templates[edit]
Several later versions of Word include the ability for users to create their formatting templates, allowing them to define a file in which: the title, heading, paragraph, and other element designs differ from the standard Word templates.[80] Users can find how to do this under the Help section located near the top right corner (Word 2013 on Windows 8).
For example, Normal.dotm is the master template from which all Word documents are created. It determines the margin defaults as well as the layout of the text and font defaults. Although Normal.dotm is already set with certain defaults, the user can change it to new defaults. This will change other documents which were created using the template.[81] It was previously Normal.dot.[82]
Image formats[edit]
Word can import and display images in common bitmap formats such as JPG and GIF. It can also be used to create and display simple line art. Microsoft Word added support[83] for the common SVG vector image format in 2017 for Office 365 ProPlus subscribers and this functionality was also included in the Office 2019 release.
WordArt[edit]

An example image created with WordArt
WordArt enables drawing text in a Microsoft Word document such as a title, watermark, or other text, with graphical effects such as skewing, shadowing, rotating, stretching in a variety of shapes and colors, and even including three-dimensional effects. Users can apply formatting effects such as shadow, bevel, glow, and reflection to their document text as easily as applying bold or underline. Users can also spell-check text that uses visual effects and add text effects to paragraph styles.
Macros[edit]
A macro is a rule of pattern that specifies how a certain input sequence (often a sequence of characters) should be mapped to an output sequence according to a defined process. Frequently used or repetitive sequences of keystrokes and mouse movements can be automated. Like other Microsoft Office documents, Word files can include advanced macros and even embedded programs. The language was originally WordBasic, but changed to Visual Basic for Applications as of Word 97.
This extensive functionality can also be used to run and propagate viruses in documents. The tendency for people to exchange Word documents via email, USB flash drives, and floppy disks made this an especially attractive vector in 1999. A prominent example was the Melissa virus, but countless others have existed.
These macro viruses were the only known cross-platform threats between Windows and Macintosh computers and they were the only infection vectors to affect any macOS system up until the advent of video codec trojans in 2007.[citation needed] Microsoft released patches for Word X and Word 2004 that effectively eliminated the macro problem on the Mac by 2006.
Word’s macro security setting, which regulates when macros may execute, can be adjusted by the user, but in the most recent versions of Word, it is set to HIGH by default, generally reducing the risk from macro-based viruses, which have become uncommon.
Layout issues[edit]
Before Word 2010 (Word 14) for Windows, the program was unable to correctly handle ligatures defined in OpenType fonts.[84] Those ligature glyphs with Unicode codepoints may be inserted manually, but are not recognized by Word for what they are, breaking spell checking, while custom ligatures present in the font are not accessible at all. Since Word 2010, the program now has advanced typesetting features which can be enabled,[85] OpenType ligatures,[86] kerning and hyphenation (previous versions already had the latter two features). Other layout deficiencies of Word include the inability to set crop marks or thin spaces. Various third-party workaround utilities have been developed.[87]
In Word 2004 for Mac OS X, support of complex scripts was inferior even to Word 97[88] and Word 2004 did not support Apple Advanced Typography features like ligatures or glyph variants.[89]
Issues with technical documents[edit]
Microsoft Word is only awkwardly suitable for some kinds of technical writing, specifically, that which requires mathematical equations,[90] figure placement, table placement and cross-references to any of these items.[citation needed] The usual workaround for equations is to use a third-party equation typesetter.[citation needed] Figures and tables must be placed manually; there is an anchor mechanism but it is not designed for fully automatic figure placement and editing text after placing figures and tables often requires re-placing those items by moving the anchor point and even then the placement options are limited.[citation needed] This problem is deeply baked into Word’s structure since 1985 as it does not know where page breaks will occur until the document is printed.[citation needed]
Bullets and numbering[edit]
Microsoft Word supports bullet lists and numbered lists. It also features a numbering system that helps add correct numbers to pages, chapters, headers, footnotes, and entries of tables of content; these numbers automatically change to correct ones as new items are added or existing items are deleted. Bullets and numbering can be applied directly to paragraphs and converted to lists.[91] Word 97 through 2003, however, had problems adding correct numbers to numbered lists. In particular, a second irrelevant numbered list might have not started with number one but instead resumed numbering after the last numbered list. Although Word 97 supported a hidden marker that said the list numbering must restart afterward, the command to insert this marker (Restart Numbering command) was only added in Word 2003. However, if one were to cut the first item of the listed and paste it as another item (e.g. fifth), then the restart marker would have moved with it and the list would have restarted in the middle instead of at the top.[92]
Word continues to default to non-Unicode characters and non-hierarchical bulleting, despite user preference for Powerpoint-style symbol hierarchies (e.g., filled circle/emdash/filled square/endash/emptied circle) and universal compatibility.
AutoSummarize[edit]
Available in certain versions of Word (e.g., Word 2007), AutoSummarize highlights passages or phrases that it considers valuable and can be a quick way of generating a crude abstract or an executive summary.[93] The amount of text to be retained can be specified by the user as a percentage of the current amount of text.
According to Ron Fein of the Word 97 team, AutoSummarize cuts wordy copy to the bone by counting words and ranking sentences. First, AutoSummarize identifies the most common words in the document (barring «a» and «the» and the like) and assigns a «score» to each word – the more frequently a word is used, the higher the score. Then, it «averages» each sentence by adding the scores of its words and dividing the sum by the number of words in the sentence – the higher the average, the higher the rank of the sentence. «It’s like the ratio of wheat to chaff,» explains Fein.[94]
AutoSummarize was removed from Microsoft Word for Mac OS X 2011, although it was present in Word for Mac 2008. AutoSummarize was removed from the Office 2010 release version (14) as well.[95]
Other platforms[edit]
Word for mobile[edit]
Word Mobile[96] is a word processor that allows creating and editing documents. It supports basic formatting, such as bolding, changing font size, and changing colors (from red, yellow, or green). It can add comments, but can’t edit documents with tracked changes. It can’t open password-protected documents; change the typeface, text alignment, or style (normal, heading 1); create bulleted lists; insert pictures; or undo.[97][98][99] Word Mobile is neither able to display nor insert footnotes, endnotes, page headers, page footers, page breaks, certain indentation of lists, and certain fonts while working on a document, but retains them if the original document has them.[100] In addition to the features of the 2013 version, the 2007 version on Windows Mobile also has the ability to save documents in the Rich Text Format and open legacy PSW (Pocket Word).[100] Furthermore, it includes a spell checker, word count tool, and a «Find and Replace» command. In 2015, Word Mobile became available for Windows 10 and Windows 10 Mobile on Windows Store.[101]
Support for Windows 10 Mobile version ended in January 12, 2021.[102]
Word for the web[edit]
Word for the web is a free lightweight version of Microsoft Word available as part of Office on the web, which also includes web versions of Microsoft Excel and Microsoft PowerPoint.
Word for the web lacks some Ribbon tabs, such as Design and Mailings. Mailings allows users to print envelopes and labels and manage mail merge printing of Word documents.[103][104] Word for the web is not able to edit certain objects, such as: equations, shapes, text boxes or drawings, but a placeholder may be present in the document. Certain advanced features like table sorting or columns will not be displayed but are preserved as they were in the document. Other views available in the Word desktop app (Outline, Draft, Web Layout, and Full-Screen Reading) are not available, nor are side-by-side viewing, split windows, and the ruler.[105]
Password protection[edit]
Three password types can be set in Microsoft Word,
- Password to open a document[106]
- Password to modify a document[106]
- Password restricting formatting and editing[107]
The second and third password types were developed by Microsoft for convenient shared use of documents rather than for their protection. There is no encryption of documents that are protected by such passwords and the Microsoft Office protection system saves a hash sum of a password in a document’s header where it can be easily accessed and removed by the specialized software. Password to open a document offers much tougher protection that had been steadily enhanced in the subsequent editions of Microsoft Office.
Word 95 and all the preceding editions had the weakest protection that utilized a conversion of a password to a 16-bit key.
Key length in Word 97 and 2000 was strengthened up to 40 bit. However, modern cracking software allows removing such a password very quickly – a persistent cracking process takes one week at most. Use of rainbow tables reduces password removal time to several seconds. Some password recovery software can not only remove a password but also find an actual password that was used by a user to encrypt the document using the brute-force attack approach. Statistically, the possibility of recovering the password depends on the password strength.
Word’s 2003/XP version default protection remained the same but an option that allowed advanced users to choose a Cryptographic Service Provider was added.[108] If a strong CSP is chosen, guaranteed document decryption becomes unavailable and, therefore, a password can’t be removed from the document. Nonetheless, a password can be fairly quickly picked with a brute-force attack, because its speed is still high regardless of the CSP selected. Moreover, since the CSPs are not active by default, their use is limited to advanced users only.
Word 2007 offers significantly more secure document protection which utilizes the modern Advanced Encryption Standard (AES) that converts a password to a 128-bit key using a SHA-1 hash function 50,000 times. It makes password removal impossible (as of today, no computer that can pick the key in a reasonable amount of time exists) and drastically slows the brute-force attack speed down to several hundreds of passwords per second.
Word’s 2010 protection algorithm was not changed apart from the increasing number of SHA-1 conversions up to 100,000 times and consequently, the brute-force attack speed decreased two times more.
Reception[edit]
|
This section needs expansion. You can help by adding to it. (December 2021) |
Initial releases of Word were met with criticism. Byte in 1984 criticized the documentation for Word 1.1 and 2.0 for DOS, calling it «a complete farce». It called the software «clever, put together well and performs some extraordinary feats», but concluded that «especially when operated with the mouse, has many more limitations than benefits … extremely frustrating to learn and operate efficiently».[109] PC Magazine‘s review was very mixed, stating: «I’ve run into weird word processors before, but this is the first time one’s nearly knocked me down for the count» but acknowledging that Word’s innovations were the first that caused the reviewer to consider abandoning WordStar. While the review cited an excellent WYSIWYG display, sophisticated print formatting, windows, and footnoting as merits, it criticized many small flaws, very slow performance, and «documentation produced by Madame Sadie’s Pain Palace». It concluded that Word was «two releases away from potential greatness».[110]
Compute!’s Apple Applications in 1987 stated that «despite a certain awkwardness», Word 3.01 «will likely become the major Macintosh word processor» with «far too many features to list here». While criticizing the lack of true WYSIWYG, the magazine concluded that «Word is marvelous. It’s like a Mozart or Edison, whose occasional gaucherie we excuse because of his great gifts».[111]
Compute! in 1989 stated that Word 5.0’s integration of text and graphics made it «a solid engine for basic desktop publishing». The magazine approved of improvements to text mode, described the $75 price for upgrading from an earlier version as «the deal of the decade» and concluded that «as a high-octane word processor, Word is worth a look».[112]
During the first quarter of 1996, Microsoft Word accounted for 80% of the worldwide word processing market.[113]
Release history[edit]
| Legend: | Old version, not maintained | Older version, still maintained | Current stable version |
|---|

Microsoft Word 2010 running on Windows 7
| Year released | Name | Version | Comments |
|---|---|---|---|
| 1989 | Word for Windows 1.0 | 1.0 | Code-named Opus[114] |
| 1990 | Word for Windows 1.1 | 1.1 | For Windows 3.0.[115] Code-named Bill the Cat[citation needed] |
| 1990 | Word for Windows 1.1a | 1.1a | On March 25, 2014, Microsoft made the source code to Word for Windows 1.1a available to the public via the Computer History Museum.[116][117] |
| 1991 | Word for Windows 2.0 | 2.0 | Included in Office 3.0. |
| 1993 | Word for Windows 6.0 | 6.0 | Version numbers 3, 4, and 5 were skipped, to bring Windows version numbering in line with that of DOS, Mac OS, and WordPerfect (the main competing word processor at the time). Also, a 32-bit version for Windows NT only. Included in Office 4.0, 4.2, and 4.3. |
| 1995 | Word for Windows 95 | 7.0 | Included in Office 95 |
| 1997 | Word 97 | 8.0 | Included in Office 97 |
| 1998 | Word 98 | 8.5 | Included in Office 97 |
| 1999 | Word 2000 | 9.0 | Included in Office 2000 |
| 2001 | Word 2002 | 10.0 | Included in Office XP |
| 2003 | Microsoft Word 2003 | 11.0 | Included in Office 2003 |
| 2006 | Microsoft Word 2007 | 12.0 | Included in Office 2007; released to businesses on November 30, 2006, released worldwide to consumers on January 30, 2007. Extended support until October 10, 2017. |
| 2010 | Word 2010 | 14.0 | Included in Office 2010; skipped 13.0 due to triskaidekaphobia.[118] |
| 2013 | Word 2013 | 15.0 | Included in Office 2013 |
| 2016 | Word 2016 | 16.0 | Included in Office 2016 |
| 2019 | Word 2019 | 16.0 | Included in Office 2019 |
| 2021 | Word 2021 | 16.0 | Included in Office 2021 |
| Year released | Name | Version | Comments |
|---|---|---|---|
| 1985 | Word 1 | 1.0 | |
| 1987 | Word 3 | 3.0 | |
| 1989 | Word 4 | 4.0 | Part of Office 1.0 and 1.5 |
| 1991 | Word 5 | 5.0 |
|
| 1992 | Word 5.1 | 5.1 |
|
| 1993 | Word 6 | 6.0 |
|
| 1998 | Word 98 | 8.5 |
|
| 2000 | Word 2001 | 9.0 |
|
| 2001 | Word v. X | 10.0 |
|
| 2004 | Word 2004 | 11.0 | Part of Office 2004 |
| 2008 | Word 2008 | 12.0 | Part of Office 2008 |
| 2010 | Word 2011 | 14.0 | Part of Office 2011; skipped 13.0 due to triskaidekaphobia.[118] |
| 2015 | Word 2016 | 16.0 | Part of Office 2016; skipped 15.0 |
| 2019 | Word 2019 | 16.0 | Part of Office 2019 |
| 2021 | Word 2021 | 16.0 | Included in Office 2021 |
| Year released | Name | Version | Comments |
|---|---|---|---|
| 1983 | Word 1 | 1.0 | Initial version of Word |
| 1985 | Word 2 | 2.0 | |
| 1986 | Word 3 | 3.0 | Removed copy protection |
| 1987 | Word 4 | 4.0 | |
| 1989 | Word 5 | 5.0 | |
| 1991 | Word 5.1 | 5.1 | |
| 1991 | Word 5.5 | 5.5 | First DOS version to use a Windows-like user interface |
| 1993 | Word 6 | 6.0 | Last DOS version. |
| Platform | Year released | Name | Comments |
|---|---|---|---|
| Atari ST | 1988 | Microsoft Write | Based on Microsoft Word 1.05 for Mac OS |
| OS/2 | 1989 | Microsoft Word 5.0 | Word 5.0 ran both under DOS and OS/2 dual-mode as a native OS/2 application |
| OS/2 | 1991 | Microsoft Word 5.5 | Word 5.5 ran both under DOS and OS/2 dual-mode as a native OS/2 application |
| OS/2 | 1990 | Microsoft Word for OS/2 Presentation Manager version 1.1 | |
| OS/2 | 1991 | Microsoft Word for OS/2 Presentation Manager version 1.2[citation needed] | |
| SCO Unix | 1990 | Microsoft Word for Unix version 5.0[119] | |
| SCO Unix | 1991 | Microsoft Word for Unix version 5.1[120] |
References[edit]
- ^ «Update history for Microsoft Office 2019». Microsoft Docs. Retrieved April 13, 2021.
- ^ a b «C++ in MS Office». cppcon. July 17, 2014. Archived from the original on November 7, 2019. Retrieved June 25, 2019.
- ^ «System requirements for Office». Office.com. Microsoft. Retrieved March 30, 2019.
- ^ «Update history for Office for Mac». Microsoft Docs.
- ^ Lardinois, Frederic (January 29, 2015). «Microsoft’s Office For Android Tablets Comes Out Of Preview». TechCrunch. Retrieved January 28, 2023.
- ^ «Microsoft Word: Write, Edit & Share Docs on the Go APKs». APKMirror.
- ^ Cunningham, Andrew (March 27, 2014). «Microsoft brings Office to iPad, makes iPhone version free to all». Ars Technica. Retrieved January 27, 2023.
- ^ «Microsoft Word». App Store.
- ^ «Version 1.0 of today’s most popular applications, a visual tour – Pingdom Royal». Pingdom. June 17, 2009. Archived from the original on August 13, 2018. Retrieved April 12, 2016.
- ^ a b c d A. Allen, Roy (October 2001). «Chapter 12: Microsoft in the 1980s» (PDF). A History of the Personal Computer: The People and the Technology (1st ed.). Allan Publishing. pp. 12/25–12/26. ISBN 978-0-9689108-0-1. Retrieved November 7, 2010.
- ^ «Microsoft Office online, Getting to know you…again: The Ribbon». Archived from the original on May 11, 2011.
- ^ «The history of branding, Microsoft history». Archived from the original on May 28, 2009.
- ^ a b c d e Edwards, Benj (October 22, 2008). «Microsoft Word Turns 25». PC World. Archived from the original on July 4, 2012. Retrieved November 7, 2010.
- ^ Tsang, Cheryl (1999). Microsoft First Generation. John Wiley & Sons. ISBN 978-0-471-33206-0.
- ^ Schaut, Rick (May 19, 2004). «Anatomy of a Software Bug». MSDN Blogs. Archived from the original on February 1, 2010. Retrieved December 2, 2006.
- ^ a b Markoff, John (May 30, 1983). «Mouse and new WP program join Microsoft product lineup». InfoWorld. p. 10. Retrieved November 7, 2010.
- ^ Pollack, Andrew (August 25, 1983). «Computerizing Magazines». The New York Times. Retrieved April 24, 2013.
- ^ Lemmons, Phil (December 1983). «Microsoft Windows». BYTE. p. 48. Retrieved October 20, 2013.
- ^ Advertisement (December 1983). «Undo. Windows. Mouse. Finally». BYTE. pp. 88–89. Retrieved October 20, 2013.
- ^ Peterson, W.E. Pete (1994). Almost Perfect: How a Bunch of Regular Guys Built Wordperfect Corporation. Prima Publishing. ISBN 0-7881-9991-9.
- ^ a b c d e f Knight, Dan (May 22, 2008). «Microsoft Word for Mac History». Low End Mac. Retrieved November 7, 2010.
- ^ «The Piece Table».
- ^ Brand, Stewart (1989). Whole Earth Software Catalog. ISBN 9780385233019.
For a year, I waited for a heavier-duty word processor than MACWRITE. I finally got it— WORD.
- ^ a b c Schaut, Rick (February 26, 2004). «Mac Word 6.0». Buggin’ My Life Away. MSDN Blogs. Archived from the original on May 14, 2004. Retrieved June 21, 2010.
- ^ «Atari announces agreement with Microsoft». Atarimagazines.com. April 25, 2008. Retrieved June 21, 2010.
- ^ «Feature Review: Microsoft Write». Atarimagazines.com. April 25, 2008. Retrieved June 21, 2010.
- ^ «Today’s Atari Corp.: A close up look inside». Atarimagazines.com. April 25, 2008. Retrieved June 21, 2010.
- ^ Miller, Michael J. (November 12, 1990). «First Look: Microsoft Updates Look of And Adds Pull-Down Menus to Character-Based Word 5.5». InfoWorld. p. 151. Retrieved November 7, 2010.
- ^ Needleman, Raphael (November 19, 1990). «Microsoft Word 5.5: Should You Fight or Switch?». InfoWorld. p. 106. Retrieved November 7, 2010.
- ^ «Microsoft Word 5.5 for MS-DOS (EXE format)». Microsoft Download Center. Retrieved August 19, 2011.
- ^ «War of the Words». InfoWorld. February 7, 1994. pp. 66–79. Retrieved November 7, 2010.
- ^ a b Lockman, James T.W. (May 15, 1998). «UGeek Software Review: Microsoft Office 98 Gold for Macintosh». Archived from the original on December 3, 2010. Retrieved November 7, 2010.
- ^ Rose, Daniel. «Microsoft Office for Windows NT». DanielSays.com – Daniel’s Legacy Computer Collections. Archived from the original on January 27, 2015. Retrieved May 15, 2015.
- ^ Ericson, Richard (October 11, 2006). «Final Review: The Lowdown on Office 2007». Computerworld. Retrieved November 8, 2010.
- ^ Lowe, Scott (December 11, 2006). «An introduction to the Microsoft Office 2007 ribbon interface». TechRepublic. Retrieved December 14, 2021.
- ^ Shultz, Greg (February 25, 2009). «Be ready for new and improved applets in Windows 7». TechRepublic. Archived from the original on December 14, 2021. Retrieved December 14, 2021.
- ^ a b Lowe, Scott (January 26, 2007). «Explore what is new and different in Microsoft Word 2007». TechRepublic. Retrieved December 14, 2021.
- ^ Mendelson, Edward (May 11, 2010). «Microsoft Office 2010». PC Magazine. Retrieved November 8, 2010.
- ^ Mendelson, Edward (May 11, 2010). «Microsoft Office 2010: Office 2010’s Backstage View». PC Magazine. Archived from the original on December 2, 2010. Retrieved November 8, 2010.
- ^ Mendelson, Edward (May 11, 2010). «Microsoft Office 2010: Lots of Graphics Options». PC Magazine. Archived from the original on April 24, 2010. Retrieved December 14, 2021.
- ^ «Introduction to Word Web App». Microsoft. Retrieved November 8, 2010.
- ^ «Microsoft Word 1.x (Mac)». WinWorld. Retrieved December 22, 2021.
- ^ a b McLean, Prince (November 12, 2007). «Road to Mac Office 2008: an introduction (Page 3)». AppleInsider. Archived from the original on July 7, 2011. Retrieved November 7, 2010.
- ^ Tetrault, Gregory (January 2001). «Review: Microsoft Office 2001». ATPM: About This Particular Macintosh. Retrieved November 7, 2010.
- ^ Negrino, Tom (February 1, 2002). «Review: Microsoft Office v. X». MacWorld. Archived from the original on August 18, 2010. Retrieved November 7, 2010.
- ^ Lunsford, Kelly; Michaels, Philip; Snell, Jason (March 3, 2004). «Office 2004: First Look». MacWorld. Archived from the original on June 25, 2010. Retrieved November 7, 2010.
- ^ Friedberg, Steve (May 25, 2004). «Review: Microsoft Office». MacNN. Archived from the original on April 5, 2010. Retrieved November 7, 2010.
- ^ McLean, Prince (November 14, 2007). «Road to Mac Office 2008: Word ’08 vs Pages 3.0». AppleInsider. Retrieved November 7, 2010.
- ^ McLean, Prince (November 12, 2007). «Road to Mac Office 2008: an introduction (Page 4)». AppleInsider. Archived from the original on July 7, 2011. Retrieved November 7, 2010.
- ^ McLean, Prince (March 29, 2010). «New Office 11 for Mac sports dense ribbons of buttons». AppleInsider. Retrieved November 7, 2010.
- ^ Dilger, Daniel Eran (October 25, 2010). «Review: Microsoft’s Office 2011 for Mac (Page 2)». Apple Insider. Archived from the original on October 28, 2010. Retrieved November 7, 2010.
- ^ Oakley, Howard (May 2, 2015). «.why .the .extensions? Quirks in the naming of files and folders». The Eclectic Light Company. Archived from the original on February 26, 2020. Retrieved February 26, 2020.
Macs used to be the only computers that did not need filename extensions…on classic Mac systems, you can name applications, documents, and most other files almost anything that you like, as the name is not linked in any way to the type of thing that file is.
- ^ «DOCX Transitional (Office Open XML), ISO 29500:2008-2016, ECMA-376, Editions 1-5». loc.gov. January 20, 2017. Retrieved July 9, 2019.
- ^ «5 Appendix A: Product Behavior» (PDF). [MS-DOC]: Word (.doc) Binary File Format (PDF). Redmond, WA: Microsoft. Archived from the original on January 10, 2015. Retrieved January 10, 2015.
- ^ «2.1 File Structure» (PDF). [MS-DOC]: Word (.doc) Binary File Format (PDF). Redmond, WA: Microsoft. Archived from the original on January 10, 2015. Retrieved January 10, 2015.
- ^ «2.1.1 WordDocument Stream» (PDF). [MS-DOC]: Word (.doc) Binary File Format (PDF). Redmond, WA: Microsoft. Archived from the original on January 10, 2015. Retrieved January 10, 2015.
- ^ «What You Can Do with Word XML [Word 2003 XML Reference]». MSDN. 2004.
- ^ a b Casson, Tony; Ryan, Patrick S. (May 1, 2006). «Open Standards, Open Source Adoption in the Public Sector, and Their Relationship to Microsoft’s Market Dominance». In Bolin, Sherrie (ed.). Standards Edge: Unifier or Divider?. Sheridan Books. p. 87. SSRN 1656616.
- ^ «Microsoft Expands List of Formats Supported in Microsoft Office, May 21, 2008». News Center. Microsoft. May 21, 2008. Retrieved April 24, 2013.
- ^ Fulton, Scott M. III (May 21, 2008). «Next Office 2007 service pack will include ODF, PDF support options». Betanews.
- ^ Andy Updegrove (May 21, 2008). «Microsoft Office 2007 to Support ODF – and not OOXML, May 21, 2008». Consortiuminfo.org. Retrieved June 21, 2010.
- ^ «Microsoft: Why we chose ODF support over OOXML, 23 May 2008». Software.silicon.com. Archived from the original on July 21, 2009. Retrieved June 21, 2010.
- ^ «Fact-sheet Microsoft ODF support» (PDF). odfalliance. Archived from the original (PDF) on June 11, 2009. Retrieved May 24, 2009.
Microsoft Excel 2007 will process ODF spreadsheet documents when loaded via the Sun Plug-In 3.0 for Microsoft Office or the SourceForge «OpenXML/ODF Translator Add-in for Office,» but will fail when using the «built-in» support provided by Office 2007 SP2.
- ^ Microsoft. «What happens when I save a Word 2007 document in the OpenDocument Text format?». Archived from the original on March 18, 2010. Retrieved April 5, 2010.
- ^ Goodwins, Rupert (October 3, 2005). «Office 12 to support PDF creation, 3 October 2005». News.zdnet.co.uk. Archived from the original on July 23, 2009. Retrieved June 21, 2010.
- ^ Marson, Ingrid (October 6, 2005). «Microsoft ‘must support OpenDocument’, 6 October 2005». News.zdnet.co.uk. Archived from the original on July 25, 2009. Retrieved June 21, 2010.
- ^ March 23, 2006, Gates: Office 2007 will enable a new class of application Mass. holding tight to OpenDocument – ZDNet Archived July 21, 2009, at the Wayback Machine
- ^ «May 08, 2006 – Microsoft Office to get a dose of OpenDocument». Zdnet.com.au. Archived from the original on July 22, 2009. Retrieved June 21, 2010.
- ^ OpenDocument Fellowship (October 20, 2005). «OpenDocument Support: Tell Microsoft You Want It!, 20 October 2005». Opendocumentfellowship.com. Archived from the original on March 23, 2008. Retrieved June 21, 2010.
- ^ «Coming soon: ODF for MS Office, May 04, 2006». Linux-watch.com. May 4, 2006. Retrieved June 21, 2010.
- ^ LaMonica, Martin (May 5, 2006). «Microsoft Office to get a dose of OpenDocument». CNET News. Retrieved June 21, 2010.
- ^ «Microsoft Expands Document Interoperability, July 5, 2006». Microsoft.com. July 5, 2006. Archived from the original on February 4, 2007. Retrieved June 21, 2010.
- ^ Jones, Brian; Rajabi, Zeyad (July 6, 2006). «Open XML Translator project announced (ODF support for Office)». Brian Jones: Office Solutions. Microsoft. Archived from the original on January 18, 2010. Retrieved April 24, 2013.
- ^ LaMonica, Martin (February 1, 2007). «Microsoft to release ODF document converter». CNet News. Retrieved April 24, 2013.
- ^ Lombardi, Candace (February 7, 2007). «Sun to release ODF translator for Microsoft Office». CNET. Retrieved June 21, 2010.
- ^ Paul, Ryan (July 7, 2007). «Sun releases ODF Plugin 1.0 for Microsoft Office, July 07, 2007». Arstechnica.com. Retrieved June 21, 2010.
- ^ «Download details: 2007 Microsoft Office Add-in: Microsoft Save as PDF or XPS». Microsoft.com. November 8, 2006. Retrieved June 21, 2010.
- ^ Microsoft to remove PDF support from Office 2007 in wake of Adobe dispute, Friday, June 2, 2006 Microsoft to remove PDF support from Office 2007 in wake of Adobe dispute | TG Daily Archived February 1, 2009, at the Wayback Machine
- ^ Klein, Matt. «Word Formatting: Mastering Styles and Document Themes». How-To Geek. Retrieved July 9, 2019.
- ^ «Change the Normal template (Normal.dotm )». support.microsoft.com. Retrieved May 20, 2021.
- ^ in-depth explanation of Normal.dot Archived June 20, 2005, at the Wayback Machine
- ^ «Edit SVG images in Microsoft Office 365». Office Support. Microsoft. Retrieved February 4, 2019.
- ^ What’s new in Word 2010. Retrieved July 1, 2010.
- ^ Improving the look of papers written in Microsoft Word. Retrieved May 30, 2010.
- ^ How to Enable OpenType Ligatures in Word 2010, Oreszek Blog, May 17, 2009.
- ^ Such as «How to delete a blank page in Word». Sbarnhill.mvps.org. Archived from the original on May 5, 2010. Retrieved June 21, 2010.
- ^ Alan Wood. «Unicode and Multilingual Editors and Word Processors for Mac OS X».
- ^ Neuburg, Matt (May 19, 2004). «TidBITS : Word Up! Word 2004, That Is». Db.tidbits.com. Archived from the original on July 8, 2012. Retrieved June 21, 2010.
- ^ «Automatically numbering equations and other equation-related questions in Word for Mac 2011». Microsoft Community. February 6, 2013.
- ^ McGhie, John (March 26, 2011). «Word’s numbering explained». word.mvps.org.
- ^ Aldis, Margaret (March 26, 2011). «Methods for restarting list numbering». Word.mvps.org.
- ^ «How To Access Auto Summarize in Microsoft Word 2007». Sue’s Word Tips. December 14, 2011. Retrieved July 9, 2019.
- ^ Gore, Karenna (February 9, 1997). «Cognito Auto Sum». Slate. Retrieved June 21, 2010.
- ^ Changes in Word 2010 (for IT pros). Technet.microsoft.com (May 16, 2012). Retrieved July 17, 2013.
- ^ Word Mobile
- ^ Ralph, Nate. «Office for Windows Phone 8: Your handy starter guide». TechHive. Archived from the original on October 15, 2014. Retrieved August 30, 2014.
- ^ Wollman, Dana. «Microsoft Office Mobile for iPhone hands-on». Engadget. Retrieved August 30, 2014.
- ^ Pogue, David (June 19, 2013). «Microsoft Adds Office for iPhone. Yawn». The New York Times. Retrieved August 30, 2014.
- ^ a b Unsupported Features in Word Mobile. Microsoft. Retrieved September 21, 2007.
- ^ Koenigsbauer, Kirk; Microsoft 365, Corporate Vice President for (July 29, 2015). «Office Mobile apps for Windows 10 are here!». Microsoft 365 Blog. Retrieved July 11, 2020.
- ^ Office Apps for Windows 10 Mobile: End of Support for Windows Phones
- ^ Bradley, Tony (February 2, 2015). «Office Online vs. Office 365: What’s free, what’s not, and what you really need». PC World. Archived from the original on July 24, 2017. Retrieved July 16, 2020.
- ^ Ansaldo, Michael (September 28, 2017). «Microsoft Office Online review: Work with your favorite Office formats for free». PC World. Retrieved October 31, 2019.
- ^ «Differences between using a document in the browser and in Word». Office Support. Microsoft. Archived from the original on November 7, 2017. Retrieved November 1, 2017.
- ^ a b «Password protect documents, workbooks, and presentations». Microsoft Office website. Microsoft. Retrieved April 24, 2013.
- ^ «How to Restrict Editing in Word 2010/2007». Trickyways. June 22, 2010. Retrieved April 24, 2010.
- ^ «How safe is Word encryption. Is it secure?». Oraxcel.com. Archived from the original on April 17, 2013. Retrieved April 24, 2013.
- ^ Cameron, Janet (September 1984). «Word Processing Revisited». BYTE (review). p. 171. Retrieved October 23, 2013.
- ^ Manes, Stephen (February 21, 1984). «The Unfinished Word». PC Magazine. p. 192. Retrieved October 19, 2021.
- ^ McNeill, Dan (December 1987). «Macintosh: The Word Explosion». Compute!’s Apple Applications. pp. 54–60. Retrieved September 14, 2016.
- ^ Nimersheim, Jack (December 1989). «Compute! Specific: MS-DOS». Compute!. pp. 11–12.
- ^ «Data Stream». Next Generation. No. 21. Imagine Media. September 1996. p. 21.
- ^ Opus Development Postmortem
- ^ «Microsoft Word 1.x (Windows) – Stats, Downloads and Screenshots :: WinWorld». WinWorld. Retrieved July 3, 2016.
- ^ Shustek, Len (March 24, 2014). «Microsoft Word for Windows Version 1.1a Source Code». Retrieved March 29, 2014.
- ^ Levin, Roy (March 25, 2014). «Microsoft makes source code for MS-DOS and Word for Windows available to public». Official Microsoft Blog. Archived from the original on March 28, 2014. Retrieved March 29, 2014.
- ^ a b «Office 14». Office Watch. June 1, 2007.
For the sake of superstition the next version of Office won’t be called ’13’.
{{cite web}}: CS1 maint: url-status (link) - ^ Marshall, Martin (January 8, 1990). «SCO Begins Shipping Microsoft Word 5.0 for Unix and Xenix». InfoWorld. p. 6. Retrieved May 20, 2021.
- ^ «Microsoft Word: SCO announces Word for Unix Systems Version 5.1». EDGE: Work-Group Computing Report. March 11, 1991. p. 33. Retrieved May 20, 2021 – via Gale General OneFile.
Further reading[edit]
- Tsang, Cheryl. Microsoft: First Generation. New York: John Wiley & Sons, Inc. ISBN 978-0-471-33206-0.
- Liebowitz, Stan J. & Margolis, Stephen E. Winners, Losers & Microsoft: Competition and Antitrust in High Technology Oakland: Independent Institute. ISBN 978-0-945999-80-5.
External links[edit]
- Microsoft Word – official site
- Find and replace text by using regular expressions (Advanced) — archived official support website
Появление “окон” Windows произвело настоящую революцию среди пользователей компьютеров. Помню, как сложно было освоить использование мышки. И насколько удобно после Лексикона на DOS стало работать с текстами и таблицами в офисных приложениях Microsoft. С тех пор вышло много релизов операционной системы. Ключевые редакторы MS Office, Word и Excel, претерпели немало модификаций. С каждым новым выпуском усложнялся функционал, менялся интерфейс. Работа с Microsoft Word в чем-то стала более удобной. С другой стороны, освоить инструментарий текстового редактора становится все сложнее. Например, изменение расширения с .doc на .docx в свое время создало проблему открытия файлов в разных сборках приложения. В статье рассмотрим основные инструменты MS Word, которые помогут сделать работу с текстами в этом приложении более понятной и, главное, удобной.
Смотрите также: Не работает Word в Windows 10 — причины и решение.
Для того чтобы сразу создать вордовский документ с нуля, достаточно кликнуть правой кнопкой мышки по Рабочему столу или свободному месту в Проводнике. В открывшемся меню выбрать “Создать” и “Документ Microsoft Word”. Вновь созданному пустому файлу можно присвоить свое имя и сразу начать работать в редакторе.
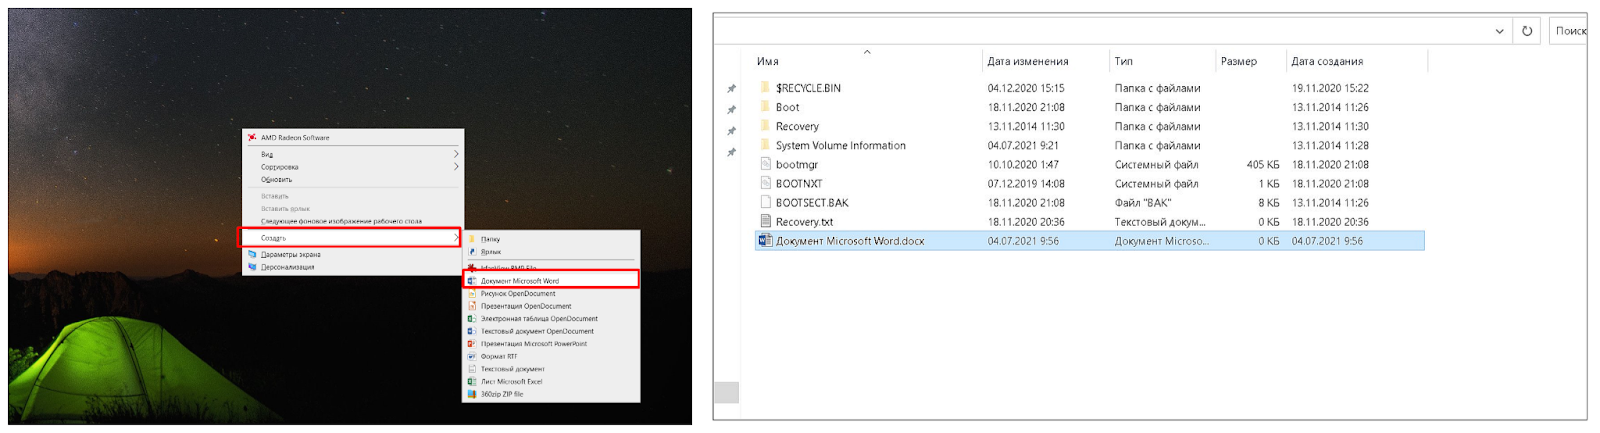
Чтобы сформировать новый документ в самом приложении, в верхнем меню выберете “Файл” — “Создать”. Откроется окно с готовыми шаблонами Word. Подведя указатель мыши к предустановленному варианту, вы увидите подсказку. Кликаете два раза левой кнопкой мыши (ЛКМ) и выберите нужный шаблон нового документа.
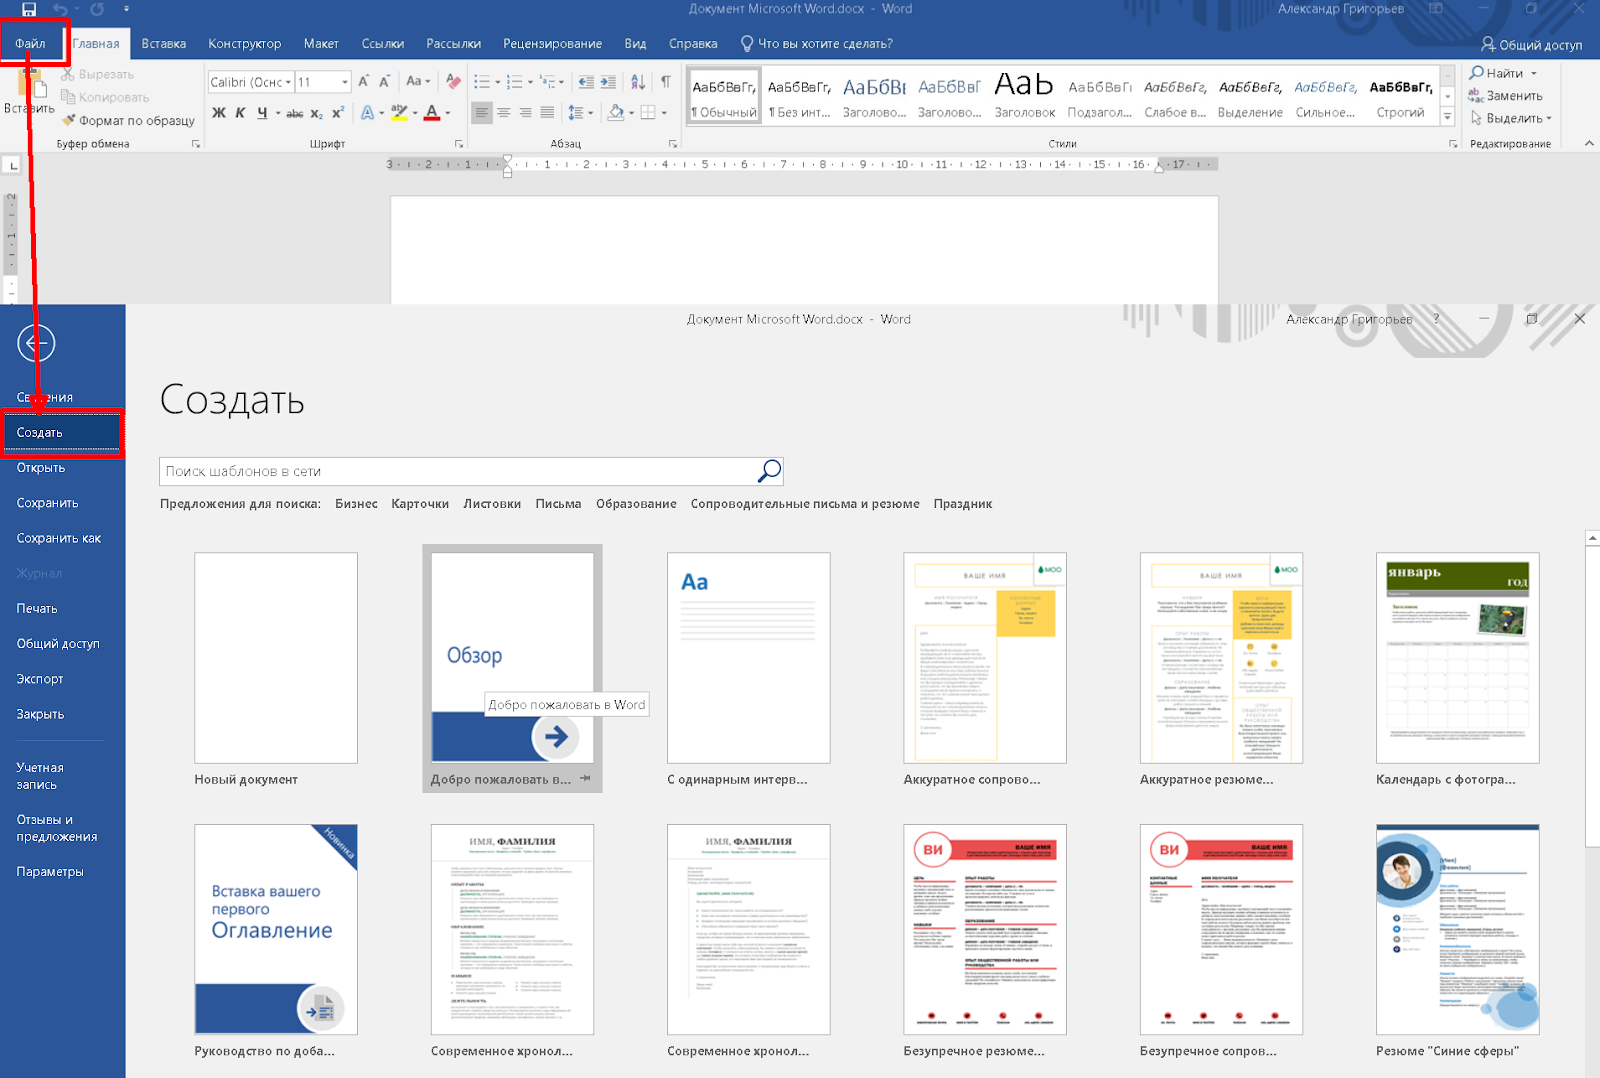
В подменю “Файл” доступны операции с существующими документами. Можно сохранить текущий файл в новом месте компьютера, выбрав при этом другие приложения, например .pdf или XML-документ, веб-страницу. Для поиска по ключевым словам добавьте теги. Можно также присвоить общее название похожим файлам, что также помогает при сортировке большого количества документов.

Вкладка “Последние” предоставит выборочный доступ к недавно открытым файлам. Здесь же вы можете поместить интернет-версию документа в папку OneDrive на диске компьютера для последующей синхронизации с облачным хранилищем. Либо сразу выгрузить файл в облако Microsoft через “Добавление места”. Для выполнения этой операции требуется Учетная запись Microsoft

Активировав вкладку “Печать”, вы получите доступ к настройкам печати документа. Данное меню можно быстро вызвать из самого документа при помощи “горячих клавиш” Ctrl+P.

Если необходимо настроить общий доступ к документу в облаке, отправить по электронной почте, опубликовать в блоге либо преобразовать в онлайн-презентацию, воспользуйтесь функционалом “Общий доступ”.

Инструмент “Экспорт” дает возможность преобразовать файл в документ PDF/XPS, изменить тип файла на альтернативный. Данная операция в чем-то аналогична функционалу “Сохранить как” с выбором расширений, но производит более корректную конвертацию из одного приложения в другое.

Вкладка “Параметры” предоставляет доступ к более сложным настройкам, которые могут быть применены во всех документах приложения Word, либо только в существующем. Поэтому менять некоторые из них следует с определенной осторожностью. Здесь вы можете настроить язык по умолчанию, проверку правописания, режим автосохранения и многое другое.

Важный пользовательский функционал, доступный в “Параметрах” — настройка команд и иконок графического интерфейса “Лента”. Добавляйте полезные функции в меню быстрого доступа и удаляйте ненужные, чтобы ускорить и упростить работу с документами в MS Word.

Создание собственного шаблона документа
Предположим, у вас есть фирменный бланк, либо запланирована массовая рассылка стандартного письма. Чтобы каждый раз не копировать документ, достаточно создать собственный Шаблон.
- >Создайте документ-шаблон для дальнейшего использования в виде исходника.
- Войдите в меню “Файл”, выберете “Сохранить как” или “Экспорт”. Затем кликнете два раза ЛКМ по кнопке “Шаблон (*dotx)”, либо выберете тип файла с таким же расширением. Сохраните документ в удобном месте.

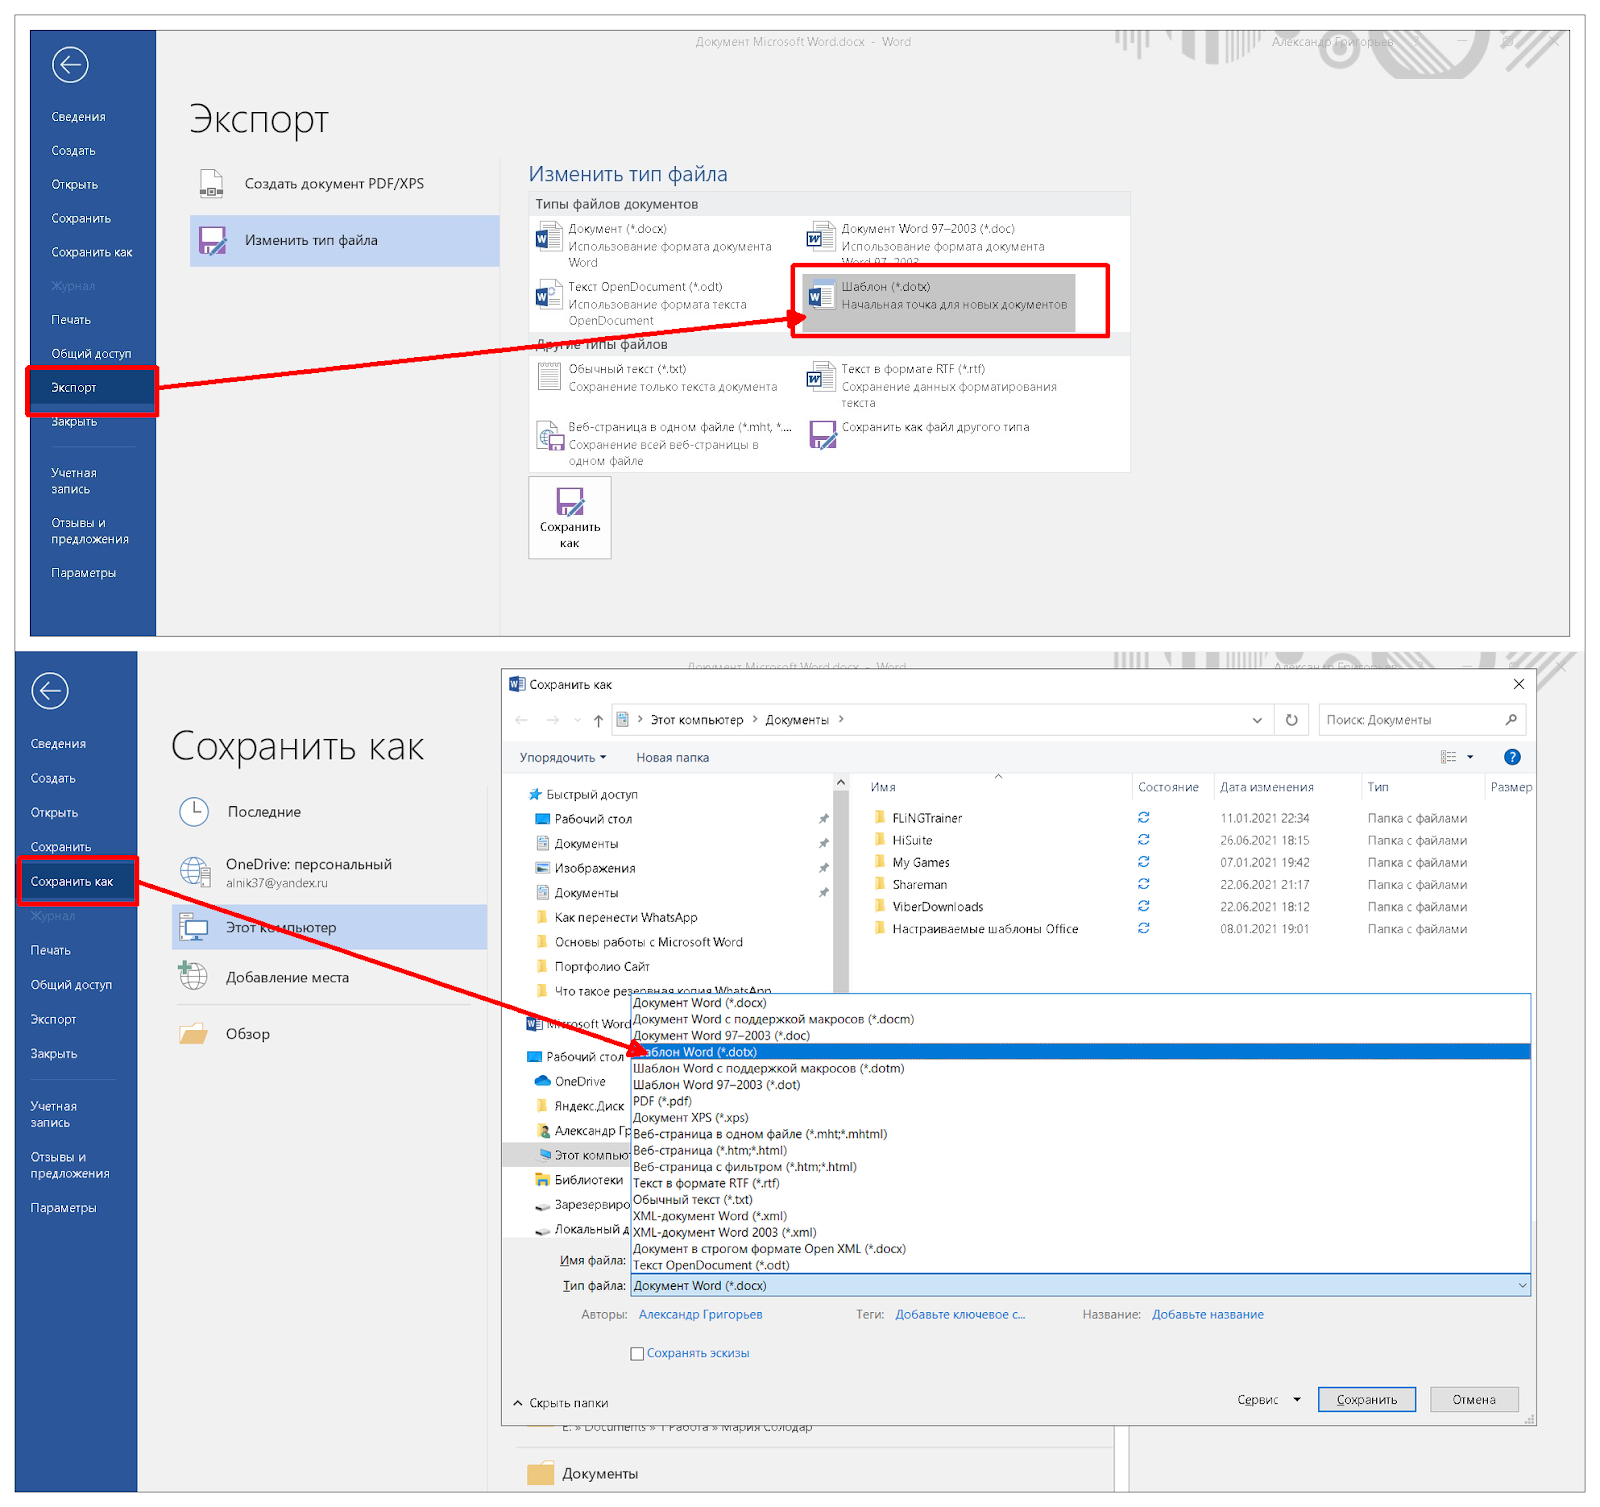
Теперь каждый раз при открытии файла *dotx у вас будет стандартный шаблон под названием “Документ” с порядковым номером 1 / 2 / 3 и т.д., в который можно вносить необходимые изменения. Далее документ сохраняете под новым названием уже с обычным префиксом *docx.
Набор текста, форматирование и редактирование
Печатание текста в редакторе не вызывает сложностей. Прежде всего для удобства работы выбираем масштаб отображения страниц. Для этого в правом нижнем углу экрана передвигаем ползунок между знаками “-” и “+”.

Изначально параметры текста, размер и стиль шрифта устанавливаются разработчиком. Пользователь легко может изменить их несколькими способами — через верхнее меню, либо с помощью правой кнопки мыши при работе с выделенными фрагментами текста. Создание своего шаблона документа сохранит личные настройки. В Windows 10 меню настроек форматирования появляется автоматически при выделении текста.

Здесь выбираем варианты начертания и стиля текста:
- доступный шрифт из списка;
- верхний либо нижний регистр;
- начертание курсивом, полужирным, зачеркнутый или подчеркнутый текст;
- дополнительные эффекты.

Вкладка “Дополнительные” расширяет возможности работы со шрифтами. Чтобы откатить изменения к начальным, достаточно нажать кнопку “По умолчанию” либо “Очистить все форматирование”.

В верхнем меню есть кнопка “Формат по образцу”, которая позволяет быстро переносить стили текста внутри документа и между разными файлами:
- поставьте курсор в то место документа, стиль текста которого вы хотите скопировать;
- нажмите кнопку с кистью;
- выделите фрагмент текста, к которому хотите применить копируемый формат.
Например, я хочу в данном документе применить стиль Заголовка первого уровня к Заголовку 2. Для этого я ставлю курсор на “Основы работы с Microsoft Word”, нажимаю на “кисточку” в верхнем меню, она становится активной, далее выделяю предложение “Создание и работа с файлами Ворд”. Все настройки форматирования первого фрагмента текста автоматически применяются ко второму.
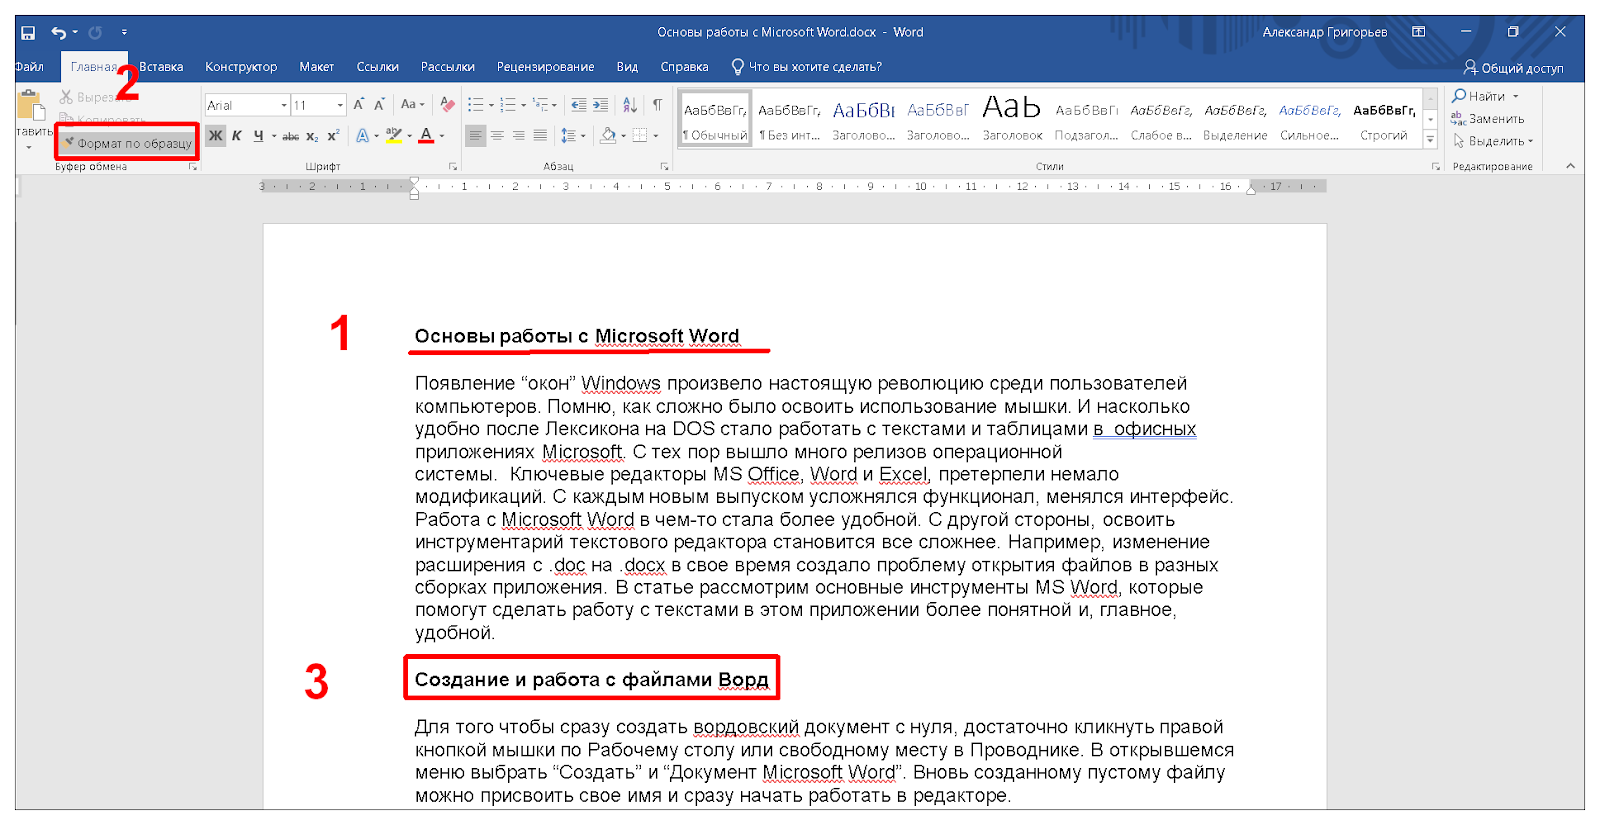
Параметры страницы и форматирование абзацев
Выполняем предварительные настройки параметров станицы:
- В основном Меню открываем вкладку “Вид” и устанавливаем режим “Разметка страницы”. Ставим галочку в окошко напротив надписи “Линейка”.
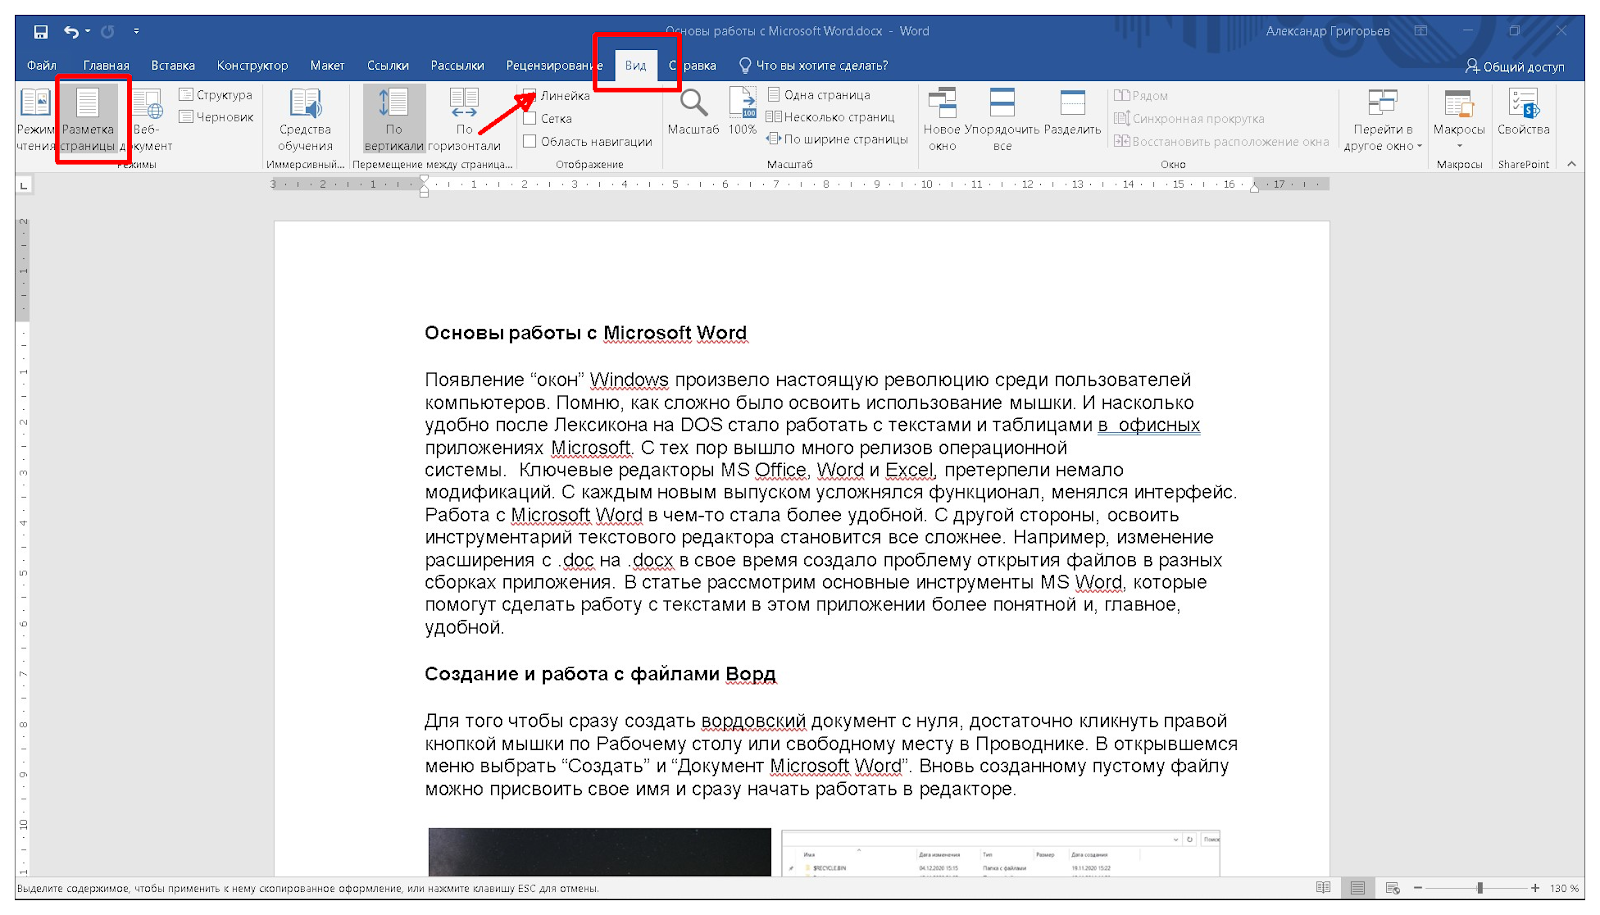
- Щелкаем два раза ЛКМ по левому или верхнему полю страницы с цифрами (“Линейка”). В открывшемся меню настраиваем базовые параметры страницы:
- книжная или альбомная;
- размер полей, переплет;
- режим отображения страниц;
- размер и источник бумаги.
Настройки могут быть применены ко всему документу, либо к выбранному фрагменту. Во втором случае выделенный текст отобразится на отдельной странице.

Настроить размер полей можно при помощи мышки. Для этого поймайте на боковой или верхней “Линейке” край поля и передвиньте его на нужное расстояние.

Настройка абзацев
В Ворд можно создать индивидуальные настройки для разных абзацев, либо поменять отступы для всего документа:
- выделите отдельный фрагмент;
- на “Линейке” при помощи мышки перемещайте указатели правого и левого отступа;
- так же меняйте “Отступ первой строки” для создания “красной строки”;
- в верхнем Меню откройте вкладку “Макет” и настройте отступы;
- откройте меню “Абзац”, установите нужные параметры.
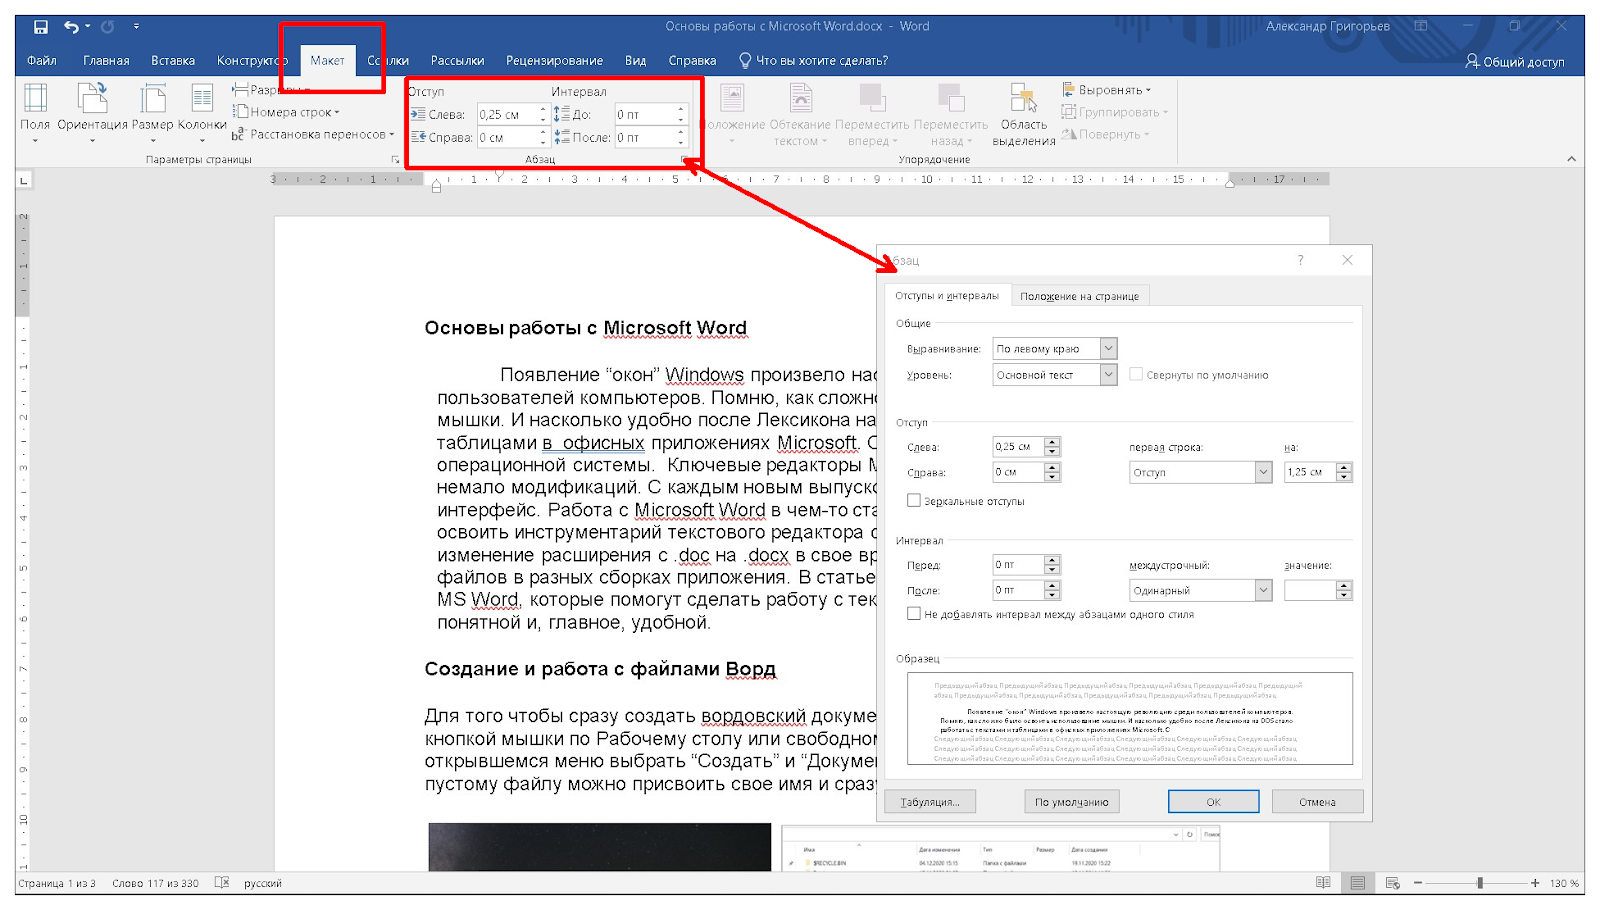
Чтобы изменить “Отступ первой строки” и “Выступ” для всего текста в файле, выделите его при помощи клавиш Ctrl+A. Быстро применить настройки одного абзаца к другому можно при помощи уже знакомой кнопки “Формат по образцу”.
Также быстро изменить отступ на фиксированный интервал можно кнопками Основного меню “Уменьшить отступ” и “Увеличить отступ”.
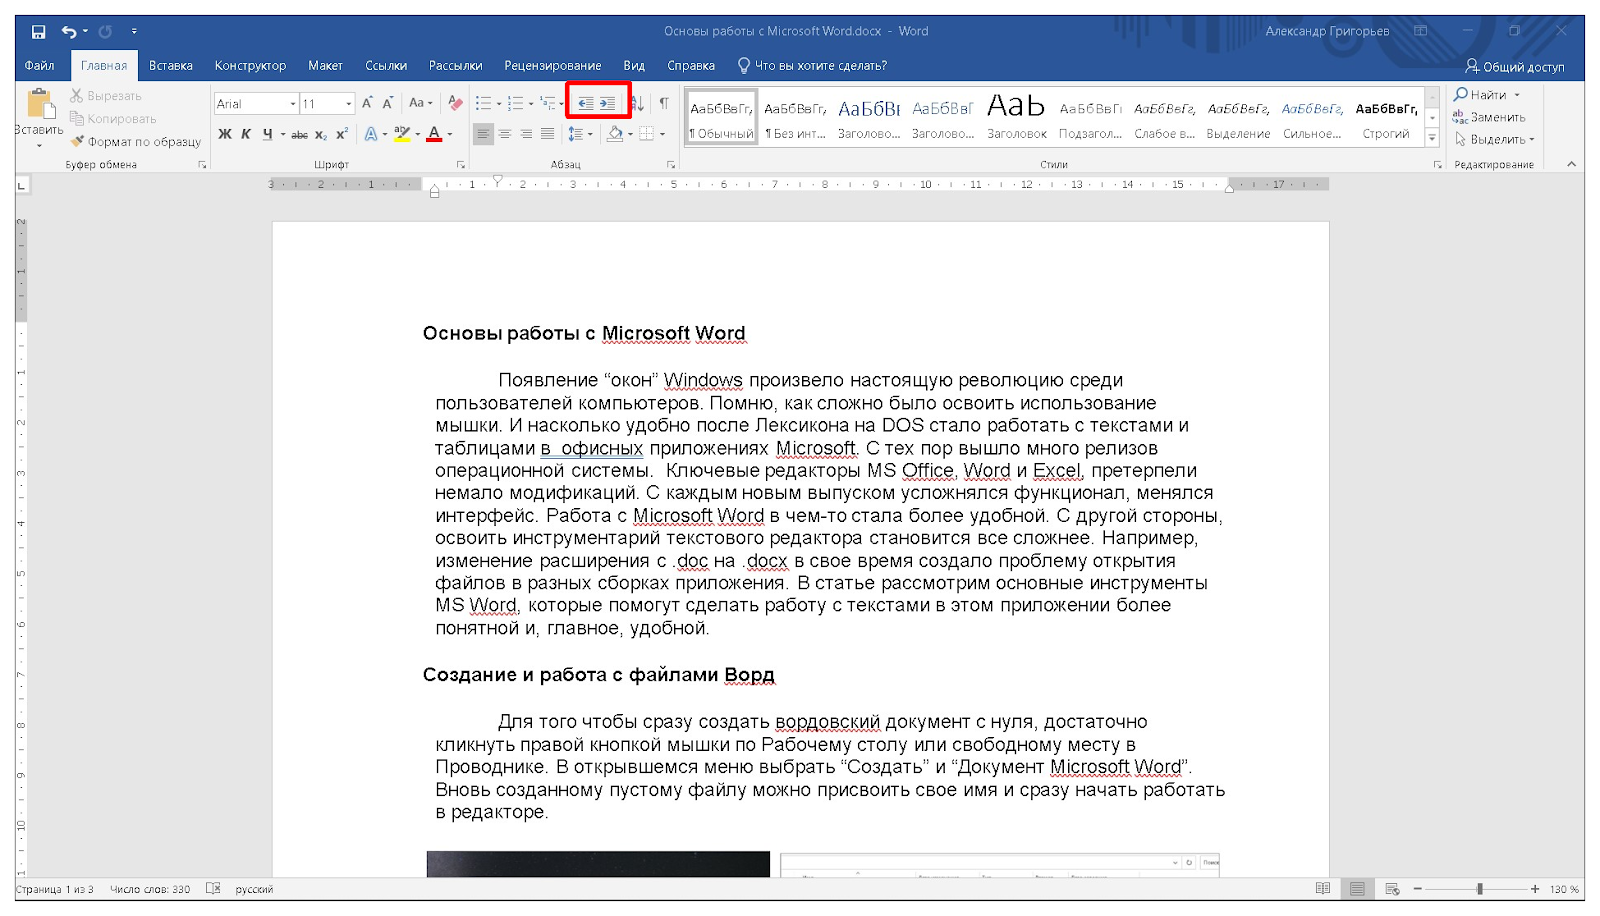
Выравнивание текста
В редакторе Word существует четыре варианта горизонтального выравнивания всего текста, либо отдельных абзацев: по левому и правому краю, по центру и ширине. Для этого используйте кнопки Верхнего меню или окно “Абзац”.
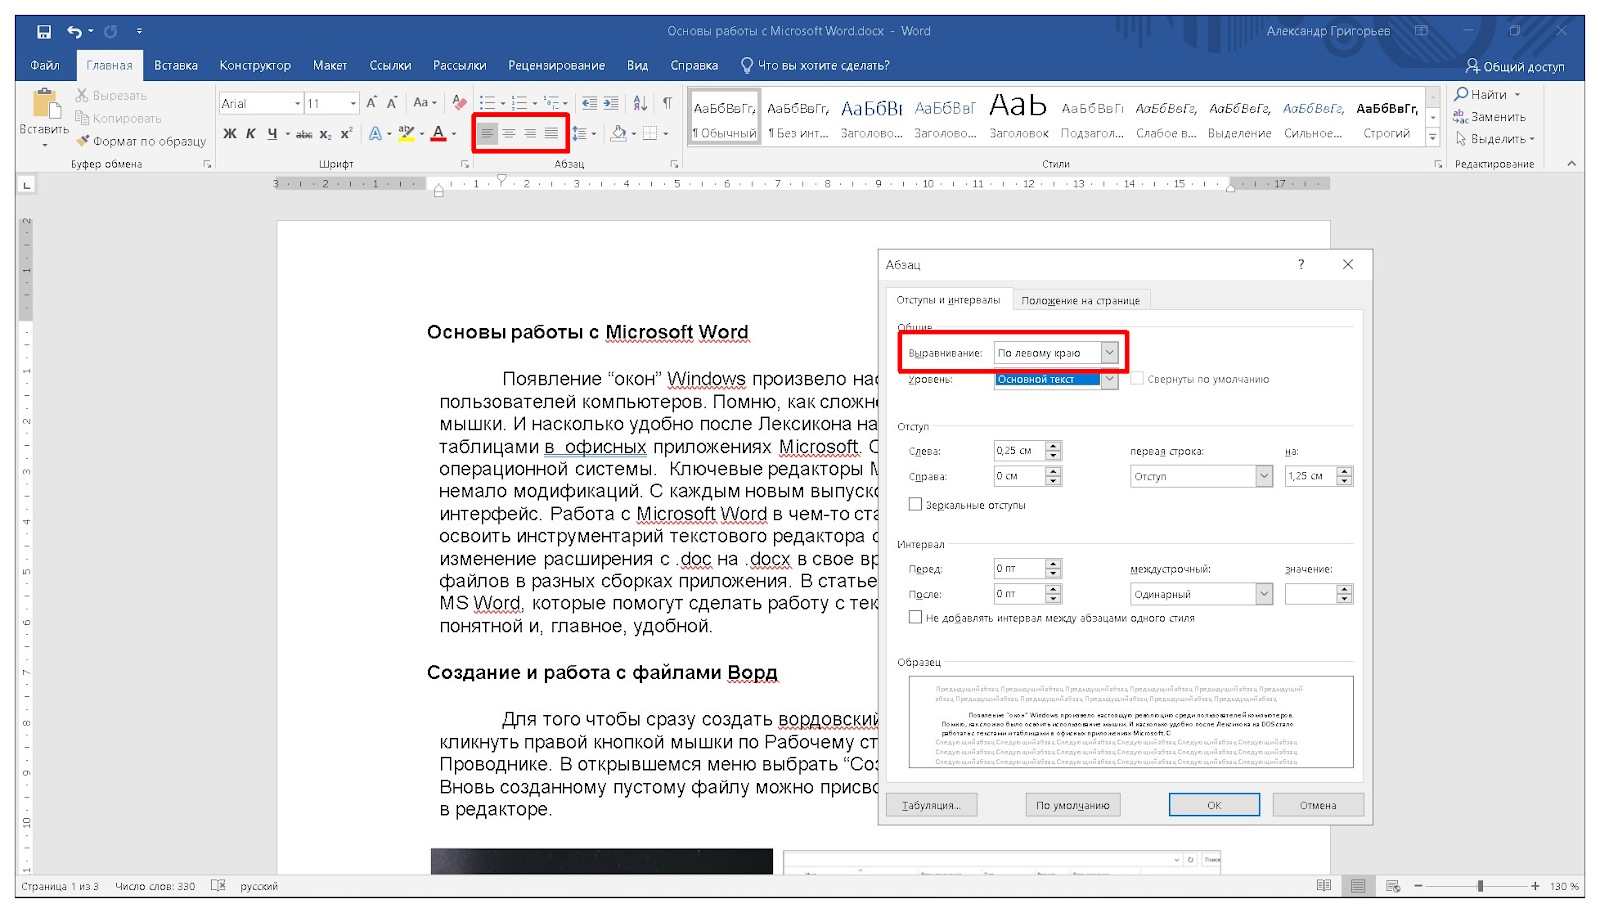
Регулирование межстрочного интервала
Выделите весь текст или фрагмент. Воспользуйтесь кнопкой Интерфейсного меню или расширенными настройками в окне “Абзац”, выбрав вариант преднастроек или пользовательский.
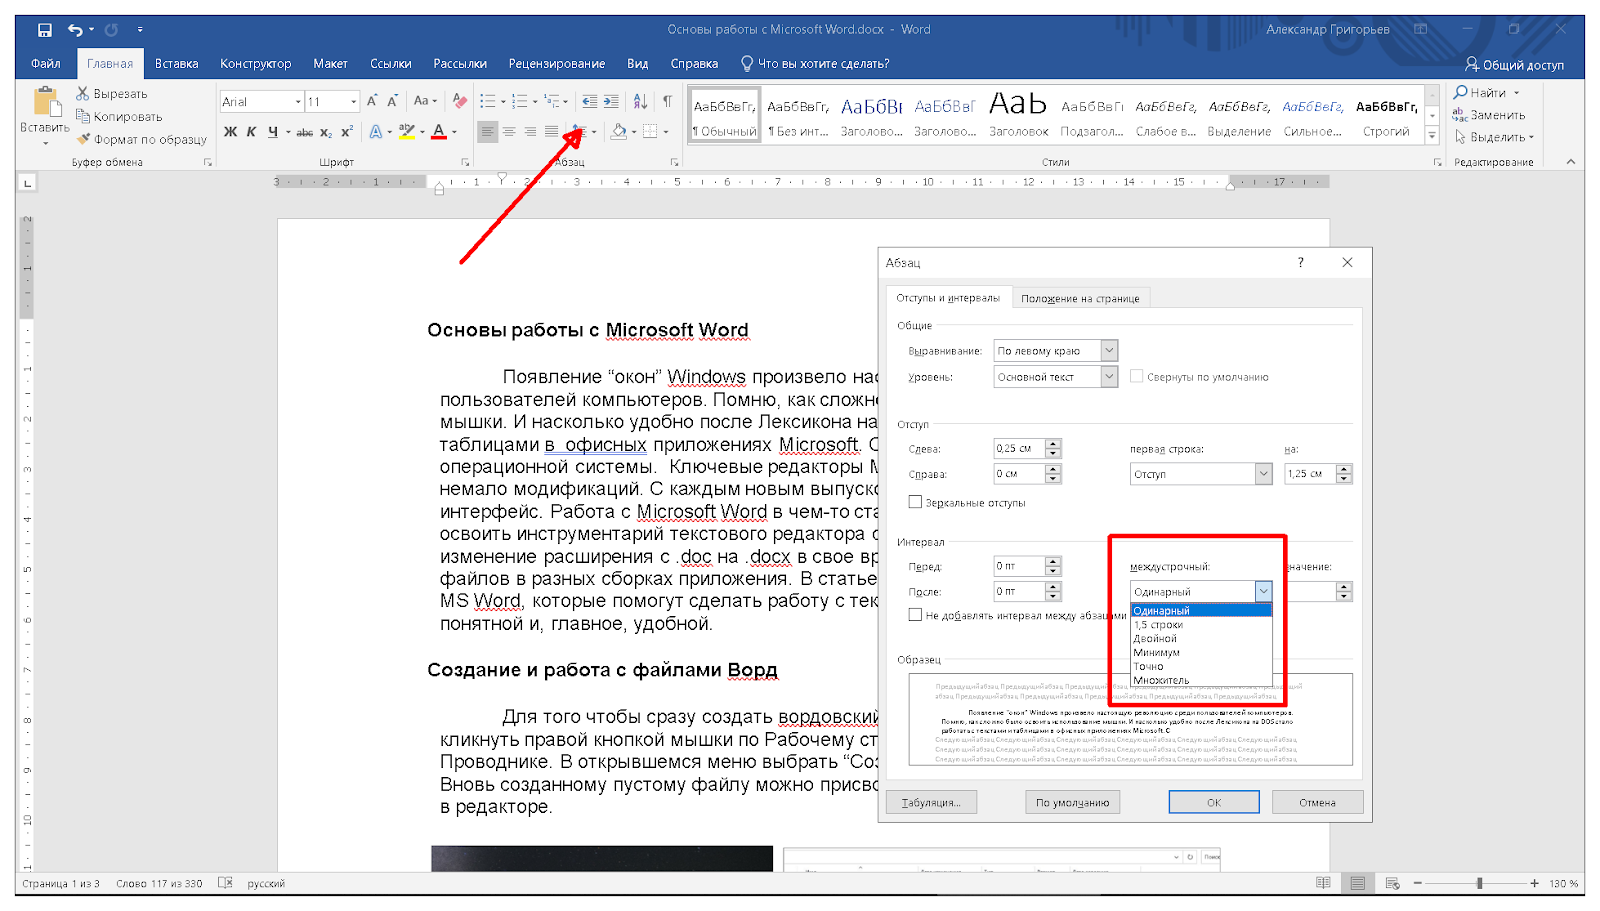
Использование инструмента “Вставка”
Для работы с объектами, не относящимися к текстовому контенту, в редакторе Microsoft Word присутствует функционал вставки. Получите к нему доступ, открыв соответствующую вкладку в Интерфейсном меню.
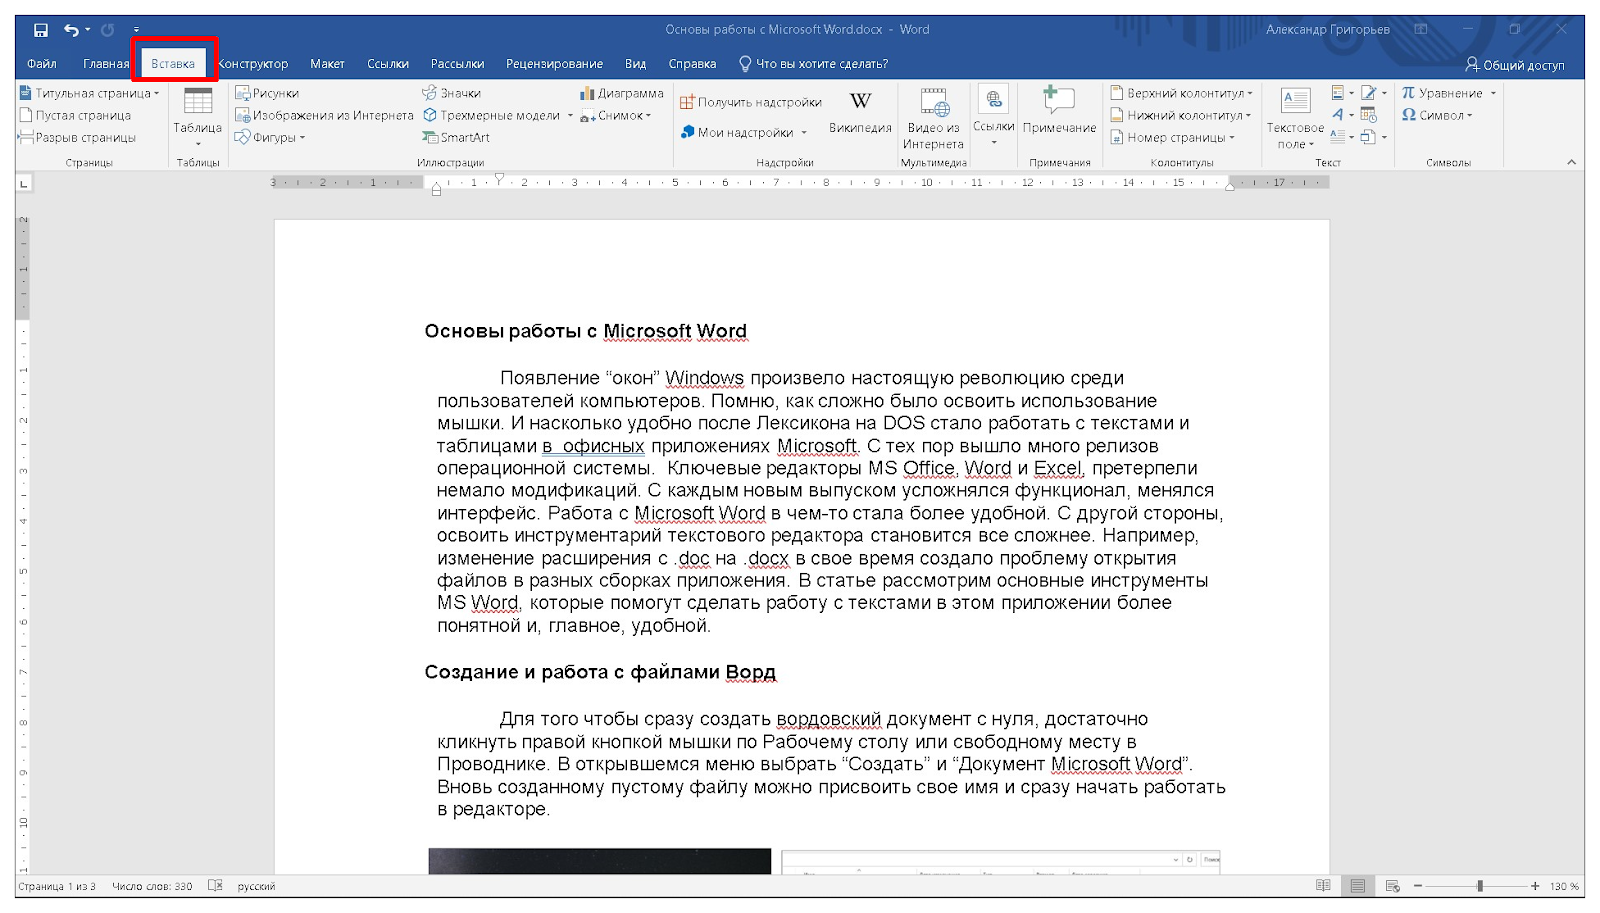
Здесь доступно создание и импорт различных объектов. Рассмотрим некоторые из них подробнее.
- “Титульная страница” предоставит доступ к набору шаблонов-обложек для быстрого создания заглавных страниц с предустановленными полями и готовым оформлением.

- “Пустая страница” создает новый чистый лист в месте нахождения курсора.
- Для разделения на страницы в произвольном месте документа используйте “Разрыв страницы”.
- Для графического оформления данных предусмотрена вставка “Диаграммы”. Одновременно с выбором типа откроется окно приложения Excel для внесения данных и меню “Конструктора Диаграмм”.

В меню “Вставка” предусмотрено большое количество вставки сторонних объектов и интеграции с внешними приложениями, импорт из интернета и с локального компьютера. По сути, его функционал требует написания отдельной методички. Остановимся на трех наиболее популярных и востребованных объектах, используемых в Microsoft Word.
Читайте также: Как в MS Word сделать картинки одного размера.
Таблица
Чтобы добавить таблицу, разверните соответствующее подменю и выберите количество строк и колонок. Произойдет автоматический переход в меню “Конструктор” с расширенными возможностями настройки таблицы.
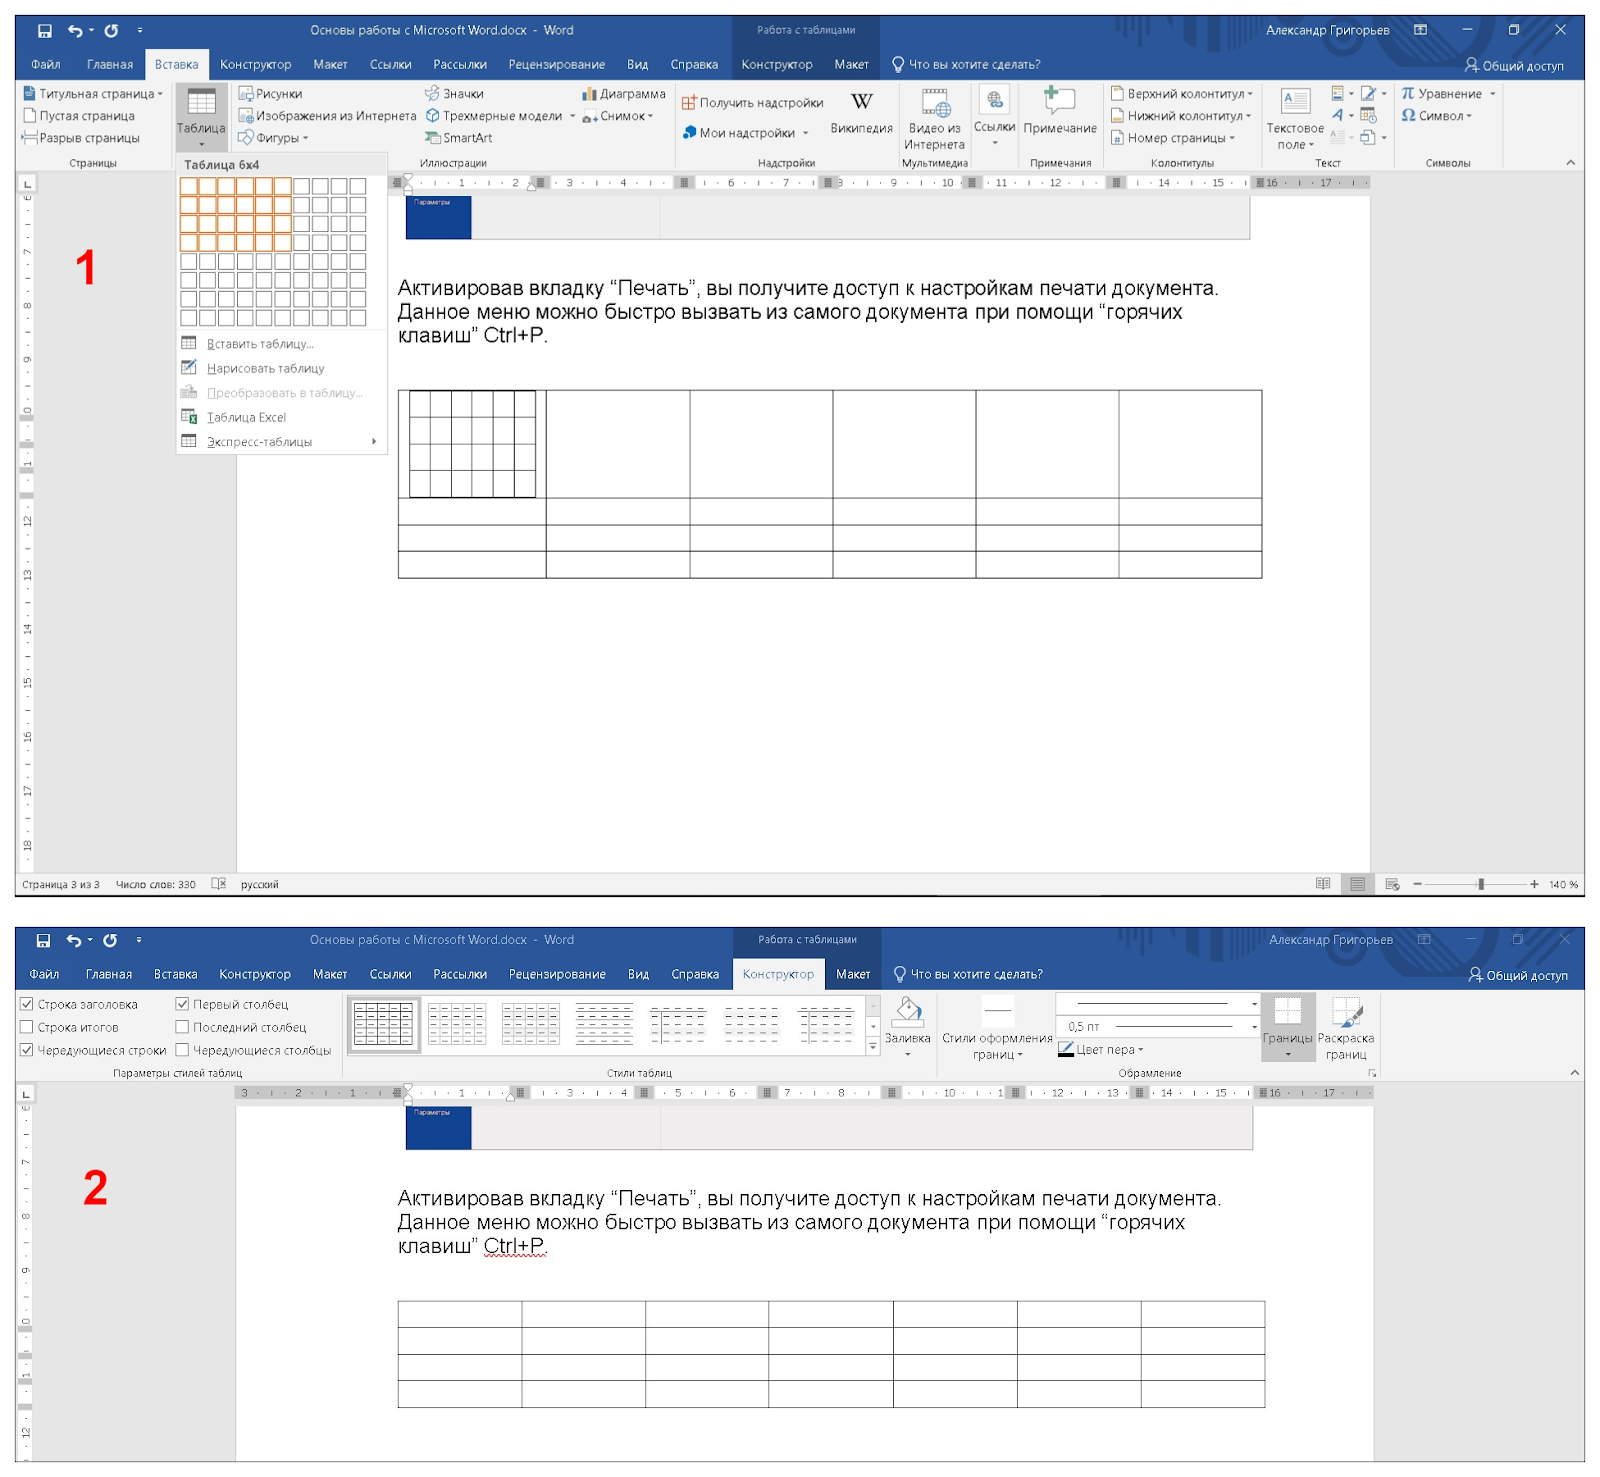
Несколько полезных советов, как упростить работу с таблицами в Ворд.
- Чтобы выделить всю таблицу, кликните ЛКМ по квадратику со стрелками рядом с левым верхним углом таблицы.

- Для быстрого перехода в следующую ячейку воспользуйтесь клавишей Tab.
- Чтобы создать новую строку внизу таблицы, установите курсор в последнюю ячейку и нажмите Tab.
- Для произвольного добавления разделительных линий воспользуйтесь инструментом “Нарисовать таблицу”.
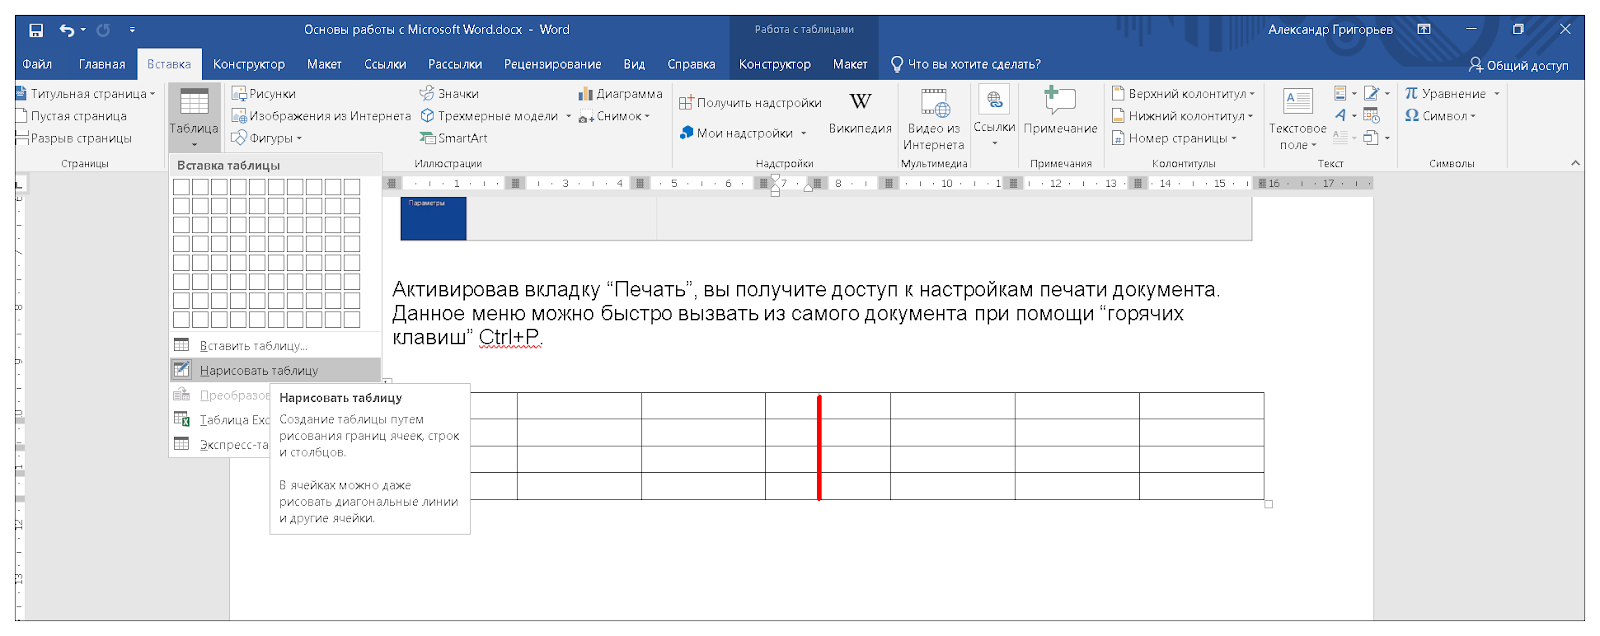
- Инструмент “Таблица Excel” в меню “Вставка” — “Таблица” дает возможность создать внутри документа внедренный объект таблицы Excel с возможностью использования функционала соответствующего приложения.

- Для дополнительной работы с таблицей удобнее всего использовать всплывающее меню, которые вызывается правой кнопкой мыши.
- Чтобы выделить отдельные ячейки с текстом, разные строки, используйте мышку, одновременно удерживая Ctrl.

Фигуры
Еще один популярный инструмент создания и редактирования встроенных объектов в Ворд, используемый в качестве дополнительного оформления документа.
- Откройте “Фигуры” в меню “Вставки”. В коллекции выберите подходящий объект.

- Внедрите фигуру и в открывшемся подменю “Формат” отредактируйте параметры объекта. Добавьте дополнительные фигуры, взяв их из готовых шаблонов.

- Дополнительное меню редактирования объекта вызывается правой кнопкой мышки.

Работать с фигурами достаточно просто. Они легко меняют размер, перемещаются по страницам. Их можно совмещать с текстом, поворачивать, менять цветовую палитру и линии.
Колонтитулы
Бывает, что в документах необходимо создать статичный контент, повторяющийся на всех страницах. Это могут быть реквизиты, логотип, иная информация или объект. Для этого воспользуйтесь инструментом создания и редактирования колонтитулов.
- Войдите в меню “Конструктор” и выберите нижний или верхний колонтитул, либо номер страницы. Доступны варианты форматирования колонтитулов.

- Заполните соответствующее поле колонтитула текстом, вставьте рисунок, либо задействуйте нумерацию страниц. Теперь контент будет автоматически отображаться на всех страницах документа.

Для быстрого входа в колонтитул достаточно два раза щелкнуть мышкой внизу страницы. Редактирование в колонтитулах выполняется так же, как и в обычном тексте Ворд.
Создание оглавления
Для быстрой навигации по многостраничному документу используйте “Содержание”. Прежде всего в документе необходимо создать заголовки различного уровня. С этой целью проще всего воспользоваться выбором стилей в Верхнем меню интерфейса.
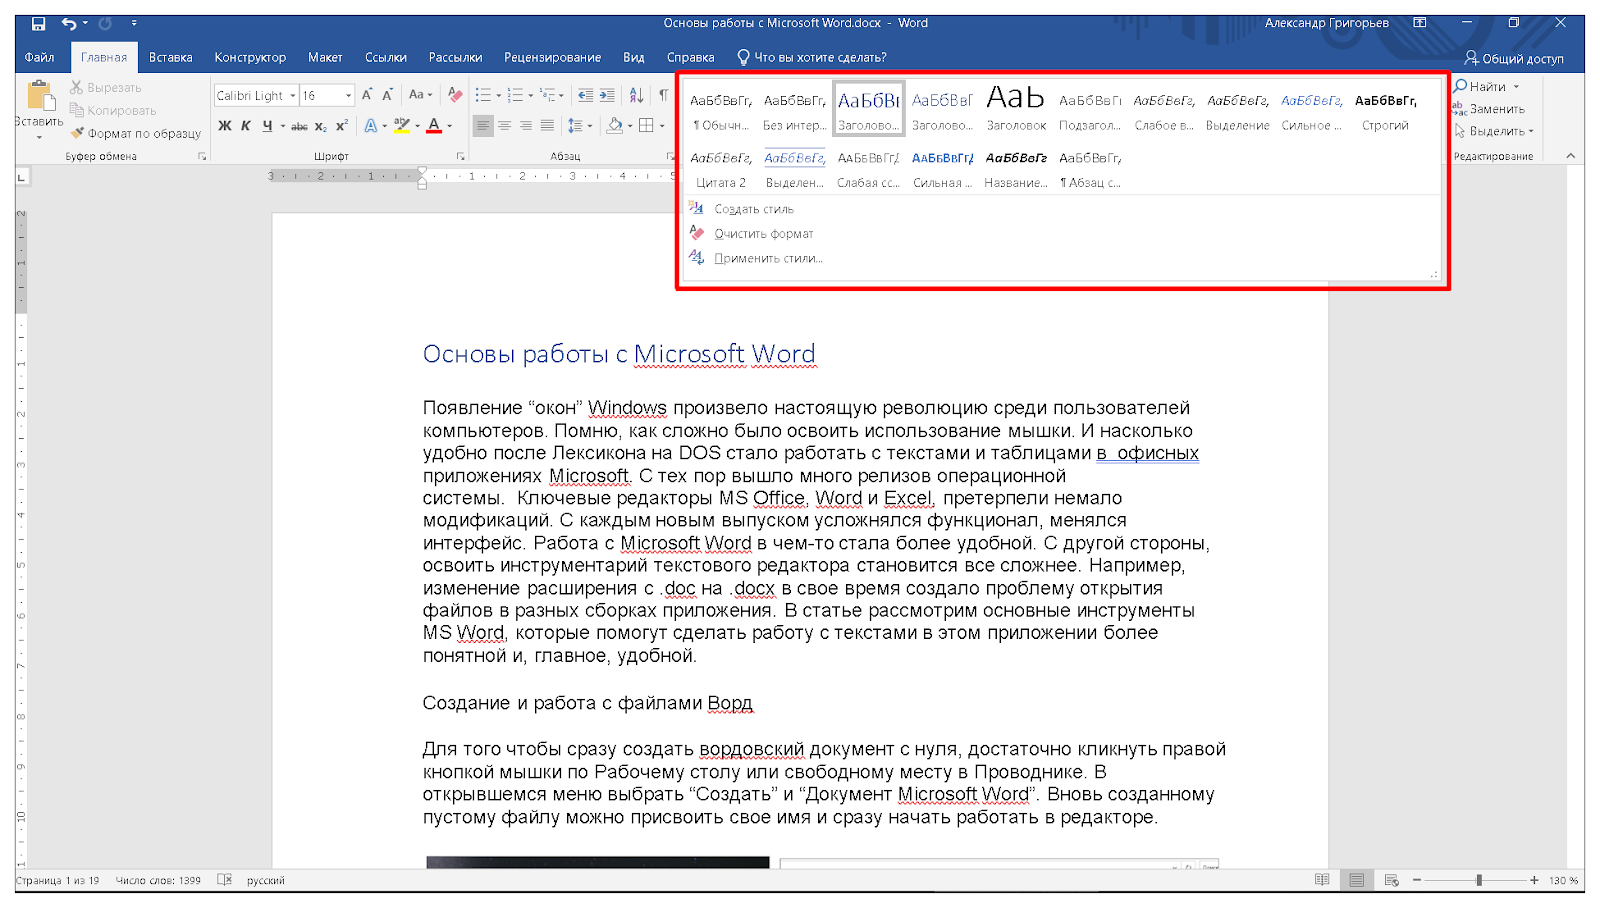
- Установите курсор на главный Заголовок документа, либо выделите его. В меню “Стили” активируйте вкладку “Заголовок” или “Заголовок 1”.
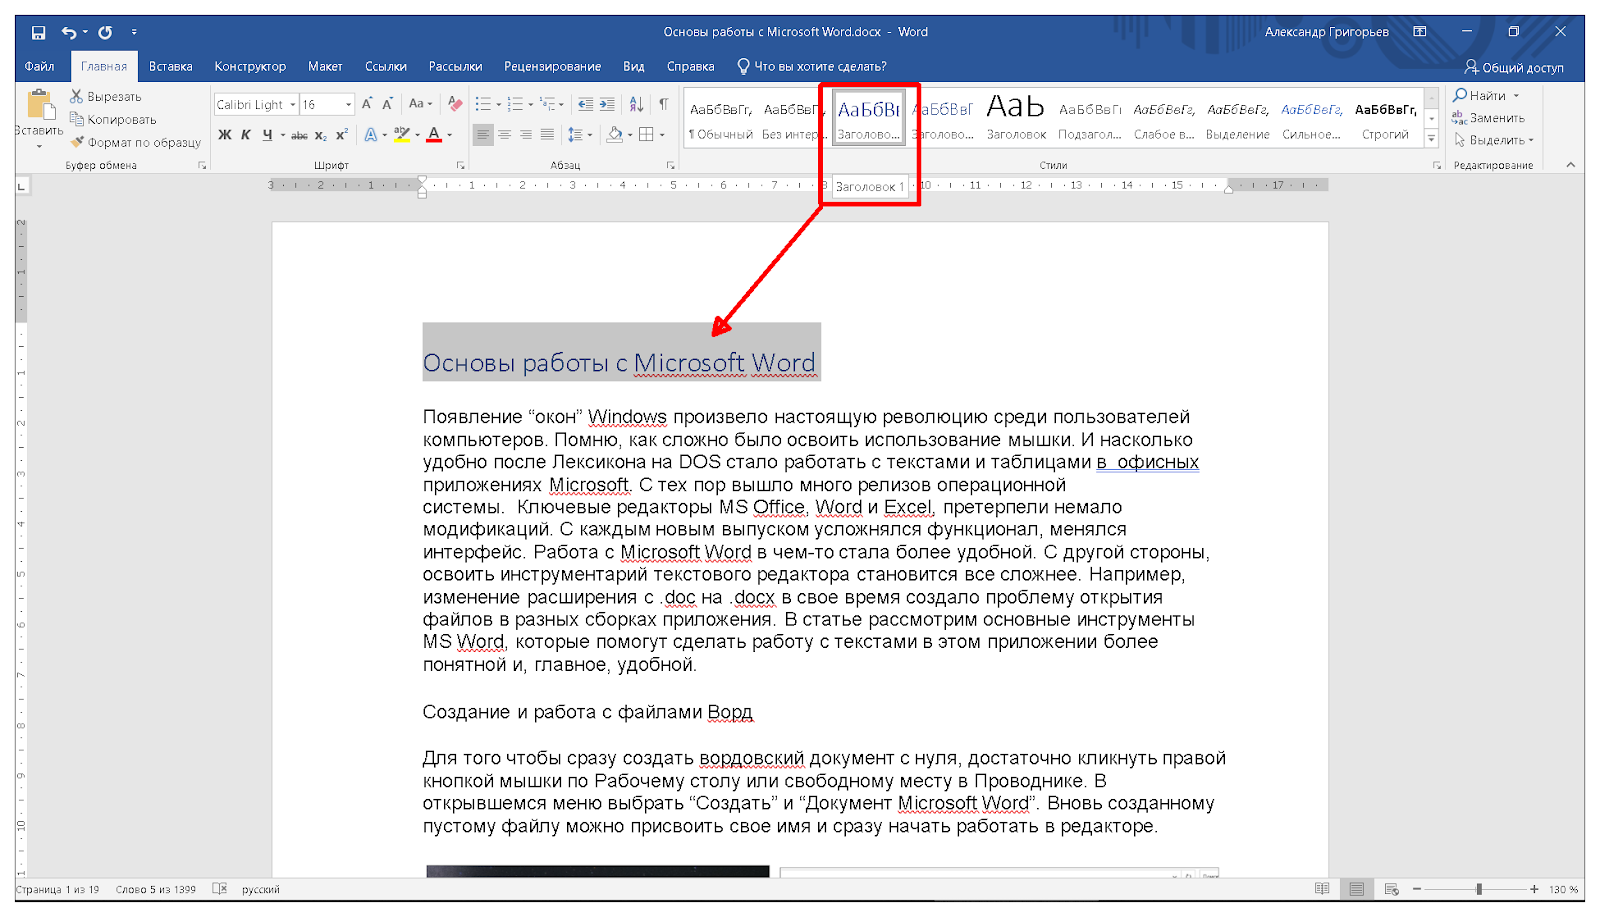
- Далее в иерархическом порядке создайте стили форматирования для тайтлов следующего уровня: “Заголовок 2”, “Заголовок 3” и т.д.
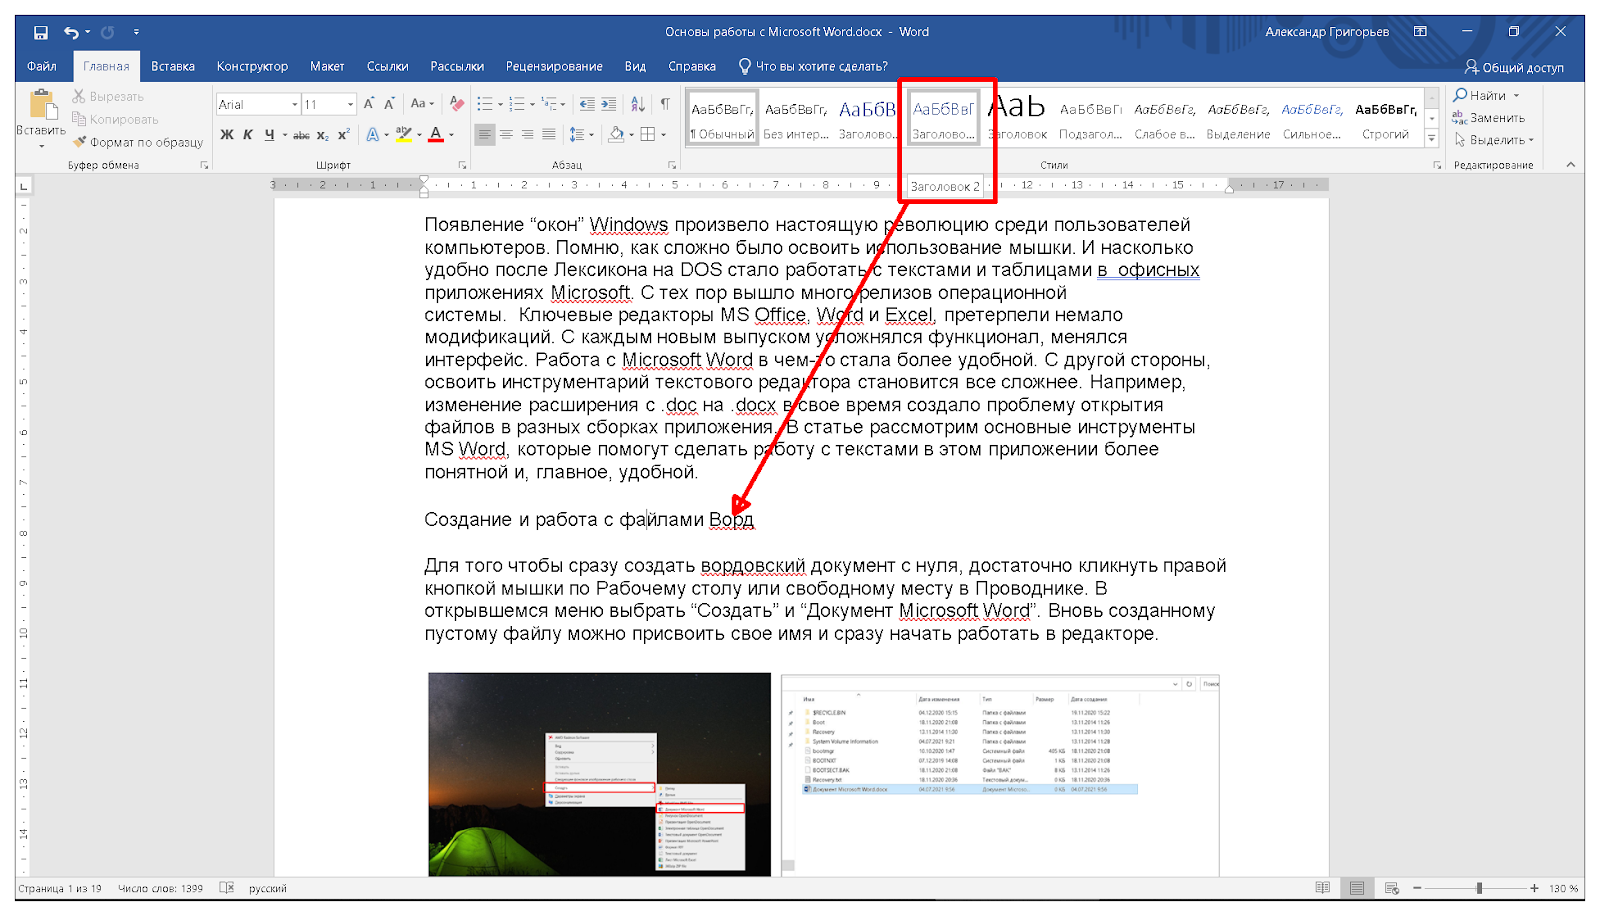
- Установите курсор в место документа, где будет находиться навигационный список. Откройте вкладку “Ссылки” и выберите “Оглавление”, определившись с вариантом компоновки Содержания. Список заголовков будет сформирован автоматически. Для перехода к нужному разделу удерживайте клавишу Ctrl и щелкните мышкой по ссылке.

Использование макросов
Инструментарий макросов в Microsoft Word используется для упрощения работы с индивидуальными настройками часто повторяющихся действий. Это функционал внутреннего программирования логики решения задач, которая не предусмотрена в стандартном наборе управления приложением. Для создания алгоритма используется вкладка “Макросы” в контекстном меню “Вид”.

Заключение
Возможности текстового редактора Microsoft Word очень обширны, описать их все в одной статье невозможно. К тому же, применение функционала программы зависит от задач конкретного пользователя при работе с текстами. Я привел примеры использования некоторых инструментов приложения, которые помогают упростить и ускорить работу в редакторе. Часть из них доступна начинающим юзерам, другие инструменты требуют более глубокого погружения в свойства программы. Главное, экспериментируя с Ворд, не забывайте создавать бэкапы важных документов. Настройте автоархивирование или почаще пользуйтесь “волшебной дискеткой” в левом верхнем углу графического интерфейса.
Post Views: 305