
Word for Microsoft 365 Word 2021 Word 2019 Word 2016 Word 2013 Word 2010 Word 2007 More…Less
You can use the numbered list feature in Word to add numbers to cells in a table.
Note: If a table cell contains multiple lines of text, Word numbers each line in the cell.
-
Select the table cells that you want to number.
To number the beginning of each row, select only the first column in the table by clicking the column’s top border.

-
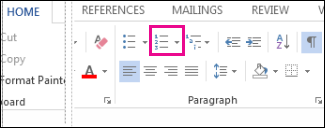
On the Home tab, in the Paragraph group, click Numbering.
Note: To select a different number format, right-click a number in the list, point to Numbering, click Define New Number Format, and then select the options that you want.

See also
Automatically number rows in Excel
Need more help?
Want more options?
Explore subscription benefits, browse training courses, learn how to secure your device, and more.
Communities help you ask and answer questions, give feedback, and hear from experts with rich knowledge.
Содержание
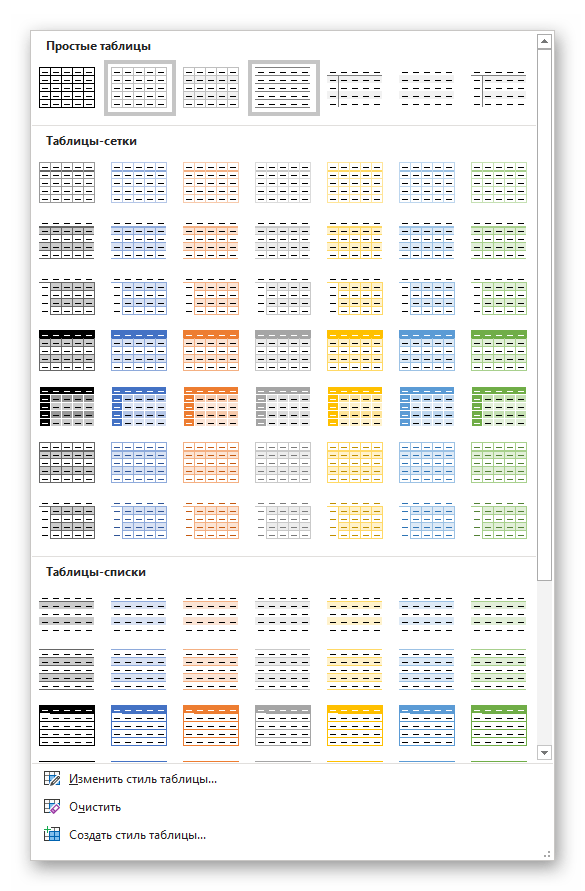
- Создание таблиц в Ворде
- Способ 1: Базовая таблица
- Способ 2: Таблица с настраиваемыми параметрами
- Способ 3: Самостоятельное рисование
- Способ 4: Экспресс-таблица
- Способ 5: Преобразование текста в таблицу
- Способ 6: Вставка и экспорт из Excel
- Способ 7: Вставка таблицы из интернета
- Заключение
- Вопросы и ответы

При работе с документами в Word нередко может понадобиться создать таблицу, внутри которой необходимо разместить те или иные сведения. Текстовый редактор от компании Microsoft, хоть и не предоставляет такие широкие возможности для создания и редактирования таблиц, как его собрат по офисному пакету Excel, но все же имеет в своем арсенале достаточный набор инструментов для работы с таблицами. В данной статье мы подробно рассмотрим то, как их создавать.
Создание таблиц в Ворде
Существует несколько способов создания таблицы в текстовом документе средствами самого Word. Точнее, как таковой способ всего один, но результаты его выполнения могут быть совершенно разными – все зависит от того, какой цели требуется достичь. Плюс ко всему, можно добавить таблицу «извне» — совместимого офисного приложения Excel или, например, с веб-сайта.
Способ 1: Базовая таблица
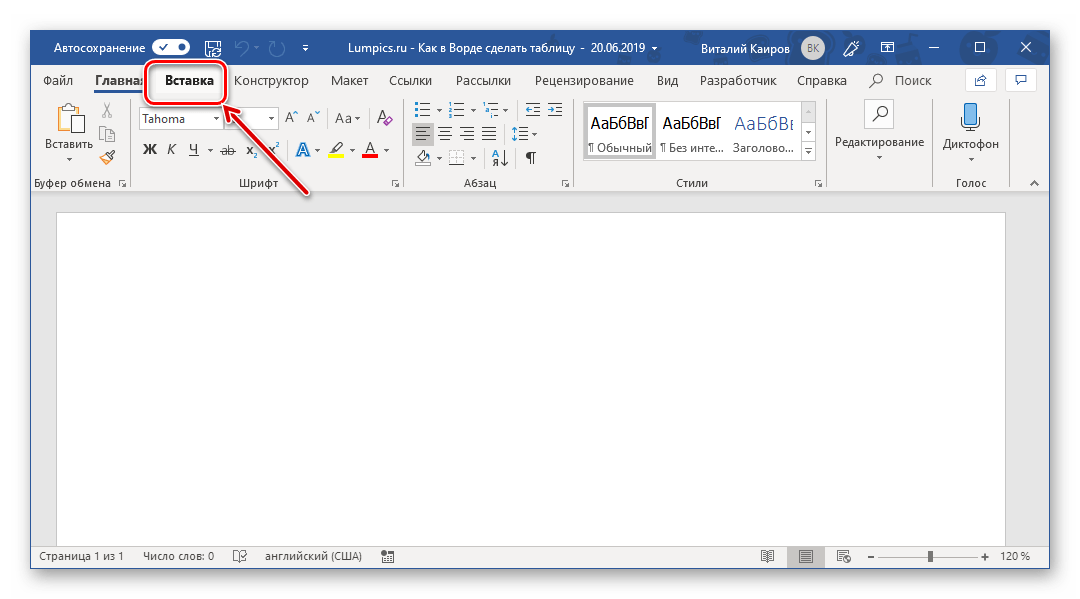
Создание и/или добавление в Ворд практически любых, отличных от текста элементов, осуществляется через вкладку «Вставка». К ней же нам потребуется обратиться для создания базовой таблицы.
- Нажмите левой кнопкой мышки (ЛКМ) в том месте текстового документа, куда вы хотите добавить таблицу, и перейдите во вкладку «Вставка».
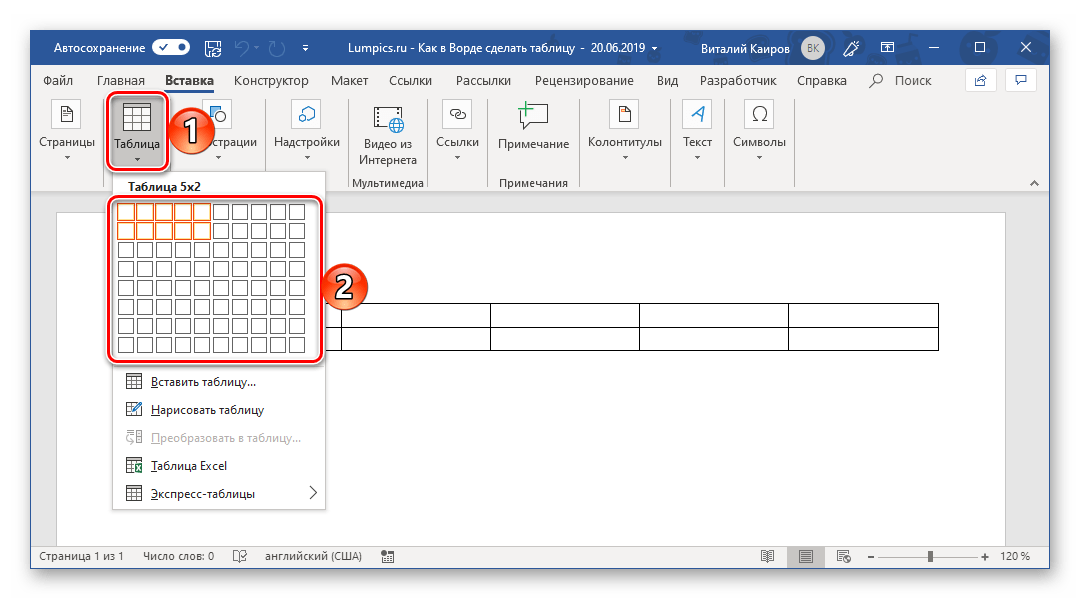
- Разверните меню кнопки «Таблица», расположенной в одноименной группе инструментов, и выберите желаемое количество строк и столбцов, передвигая мышку по изображению с превью таблицы, а затем, обозначив желаемый диапазон (он подсвечивается оранжевым). Кликните ЛКМ для подтверждения.
- Перед вами появится таблица выбранных размеров.
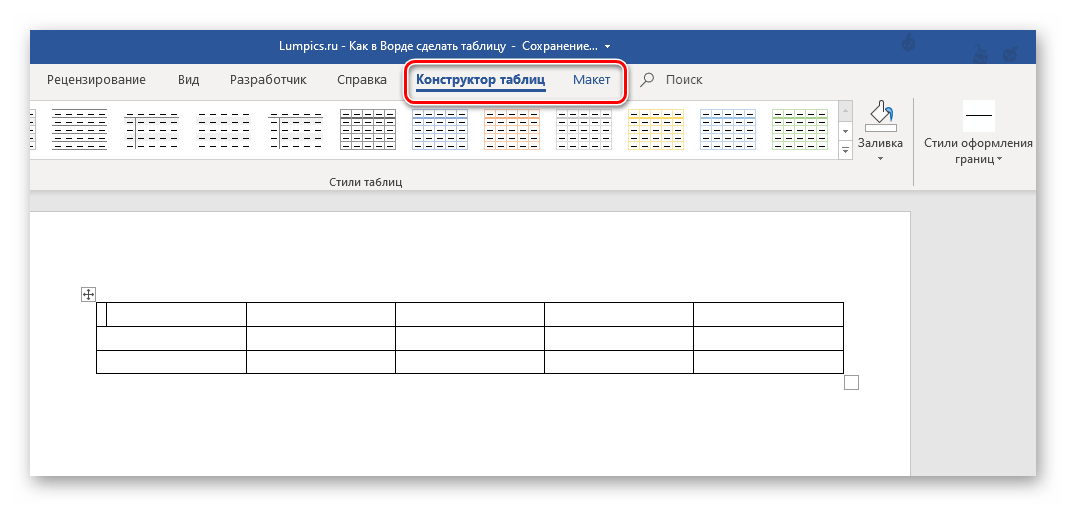
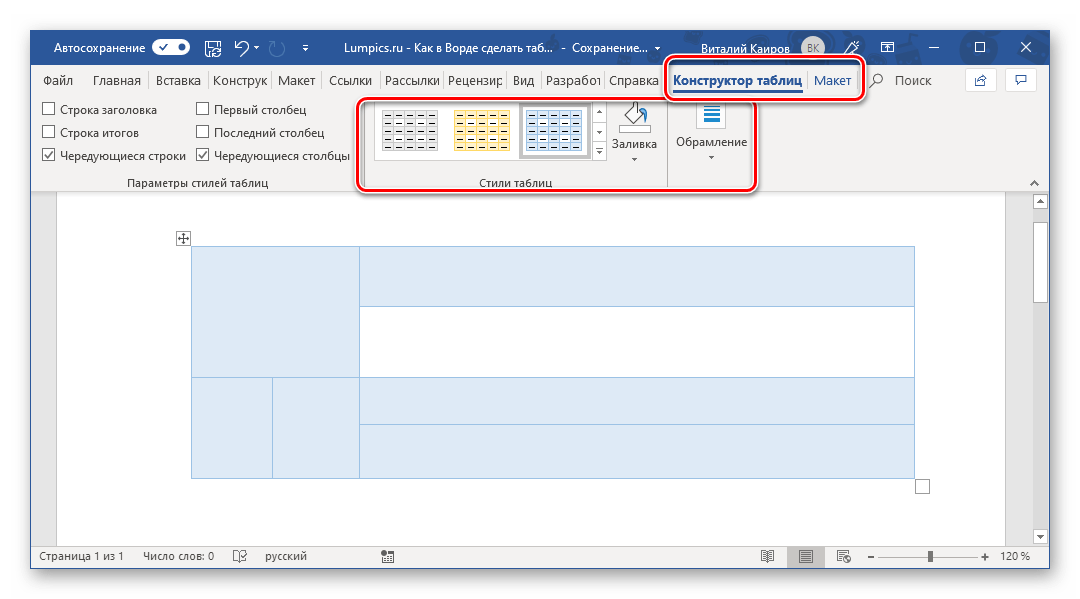
Одновременно с тем, как вы ее создадите, на панели управления (лента) Word появится группа вкладок «Работа с таблицами», состоящая из вкладок «Конструктор таблиц» и «Макет» и содержащая необходимый набор инструментов для работы с таблицами, их изменения и оформления.
Используя их, вы сможете придать своей таблице желаемый вид и стиль, добавить или удалить границы, сделать обрамление, заливку, вставлять различные формулы и т.д.

Читайте также: Вставка формулы в таблицу в Ворде
Это был самый простой, но далеко не единственный способ создания таблицы в Word.
Читайте также: Форматирование таблиц в Ворде
Способ 2: Таблица с настраиваемыми параметрами
Если же вы имеете более-менее точное представление о том, как должна выглядеть ваша таблица и какие приблизительно размеры она должна иметь, эти параметры можно определить непосредственно при ее создании.
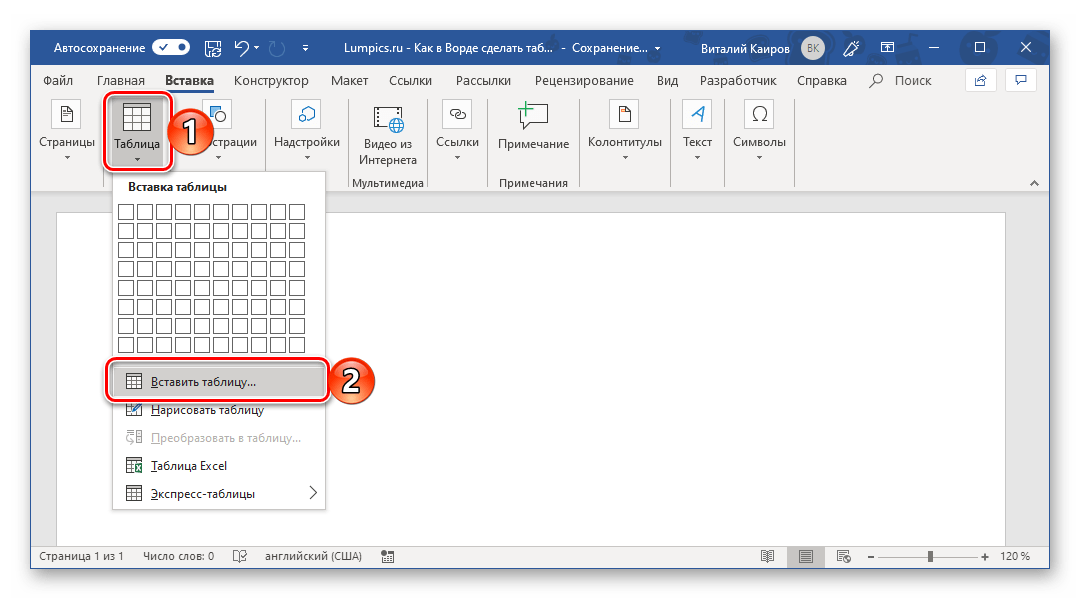
- Все в той же вкладке «Вставка» воспользуйтесь кнопкой «Таблица» и выберите в ее меню пункт «Вставить таблицу».
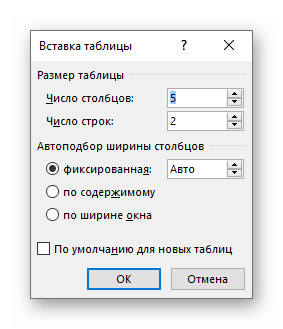
- В небольшом диалоговом окне, которое будет открыто, задайте желаемые параметры для таблицы. То есть укажите необходимое число строк и столбцов, дополнительно можно выбрать опцию подбора ширины столбцов (хотя для пустой таблицы это не слишком актуально). Доступны следующие варианты:
Вариант Описание Постоянная По умолчанию установлено значение «Авто», то есть ширина столбцов будет изменяться автоматически, по мере их заполнения По содержимому Изначально будут созданы узкие столбцы, ширина которых увеличивается по мере добавления содержимого По ширине окна Таблица автоматически будет изменять свою ширину в соответствие с размерами документа, с которым вы работаете 
Примечание: Если вам необходимо, чтобы таблицы, которые вы будете создавать в дальнейшем, выглядели точно так же, как и эта, установите галочку напротив пункта «По умолчанию для новых таблиц».
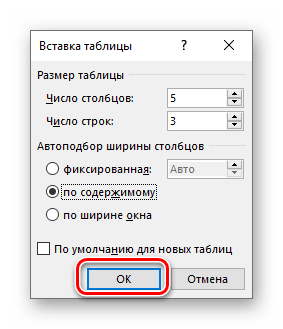
- Задав необходимые параметры в окне «Вставка таблицы», нажмите «ОК» для их подтверждения.
На странице документа появится созданная вами таблица, ширину столбцов и высоту строк которой, скорее всего, придется изменить, а после этого (или в процессе) заполнить информацией.


Читайте также: Как в Word добавить строку и/или столбец в таблицу
Способ 3: Самостоятельное рисование
В случае если вам нужна таблица произвольного размера и вида, например, с объединенными ячейками или с разной высотой и шириной таковых (а также строк и/или столбцов), потребуется нарисовать ее вручную, воспользовавшись соответствующей возможностью текстового редактора.

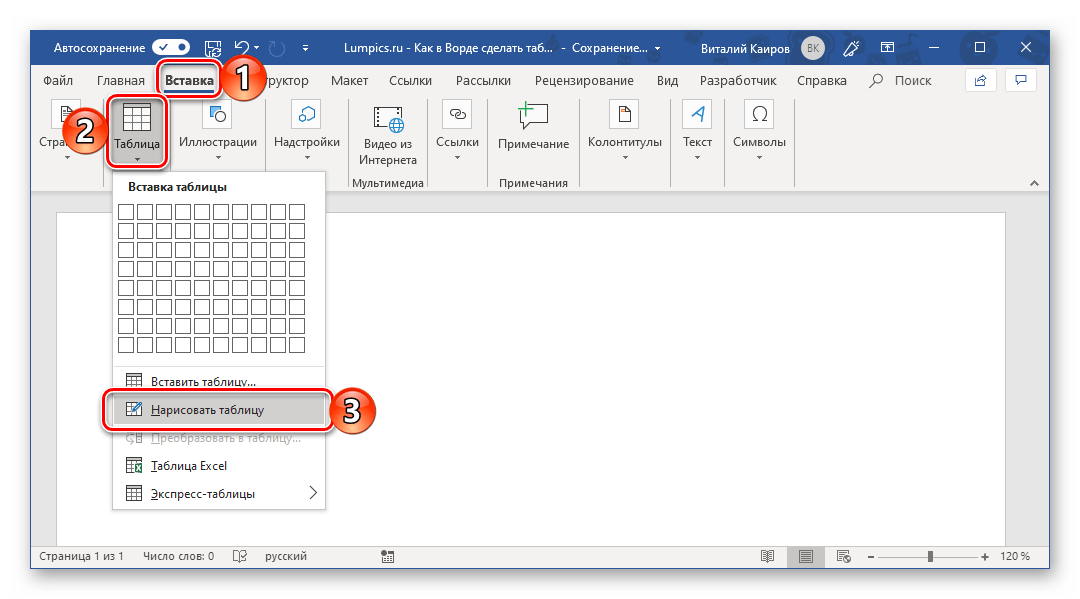
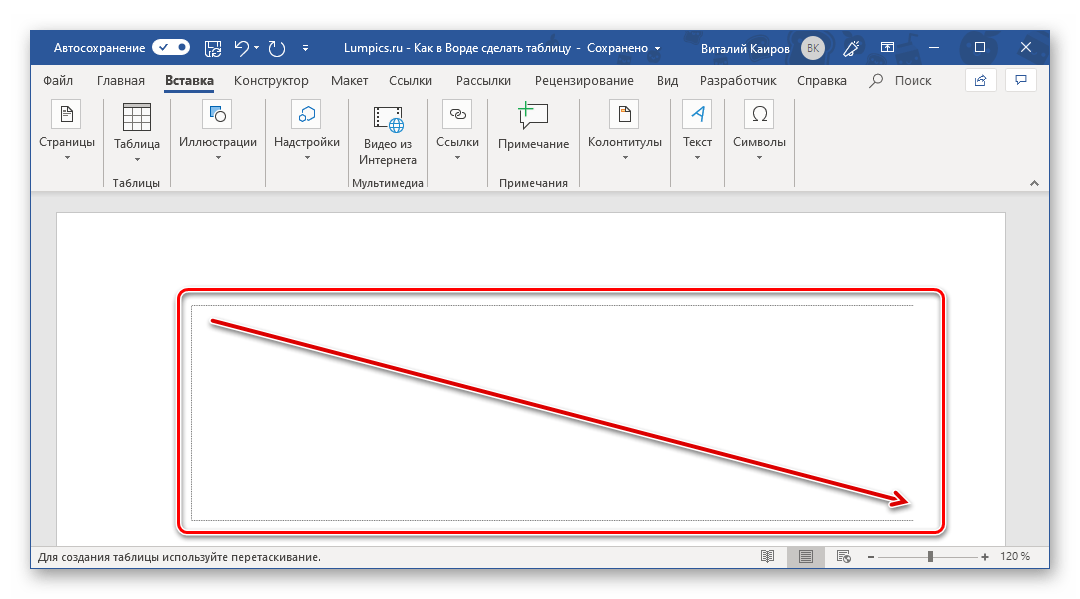
- В меню вставки таблицы выберите пункт «Нарисовать таблицу». Указатель курсора после этого действия примет вид карандаша.
- Обозначьте внешние границы таблицы, то есть просто нарисуйте прямоугольник с необходимой высотой и шириной (в дальнейшем эти параметры можно будет легко изменить).

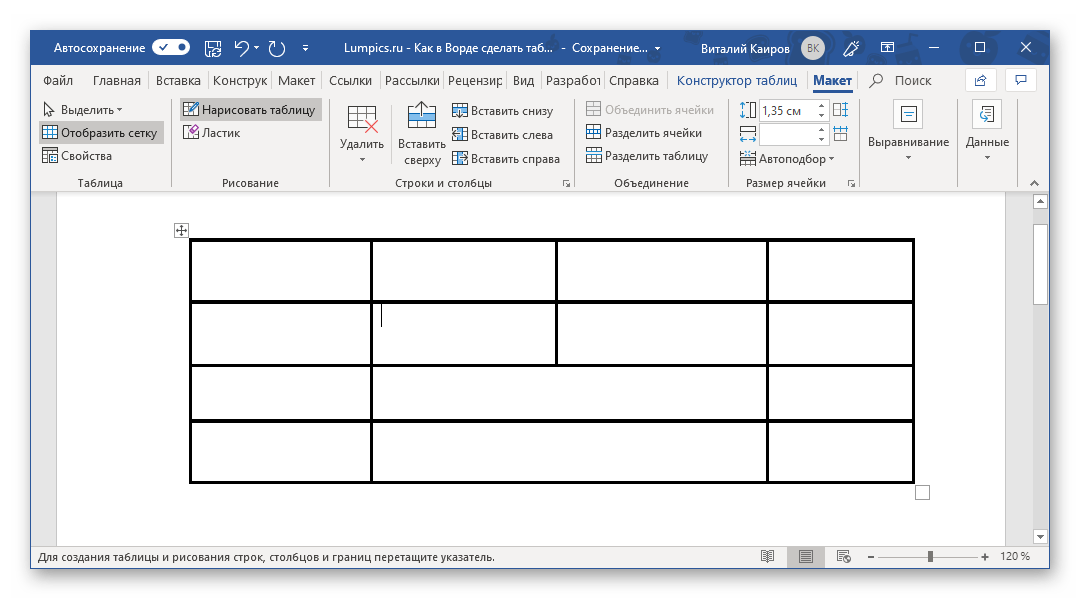
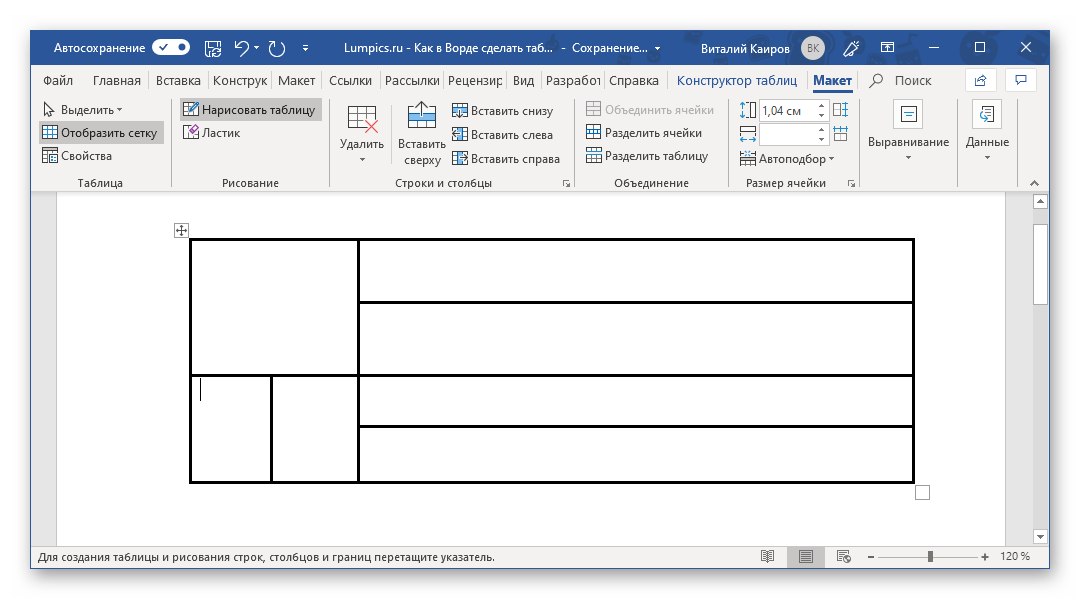
Далее нарисуйте внутри него строки и столбцы, проводя карандашом соответствующие горизонтальные и вертикальные линии. Сделав это, снова выберите пункт «Нарисовать таблицу» в меню вставки, чтобы выйти из режима рисования.
Как вы наверняка уже могли догадаться, высота строк и ширина столбцов изначально может быть произвольной (или просто желаемой), а не строго определенной, как это происходит при вставке базовой и настраиваемой таблицы. Также можно сразу нарисовать объединенные столбцы, строки, ячейки, если такая необходимость имеется.
Читайте также: Как объединить ячейки в таблице в Ворде - Как и в рассмотренных выше случаях, вся работа с таблицей, ее элементами и содержимым, выполняется в группе вкладок «Работа с таблицами»,
в которую входят «Конструктор таблиц» и «Макет».

Довольно часто именно произвольное, ручное рисование таблицы в Word является оптимальным решением и позволяет сделать в точности то, требуется (или просто хочется).
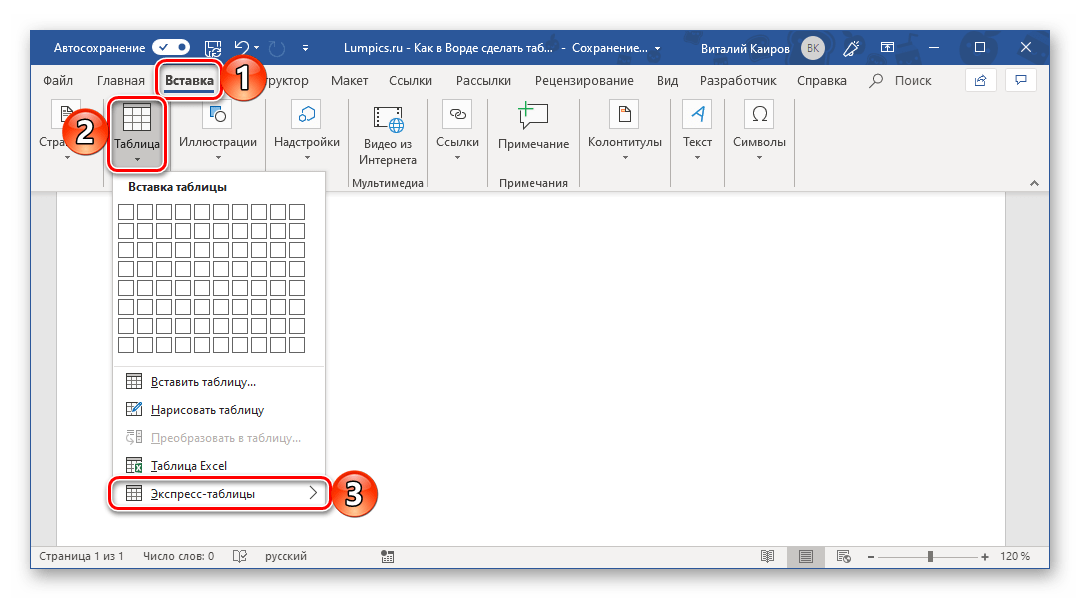
Способ 4: Экспресс-таблица
С каждой новой версией редактора Ворд в нем появлялось все больше шаблонов документов. Выбрать их можно при запуске программы или через меню «Файл» — «Создать». Есть в программе и шаблоны таблиц, причем расположены они не в стартовом окне, а во все том же, уже хорошо знакомом нам меню вставки.
- Разверните меню кнопки «Таблица» и выберите пункт «Экспресс-таблицы».
- Выберите подходящий шаблон из небольшого списка «Встроенные», нажав по нему ЛКМ.
- Таблица будет добавлена в текстовый документ и заполнена шаблонным содержимым. Все эти данные можно и нужно заменить на свои.
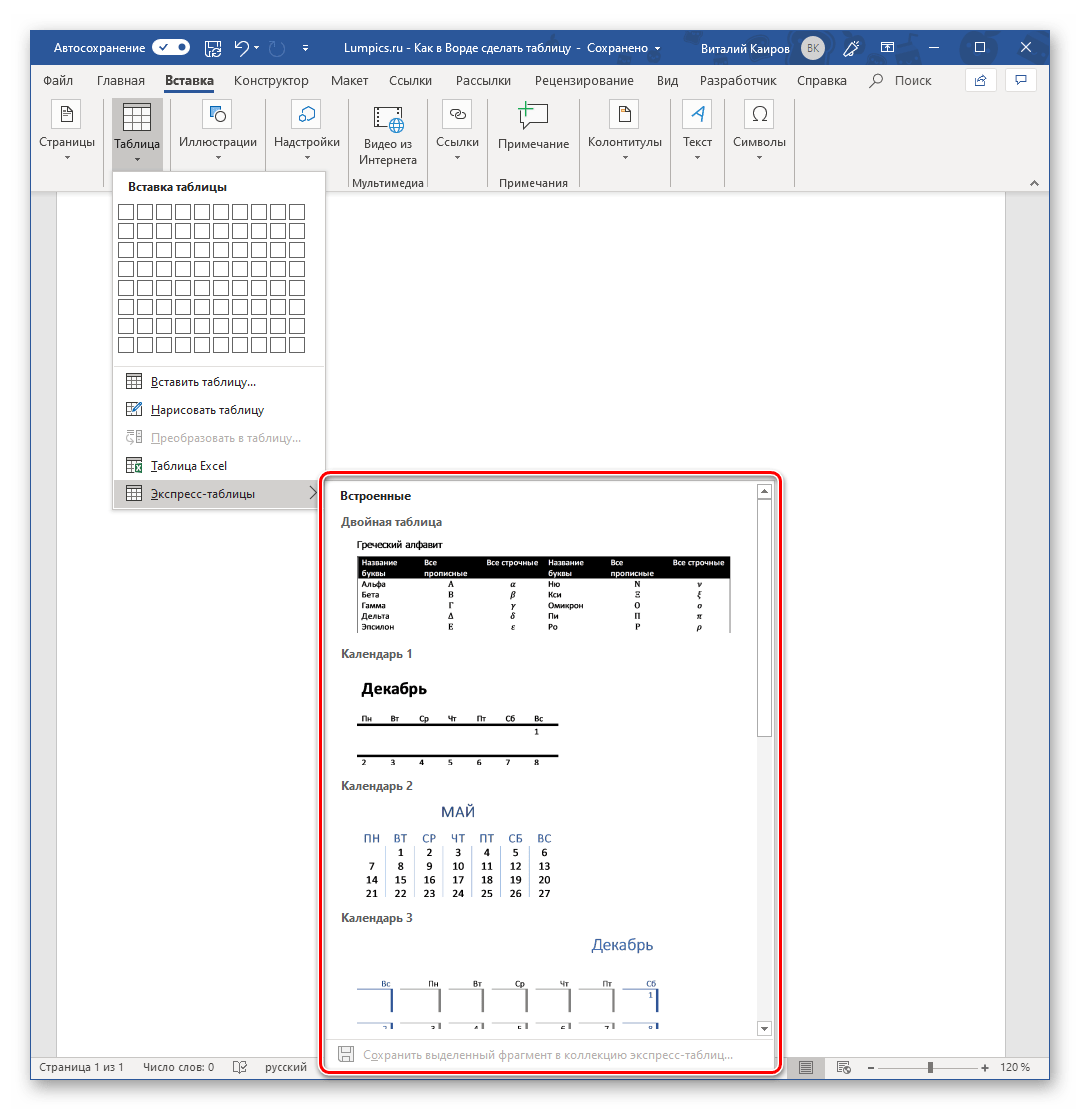

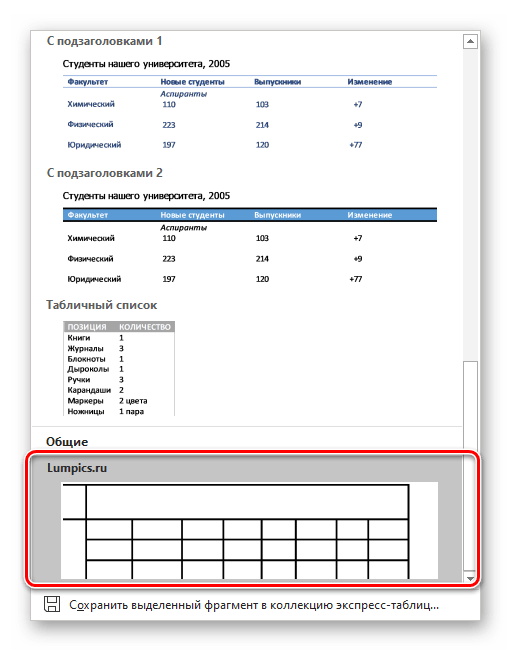
К сожалению, набор шаблонных таблиц в Word довольно скромный, зато его легко можно расширить собственными проектами. То есть любую созданную вами таблицу можно добавить в этот набор, для чего необходимо выполнить следующее.
- Выделите таблицу вместе со всем ее содержимым и перейдите во вкладку «Вставка».
- В меню кнопки «Таблица» наведите указатель курсора на пункт «Экспресс-таблицы».
- Выберите расположенный в самом низу пункт «Сохранить выделенный фрагмент в коллекцию экспресс-таблиц…»

В появившемся окне создания нового блока дайте своей таблице «Имя» и по желанию добавьте «Описание». Остальные поля лучше оставить по умолчанию. Для сохранения шаблона нажмите «ОК».


С этого момента ваша таблица будет отображаться в списке «Экспресс-таблицы».
Читайте также: Как в Ворде создать шаблон документа
Способ 5: Преобразование текста в таблицу
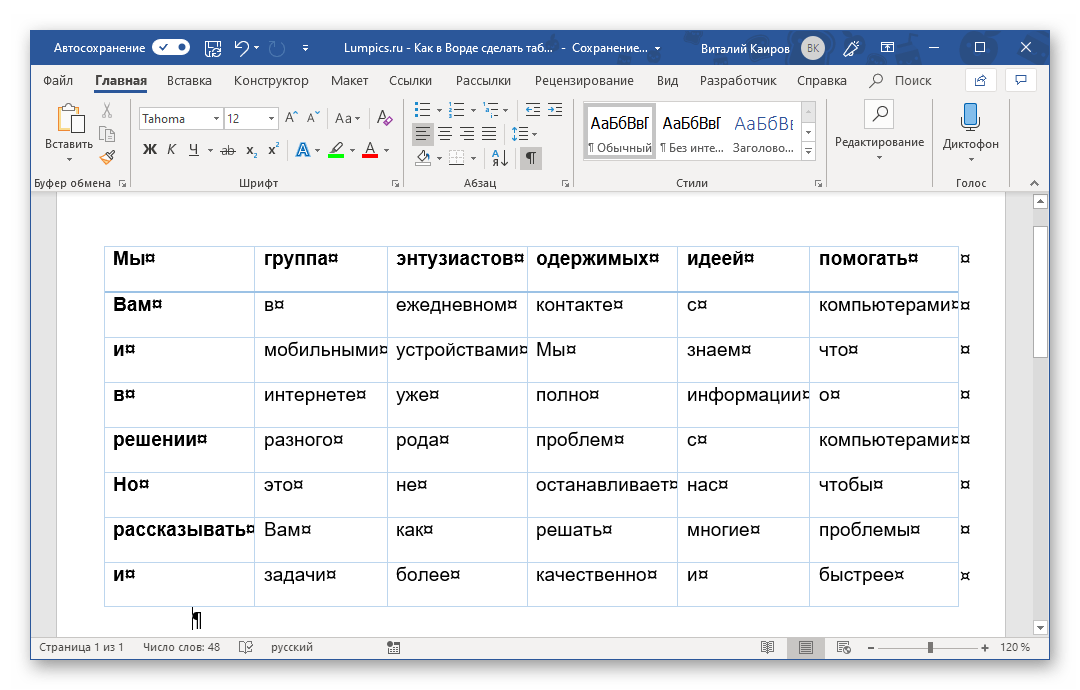
Все рассмотренные нами выше способы позволяют создать таблицу, которая в дальнейшем будет заполняться необходимыми данными. Но что, если требуется пойти от обратного – то есть данные уже имеются, и теперь их нужно преобразовать в таблицу? Microsoft Word предоставляет нам с вами и такую возможность, а именно, программа позволяет преобразовать текст в таблицу. Проще всего таким образом представлять списки (чаще – маркированные), но это далеко не единственное применение функции.
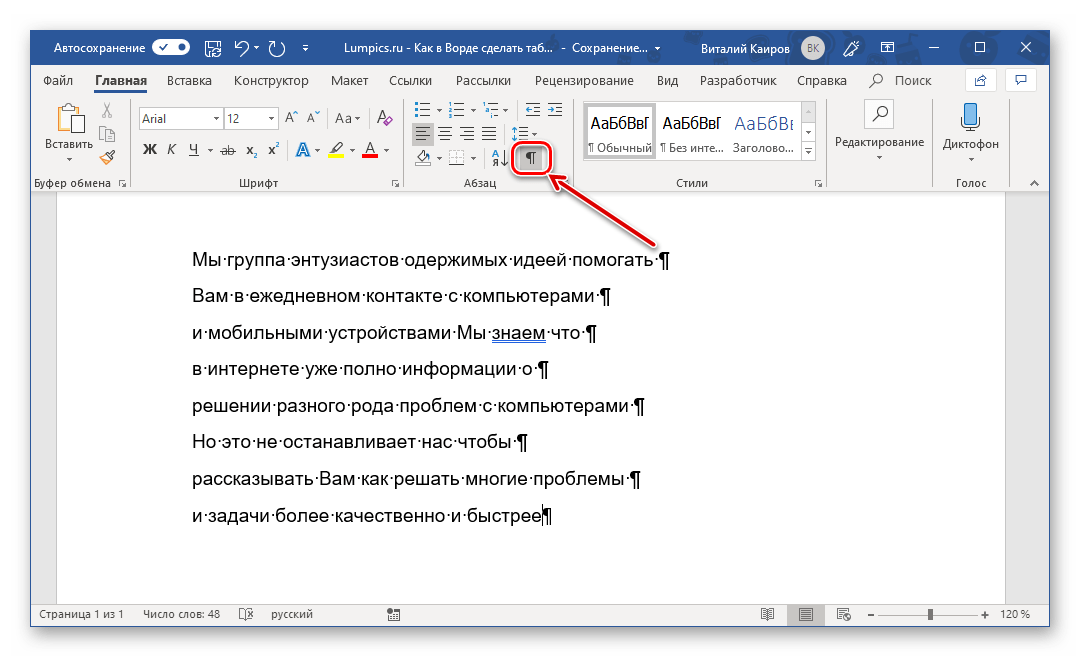
- Для того чтобы начать перевоплощение уже имеющегося текста в таблицу, необходимо включить отображение скрытых символов. Сделать это можно путем нажатия показанной на изображении ниже кнопки (вкладка «Главная», группа инструментов «Абзац») или закрепленной за ней комбинацией клавиш – «CTRL+*».

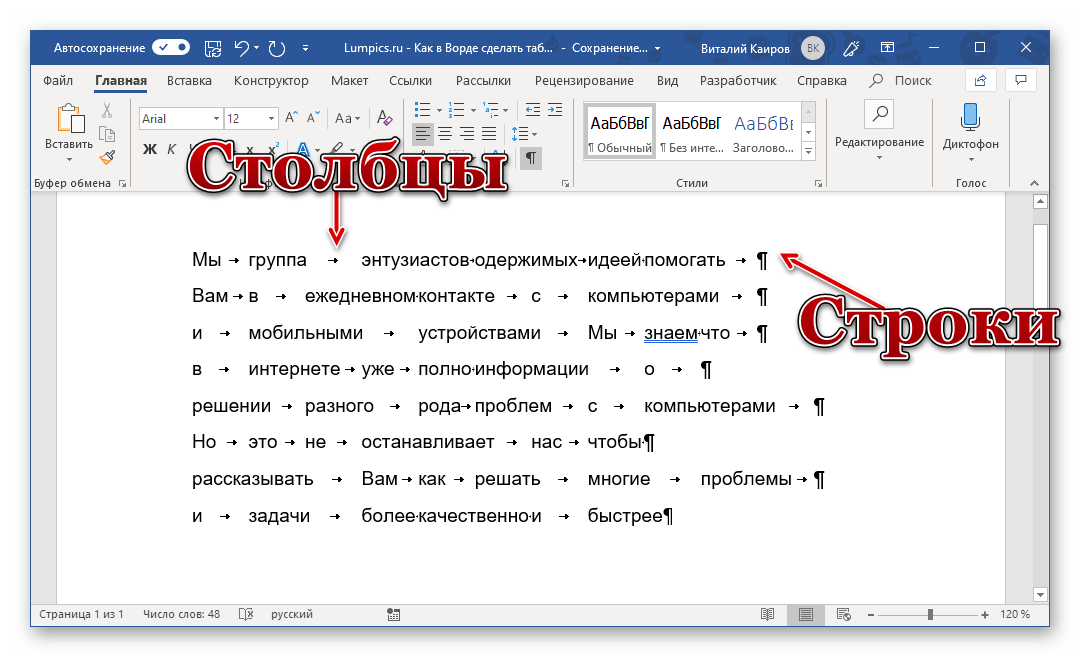
Читайте также: Отображение скрытых символов в Ворде - Теперь нам с вами требуется указать места разбивки будущей таблицы на столбцы. Для этого нужно вставить соответствующие знаки разделения, коими могут быть запятые, табуляция или точка с запятой, а также любой другой произвольный символ. Но, так как обычный текст чаще всего уже содержит запятые, для разделения будущих элементов таблицы лучше использовать знаки табуляции, что мы и сделали в нашем примере (скриншот в следующем пункте).
- С разделением текста на строки все проще – скорее всего, он уже правильно записан, а значит, и разделен (особенно, если это список или то, что таковым может стать). Знаки абзацев (буква «пи», такая же, как и кнопка вызова скрытых символов на панели инструментов), которые находятся в конце строки, и будут служить этим самым указателем на разбивку.
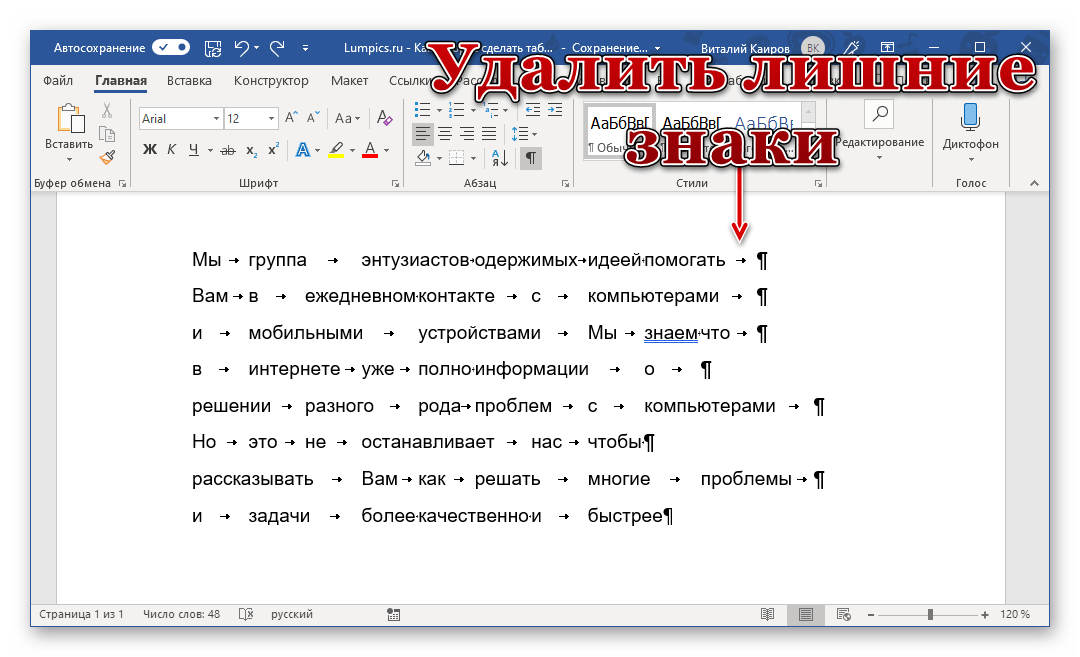
Примечание: Обязательно проследите за тем, чтобы в конце строк не было лишних символов-разделителей, а если таковые будут обнаружены, обязательно удалите их. Если там будет стоять и, например, знак табуляции, и знак абзаца, один (последний) столбец таблицы будет лишним и пустым.
Если же таковых в тексте еще нет или они есть не везде, просто кликните ЛКМ в конце строки, установив туда каретку (указатель курсора), и нажмите «ENTER» для переноса остального текста на следующую строку. Это же проделайте в конце каждой последующей строки, чтобы перенести ту, что идет за ней. То есть одна строка текста с нажатым в ее конце «ENTER» — это одна строка будущей таблицы
Примечание: На показанном выше примере знаки табуляции (указывающая вправо стрелка) обозначают будущие столбцы таблицы, а знаки абзаца — строки. Следовательно, в данной таблице будет 6 столбцов и 8 строк.
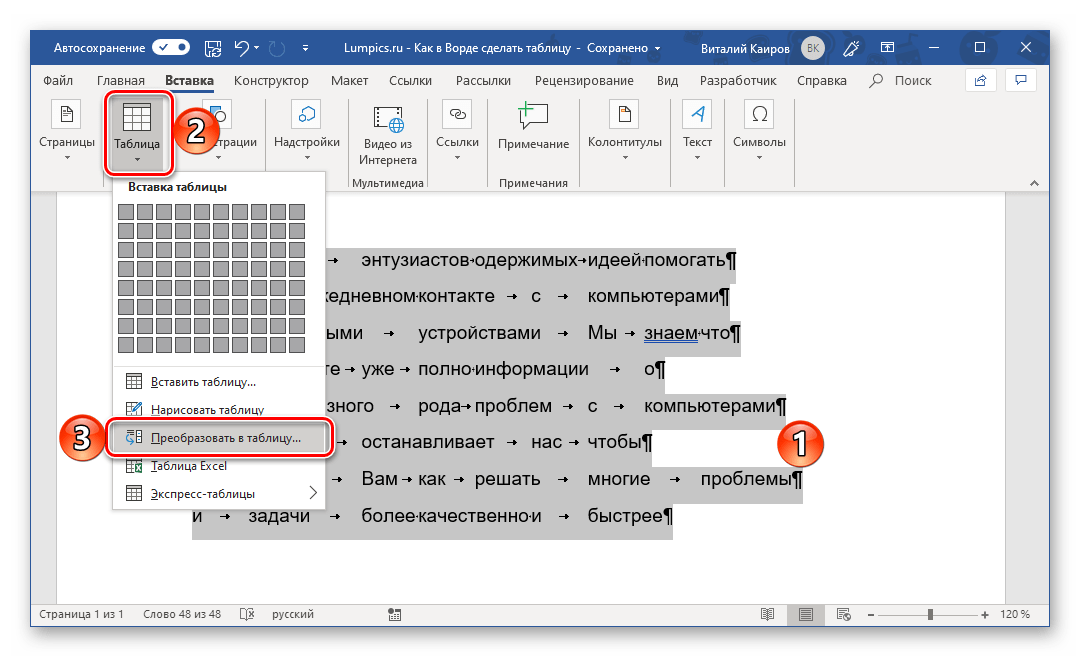
- Теперь выделите подготовленный текст и перейдите во вкладку «Вставка». Нажмите на значок «Таблица» и в открывшемся списке опций выберите пункт «Преобразовать в таблицу».
- Будет открыто небольшое диалоговое окно, в котором можно установить желаемые параметры для таблицы. Но, если до этого все было сделано правильно, основные из них будут определены автоматически.
Для закрытия диалогового окна «Преобразовать в таблицу» и непосредственного выполнения данной операции нажмите кнопку «ОК». Ниже показано то, что получилось в нашем примере.
Очевидно, что придется как минимум немного поиграться с размерами строк и столбцов и/или отдельных ячеек (либо с вариантом автоматического подбора размеров) для их выравнивания.
Дальнейшие действия по редактированию таблицы выполняются так же, как и в рассмотренных выше способах – с помощью инструментов группы вкладок «Работа с таблицами».
Осталось только отключить отображение скрытых символов в документе (это они отображаются в каждой ячейке таблицы сразу за текстом и за ее правой границей). Сделать это поможет следующая статья:
Подробнее: Как отключить непечатаемые символы в Ворде
Способ 6: Вставка и экспорт из Excel
Как известно, Word – это одно из нескольких приложений, входящих в пакет Microsoft Office. В составе этого же набора есть и табличный процессор Excel, который в значительно большей степени ориентирован на создание таблиц и работу с ними, чем рассматриваемый нами сегодня текстовый редактор. Ввиду тесной взаимосвязи компонентов офисного пакета от Майкрософт друг с другом, неудивительно, что практически любую таблицу, созданную в Эксель, можно буквально в несколько кликов перенести в Ворд. Сделать это можно с помощью простого копирования, специальной вставки или вставки из файла. Более подробно о каждом из доступных способов мы рассказывали в отдельной статье на нашем сайте.
Подробнее: Перенос таблицы из Excel в Word
Помимо экспорта таблицы из Эксель, в Ворд ее можно создать и самостоятельно (именно того вида, который они имеют в табличном процессоре от Майкрософт, а не как в рассмотренных выше случаях). Для этого:
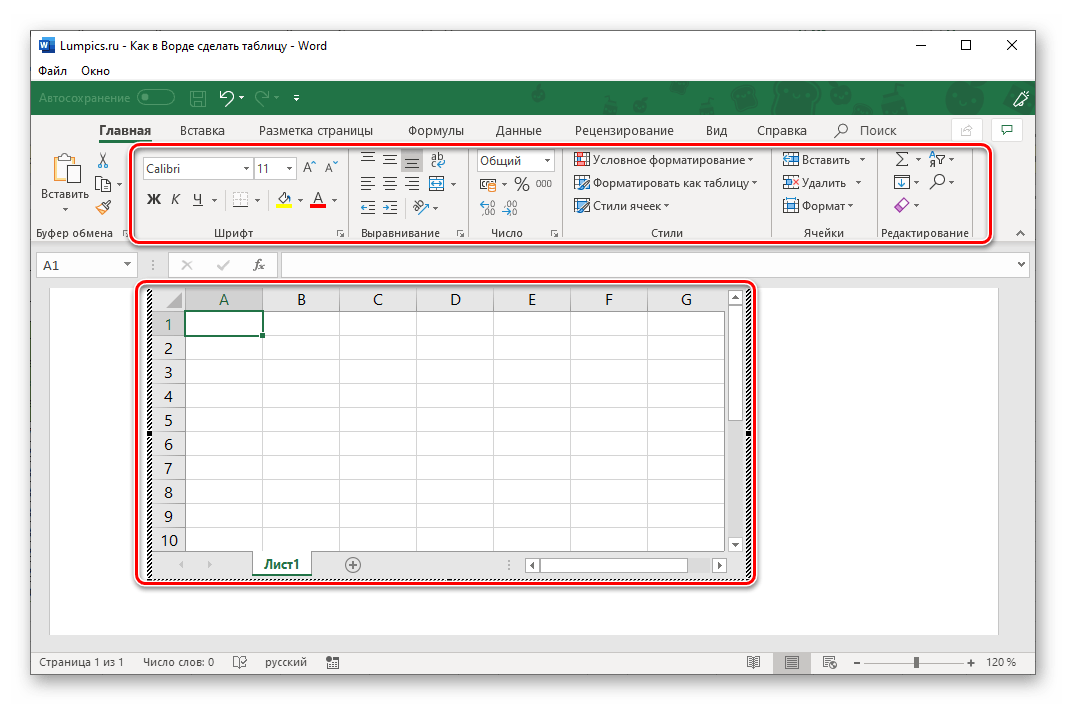
- Перейдите к меню вставки таблицы, нажмите по соответствующей кнопке и выберите пункт «Таблица Excel».
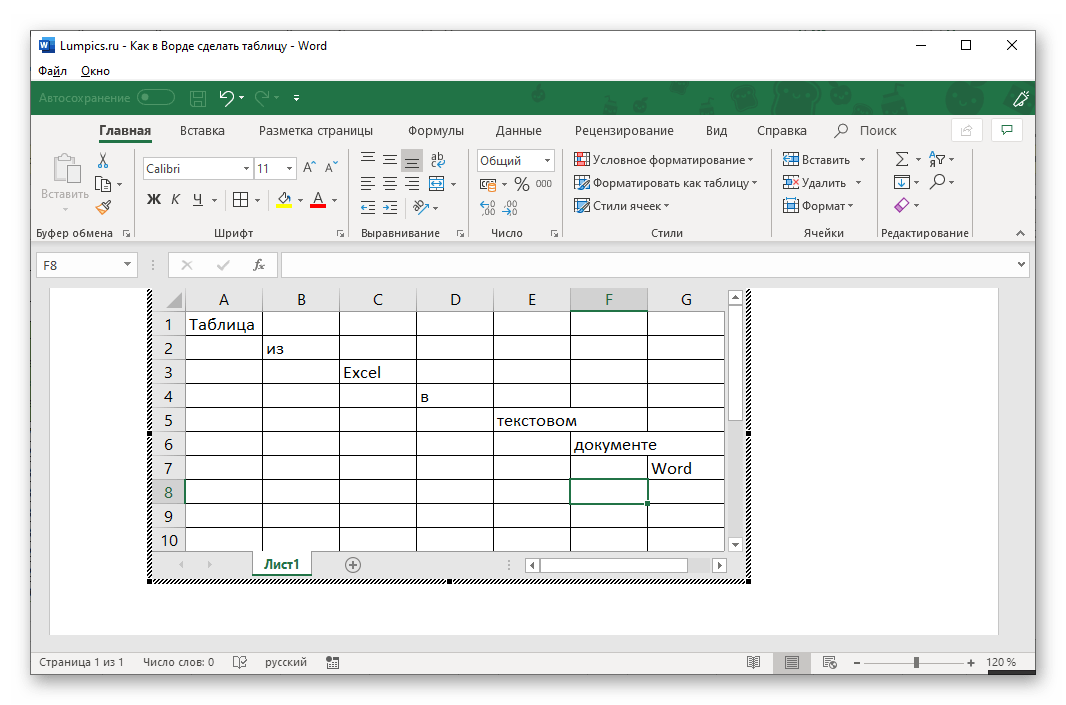
- В документе появится таблица, а точнее, лист из Эксель, сам же интерфейс Ворд (верхняя панель) преобразится и станет больше похож не на текстовый редактор, а на табличный процессор из пакета Майкрософт.
- Дальнейшие действия не отличаются от таковых в Excel, то есть вы просто создаете на листе таблицу желаемых размеров, заполняете, редактируете ее и форматируете, используя для всего этого уже не инструменты Word, а более продвинутый набор из Excel. Представленная по ссылке ниже инструкция поможет вам разобраться во всех нюансах.

Читайте также: Как создать таблицу в Microsoft Excel

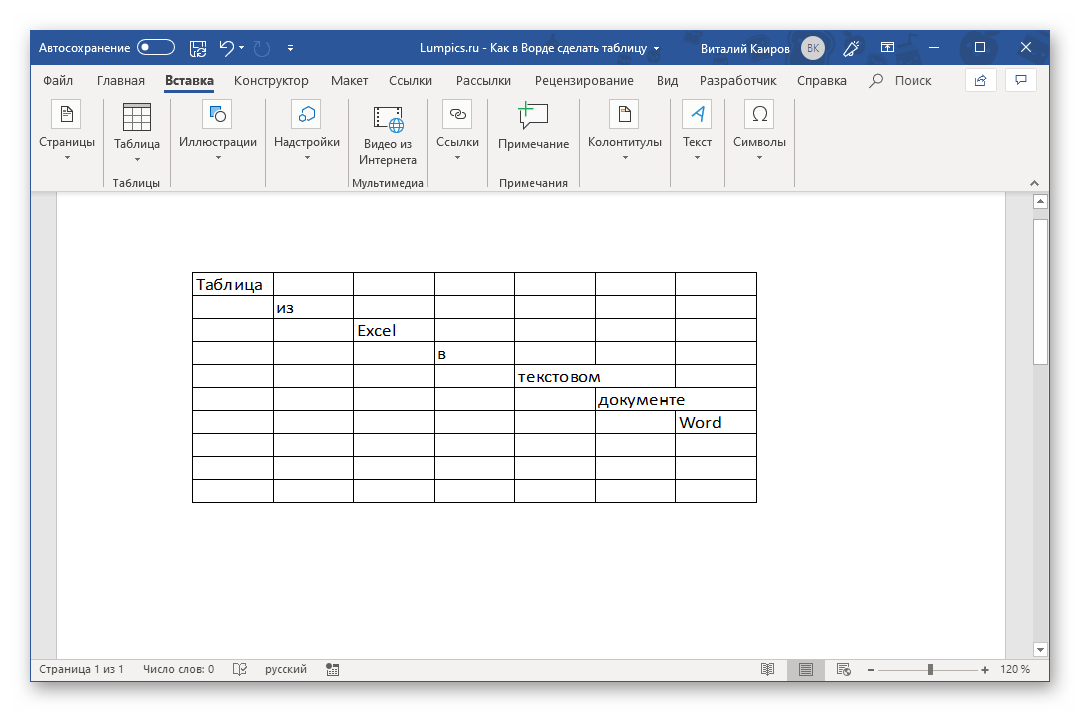
Для того чтобы выйти из режима работы с Эксель-таблицей, просто кликните по любому пустому месту на странице документа – перед вами снова появится привычный Ворд, но с несколько нетрадиционной для него таблицей.
Способ 7: Вставка таблицы из интернета
В арсенале Майкрософт Ворд есть довольно много стилей и шаблонов для создания и/или изменения, преобразования таблиц. Какая бы задача перед вами не стояла, какой бы идеей вы не вдохновлялись, вы всегда сможете придать созданной в текстовом редакторе таблице желаемый вид (в разумных пределах, так как для полноценной работы с таблицами все же следует обратиться к Эксель). Но бывает и так, что на таблицу оптимального вида вы наткнулись отнюдь не в библиотеке офисного приложения, а на просторах интернета или же вам просто потребовалось вставить опубликованную в вебе таблицу в текстовый документ. Сделать это довольно просто, то есть таблицу с сайта можно копировать, а затем вставить на нужную страницу. Правда, с ней придется еще немного поработать. О том, что именно потребуется делать в данном случае, мы ранее тоже писали.
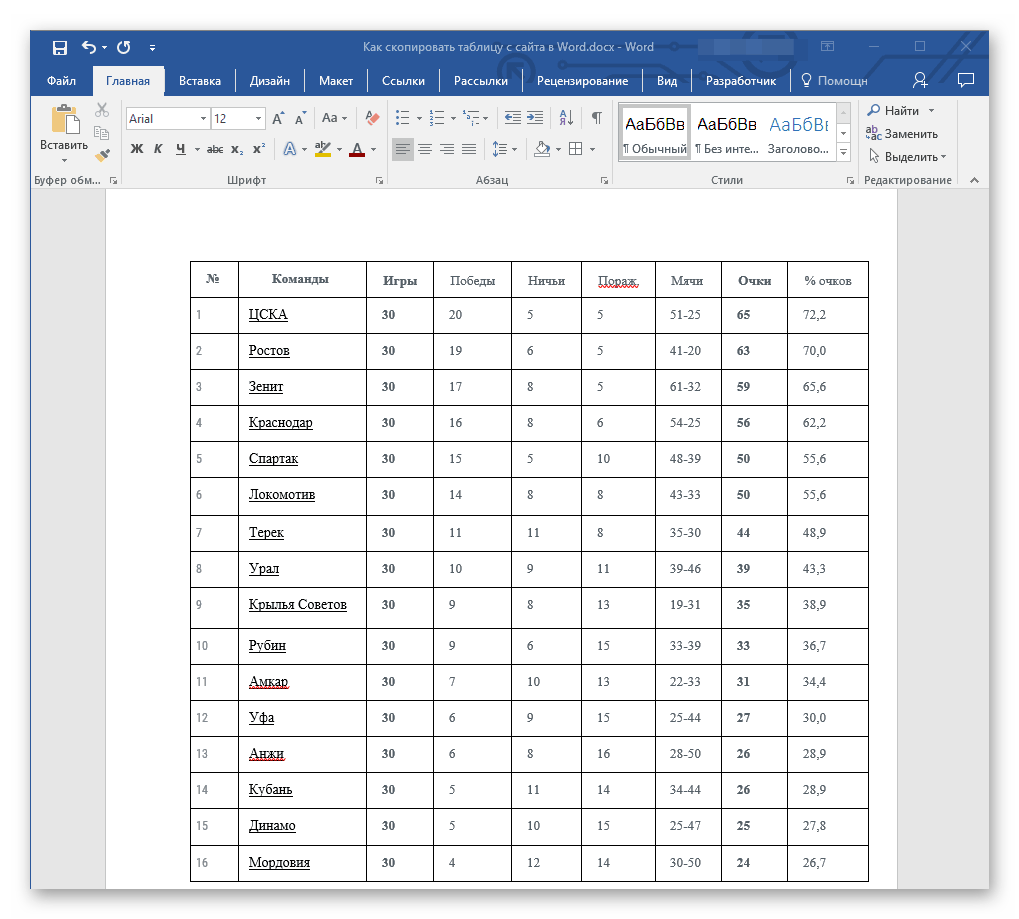
Подробнее: Копирование таблицы с веб-сайта в документ Word
Заключение
Ознакомившись с этой статьей, вы наверняка поняли, что Майкрософт Ворд предоставляет довольно широкие возможности для создания таблиц, и даже если в арсенале программы вы не найдете необходимые инструменты и/или функции, их можно добавить извне, просто вставив таблицу из Эксель или из интернета.

on
July 12, 2012, 12:43 AM PDT
A quick way to create a list of sequential numbers in Word
Creating a list of sequential numbers isn’t as difficult as it might sound at first. If you can create a table, you can create a list of sequential numbers.
 Creating a sequential list of numbers, in Word, sounds like an intimidating task. Sure, you can create a numbered list quickly enough, but that feature works with additional text – you’re numbering something. If you want a list of just numbers, you have to work a bit harder. Word’s SEQ field might come to mind, but that solution is better suited to template-type numbering. In order words, this field works great if you’re numbering documents, labels, and so on. It doesn’t work so well if you just want to create a list of sequential numbers. You can use it that way, but it’ll be more work than it’s worth.
Another way
Instead of working harder than you need to, insert a one-column table with as many rows as necessary to accommodate your list. Then, using Word’s numbering feature, number that column. Finally, convert the table to text. The resulting list is a fixed numbered list, so you’ll have to live with its limitations; when you can do so, this method definitely beats most alternative solutions.
To illustrate this simple technique, we’ll create a sequential list from 1 to 100. First, we need to insert a table with one column and one hundred rows:
- Position your cursor where you want the table.
- Click the Insert tab. Then, choose Insert Table from the Table dropdown in the Tables group. In Word 2003, choose Insert from the Table menu and then choose Table.
- In the resulting dialog, enter 1 in the Number Of Columns field and 100 in the Number Of Rows field.
- Click OK. The resulting table will have one column and one hundred rows.
The next step is to number the column, as follows:
- Select the table by clicking the Table Selector (the small square in the table’s top-left corner that I’ve circled in the figure above).
- Click the Home tab.
- Click Numbering in the Paragraph group. In Word 2003, Numbering is on the Formatting toolbar. At this point, you have a one-column table with one hundred rows displaying a sequential list of 1 to 100.
Converting the table to text is the last step:
- With the table selected, click the contextual layout tab. Then, choose Convert To Text in the Data group. In Word 2003, choose Convert from the Table menu, and then select Table To Text.
- In the resulting dialog, click OK, as the table uses paragraph marks to denote columns by default. You now have a numbered list, but no table or list items-just numbers.
The results is a numbered list and as such, has the same pros and cons. For instance, you can quickly remove the period character following each number and the indention property, as follows:
- Right-click anywhere in the list, choose Numbering from the resulting context menu and then choose Define New Number Format.
- In the Number Format field, delete the period character.
- From the Alignment dropdown, choose Right.
- Click OK.
You can change the numbers in the list by restarting the sequence or by specifying a new start number. You can change the list’s style. You can do anything to this list that you can do to a normal numbered list because it is a numbered list, with one exception: the list, while easy to format, is fixed. If you delete an item, the list updates accordingly, but I haven’t found a way to add numbers.
-
Software
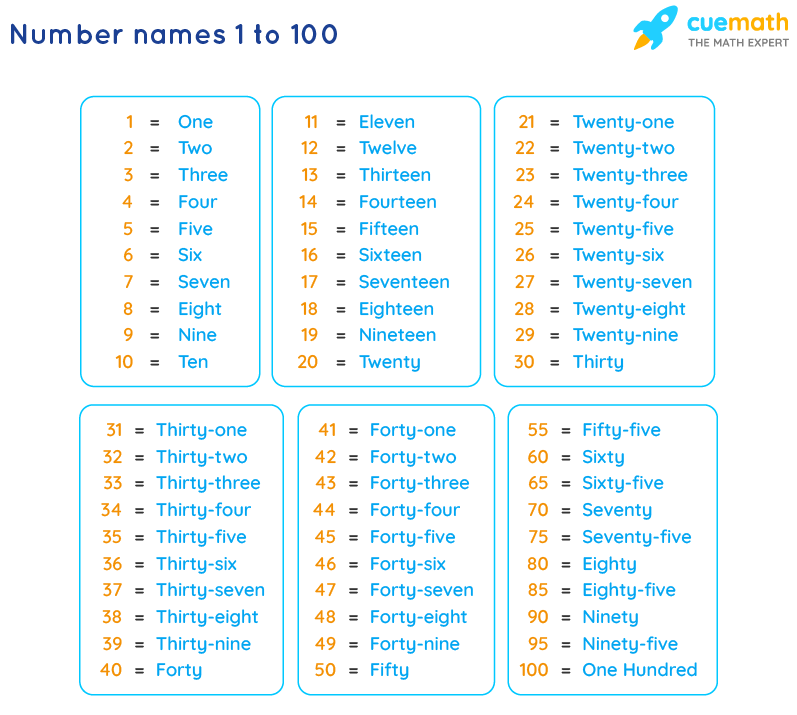
Number names 1 to 100 means writing numbers 1 to 100 in words. When students learn counting 1 to 100, it also helps them learn one to hundred spellings in English. A few examples of number names 1 to 100 are given as follows. For example, 98 is written as Ninety-eight, 57 is written as Fifty-seven, 45 is written as Forty-five, and so on. In this article, we have simplified all the rules that are to be followed while writing 1 to 100 number names.
| 1. | Number Names 1 to 100 Chart |
| 2. | Numbers in Words 1 to 100 |
| 3. | Rules to Write 1 to 100 Number Names |
| 4. | Numbers in Words 1 to 100 Examples |
| 5. | FAQs on Number Names 1 to 100 |
Number Names 1 to 100 Chart
The following figure shows a printable number names 1 to 100 chart to help kids with 1 to 100 spellings in English. To make the students learn this easily, they can be prompted to call out numbers in their day-to-day life referring to the objects that they see around them. This chart helps the students memorize one to hundred in words.
Numbers in Words 1 to 100
The number names chart from 1 to 100 can help kids learn how to write any number from 1 to 100 in words if its numeric form is given. Learning numbers one to hundred in English requires a little practice, but once the students recite one to hundred spellings on a regular basis, they never forget them. The following table has 1 to 100 spellings in English and learning these is beneficial for students in higher grades.
List of Number Names from 1 to 100
Observe the following table which shows numbers one to hundred in English.
| 1 = One | 2 = Two |
| 3 = Three | 4 = Four |
| 5 = Five | 6 = Six |
| 7 = Seven | 8 = Eight |
| 9 = Nine | 10 = Ten |
| 11 = Eleven | 12 = Twelve |
| 13 = Thirteen | 14 = Fourteen |
| 15 = Fifteen | 16 = Sixteen |
| 17 = Seventeen | 18 = Eighteen |
| 19 = Nineteen | 20 = Twenty |
| 21 = Twenty-one | 22 = Twenty-two |
| 23 = Twenty-three | 24 = Twenty-four |
| 25 = Twenty-five | 26 = Twenty-six |
| 27 = Twenty-seven | 28 = Twenty-eight |
| 29 = Twenty-nine | 30 = Thirty |
| 31 = Thirty-one | 32 = Thirty-two |
| 33 = Thirty-three | 34 = Thirty-four |
| 35 = Thirty-five | 36 = Thirty-six |
| 37 = Thirty-seven | 38 = Thirty-eight |
| 39 = Thirty-nine | 40 = Forty |
| 41 = Forty-one | 42 = Forty-two |
| 43 = Forty-three | 44 = Forty-four |
| 45 = Forty-five | 46 = Forty-six |
| 47 = Forty-seven | 48 = Forty-eight |
| 49 = Forty-nine | 50 = Fifty |
| 51 = Fifty-one | 52 = Fifty-two |
| 53 = Fifty-three | 54 = Fifty-four |
| 55 = Fifty-five | 56 = Fifty-six |
| 57 = Fifty-seven | 58 = Fifty-eight |
| 59 = Fifty-nine | 60 = Sixty |
| 61 = Sixty-one | 62 = Sixty-two |
| 63 = Sixty-three | 64 = Sixty-four |
| 65 = Sixty-five | 66 = Sixty-six |
| 67 = Sixty-seven | 68 = Sixty-eight |
| 69 = Sixty-nine | 70 = Seventy |
| 71 = Seventy-one | 72 = Seventy-two |
| 73 = Seventy-three | 74 = Seventy-four |
| 75 = Seventy-five | 76 = Seventy-six |
| 77 = Seventy-seven | 78 = Seventy-eight |
| 79 = Seventy-nine | 80 = Eighty |
| 81 = Eighty-one | 82 = Eighty-two |
| 83 = Eighty-three | 84 = Eighty-four |
| 85 = Eighty-five | 86 = Eighty-six |
| 87 = Eighty-seven | 88 = Eighty-eight |
| 89 = Eighty-nine | 90 = Ninety |
| 91 = Ninety-one | 92 = Ninety-two |
| 93 = Ninety-three | 94 = Ninety-four |
| 95 = Ninety-five | 96 = Ninety-six |
| 97 = Ninety-seven | 98 = Ninety-eight |
| 99 = Ninety-nine | 100 = One hundred |
☛ Download Number Names 1 to 100 Chart
We have provided a downloadable reference sheet with the above information in an easy-to-print format. Students can practice 1 to 100 spellings for a better understanding of the decimal number system.
Rules to Write 1 to 100 Number Names
There are certain rules that can be followed while writing one to hundred spellings. These rules are explained here in detail.
Rule 1: For numbers 1-20, we can directly refer to the chart of number names 1 to 100 given above because these numbers from 1 to 20 have unique number names and spellings. For example, the number name of 4 is Four, the number name of 11 is Eleven, the number name of 18 is Eighteen, and so on.
Rule 2: After the number name of 20, we should understand the pattern that is followed. Once we understand the pattern in which the number names are written it becomes easy for us to teach the students. For example, if we count the twenty series, we have twenty-one, twenty-two, twenty-three, and so on. Similarly, when we start with the thirty series, we have thirty-one, thirty-two, thirty-three, and so on. This rule applies up to 99 and then we reach 100 — Hundred.
Cuemath is one of the world’s leading math learning platforms that offers LIVE 1-to-1 online math classes for grades K-12. Our mission is to transform the way children learn math, to help them excel in school and competitive exams. Our expert tutors conduct 2 or more live classes per week, at a pace that matches the child’s learning needs.
Numbers in Words 1 to 100 Examples
-
Example 1: Write the number name for 78.
Solution:
Referring to the 1 to 100 spellings, we know that 78 is written and read as seventy-eight.
-
Example 2: What is the number name for 97?
Solution:
According to the chart of 1 to 100 number names, 97 is written as ‘ninety-seven’ in words.
-
Example 3: How to Write 19 in Words?
Solution:
The chart of 1 to 100 in words says that 19 is written as ‘nineteen’ in words.
go to slidego to slidego to slide
FAQs on Number Names 1 to 100
What do Number Names 1 to 100 Mean?
Number names 1 to 100 are the cardinal numbers from 1 to 100 written in their word form. To write 1 to 100 in words, we use the place value ones, tens, and hundreds. For example, 39 is written as ‘Thirty-nine’.
How to Write Numbers in Words 1 to 100?
To write number names from 1 to 100, we follow certain rules. The given number is written in the expanded form, i.e., 89 = 80 + 9. Then, write and combine the respective names of all the addends using the general rules, as shown below, 80 + 9 = Eighty-nine. Referring to the chart of number names 1 to 100, the students can start reciting and revising them on a regular basis. This will help them learn all one to hundred spellings easily.
How to Teach One to Hundred in Words?
One to hundred in words can be taught to students using the following techniques:
- Download or make a chart of the number names from 1 to 100. Paste this chart at a place where the child can see it frequently, or, perhaps where he usually studies. This will help him/her go through the spellings on a regular basis and help him learn one to hundred spellings.
- Split each spelling into 2 parts. For example, 18 is written as eighteen. This can be split as EIGHT and TEEN. Similarly, 30 is written as thirty. This can be split as THIR and after a pause, TY.
- The child can be made to read it aloud and then write the spelling to learn it.
- Another way in which we can teach students is to create a game of ‘fill in the blanks’ for the spellings. For example, 30 — TH _RT_ . Similarly, for 15 — FI_TE_N.
- Try to go according to the learning capacity of the students. Let them learn 2 number names in a day, then, gradually shift to 3 numbers in a day.
How to Write the Number Names from 44 to 49?
Referring to the chart of number names 1 to 100, the numbers in words from 44 to 49 can be written as follows:
- 44 — Forty-four
- 45 — Forty-five
- 46 — Forty-six
- 47 — Forty-seven
- 48 — Forty-eight
- 49 — Forty-nine
How to Write 1 to 100 Spellings in English?
To make the children write 1 to 100 spellings in English, the following tips can be used:
- Let the children speak aloud and write each number along with its number name at least twice. For example, as you make them write 3 — three, ask them to speak it loudly using the letters T — H — R — E — E
- Understand the grasping and learning capability of the student and make them learn 2 number names in one day and then increase the number gradually.
- Make or download a number names chart of 1 to 100 and stick it in a place where it is always visible to the child. This will help the students frequently glance at the spellings even at times when they are not studying. A downloadable and printable chart of number names from 1 to 100 is given above on this page for reference.
What are One to Hundred Spellings in English?
One to hundred spellings are the number names of numbers from 1 to 100. When the numbers from 1 to 100 are expressed in words, they are written as follows:
1 — One, 2 — Two, 3 — Three, 4 — Four, 5 — Five, 6 — Six, 7 — Seven, 8 — Eight, 9 — Nine, 10 — Ten, 11 — Eleven, 12 — Twelve, 13 — Thirteen, 14 — Fourteen, 15 — Fifteen, 16 — Sixteen, 17 — Seventeen, 18 — Eighteen, 19 — Nineteen, 20 — Twenty, and so on. A complete list of 1 to 100 spellings in English are given above on this page for reference.
How to Teach Counting 1 to 100?
Counting 1 to 100 becomes easy if the correct techniques are followed. Students can also learn one to hundred spellings with the help of a few simple methods given below:
- As we start from number names 1 to 20, we know that this particular set has unique number names. So, these spellings can be taught to students by asking them to split each spelling into 2 parts. For example, we know that 16 is written as sixteen. So, we can split and make the kids learn it as SIX and TEEN.
- After the number name of 20, make the students understand the pattern that is followed, and then it becomes easier for them to learn. For example, the series of twenty has twenty-one, twenty-two, twenty-three, and so on, then the series of thirty comes as thirty-one, thirty-two, thirty-three, and so on.
- Ask the child to read the spellings aloud at least twice and then write the spelling to learn it.
- Let the child prepare a colorful chart on his own and write the 1 to 100 spellings in it. Paste this chart near his study area, so that he gets motivated to see it and eventually as he looks at the spellings frequently, he will be able to memorize it easily.
Tables are visual displays of data arranged in rows and columns. Table cells contain numbers, text, or a combination of numbers and text. Some cells can include images, symbols, links, and other objects. See how to create and modify tables in Word.
Each table should be referenced in the document content. Typically, tables have a number and a title, which are referenced. Microsoft Word offers functionality to create automatically updated numbers for figures, tables, and equations. The numbers and titles, created using the Captions functionality, are used to cross-reference tables in a document and create a List of Tables.
The word Table and a number identify a table then follows the caption. A caption is a short block of text that explain table contents without referring to the document content:

See more about creating numbers and captions for figures: images, pictures, charts, etc., creating captions for equations, and creating captions for photographs.
Attention! We highly recommend checking the formatting requirements, accepted by your college, university, company, or established on the project, etc.
Insert a caption for tables
To add automatically updated numbers and a title (caption) for a table, select it by:
- Selecting all rows or columns of the table one by one, or
- Moving the mouse over the table until you see the table selection icons in the upper-left corner of the table and clicking it:

Note: You can also click on the table selection icon in the bottom-right corner for the same effect. See how to select table elements for more details.

After selecting a table, do one of the following:
- On the References tab, in the Captions group, click the Insert Caption button:

- Right-click on the selection and select the Insert Caption… in the popup menu:


In the Caption dialog box:

Select the label and its position
- Under Options:
- From the Label dropdown list, select the item type you need:

- Table,
- Equation – see how to create captions for equations,
- Figure (selected by default) — see how to create captions for figures,
- Another label (in this example, My Caption) was created using the New Label… button (see how to create a new label below).
Note: Remember that each type of object you labeled will be numbered sequentially within its group.
- From the Position dropdown list, select one of the options:
- Above selected item (selected by default for the Table label), or
- Below selected item (selected by default for the Figure label).
Note: The captions for tables are usually located above the tables.
- From the Label dropdown list, select the item type you need:


Exclude label from caption
- Select the Exclude label from caption check box if you don’t need to add the label to the caption:
Some requirements recommend using the lowercase word table instead of the automatically added Table in Word cross-references.
The option Exclude label from caption hides the label from being displayed in cross-references or a List of Tables.
For example:
- When you insert a cross-reference with the selected option Entire captions or Only label and number (see more details how to use cross-references in Word), Word adds the capitalized label and number, as you see in the Caption field of the Caption dialog box. E.g., “are listed in Table 3” or “are listed in Table 3 Number of articles by statuses and products”.
- All captions, created with selected option Exclude label from caption, Word adds in cross-references as their numbers without the labels. Type the word table (as required) and insert a reference to a caption (e.g., “are listed in table 3”).

Add a new label
- Click the New Label… button to create a new label:
In the New Label dialog box, type a new label name:


Note: See also how to delete a custom label.
Modify caption numbering
- Click the Numbering… button if you want to change any of the numbering options:
In the Caption Numbering dialog box:

- In the Format dropdown list, select the numbering format you need (some requirements recommend using Latin capital letters instead of numbers for tables):
- Select the Include chapter number check box to include the chapter number in the caption number. After selecting this option, two more options will be unlocked:
- From the Chapter starts with style dropdown list, select the heading level you need to include in the caption:
- In the Use separator dropdown list, select the punctuation you need to insert between the chapter number and the table number:
- At the bottom of the dialog box, see how your choices will look in the Examples section. E.g., Table 2.3” means the third table in chapter 2.
- Click the OK button.
- From the Chapter starts with style dropdown list, select the heading level you need to include in the caption:


Add a title
- To add the text of your caption, click after the table number and enter the text. E.g.:

Notes:
- There are several standard requirements for table titles:
- Chicago style recommends using the table title in line with the label and number. E.g.:

- In opposite, APA (American Psychological Association) and MLA (Modern Language Association) styles recommend using the table title with one double-spaced line below the table number (see how to adjust line spacing). E.g.:

To create such a title, don’t type any text in the Caption field, leave it, then do the following:
- Create a caption without a title.
- Position cursor after a caption number and add a new line (by pressing Shift+Enter) in which type of title you need.
Note: You can press Enter and create a new paragraph instead of a new line. See how to create a List of Tables (Table of Figures) for more details.
- Format the caption to adjust line spacing (see how to change caption line spacing).
- In addition, MLA style recommends using a hanging indent to the second line of long titles. E.g.:

- Chicago style recommends using the table title in line with the label and number. E.g.:
- Word offers very helpful functionality to create a text that can be displayed in a List of Tables instead of a caption text. See how to create a Table of Contents Entry.
- For most requirements, the number and the title should be without an ending period. If you need a period after a number, type it in the Caption field.
- If a table spans more than one page, the first page of that table should have a complete caption; the subsequent pages should have an abbreviated caption consisting of a label, a number, and the word Continued. E.g., “Table 3. Continued”.


Using an AutoCaption
See Adding captions with AutoCaption.
Group a table and its caption
According to all requirements, a table (or its part) with its caption should appear on the same page. Word adds captions for tables as a regular paragraph with selected Keep with next option. See how to keep lines and paragraphs together for more details.
See also how to keep a table row on one page and keep a table on one page of a Word document.
Edit or modify a caption
Microsoft Word adds numbers in captions as fields.
![]()
You can show all fields in a document with a gray background, see how to turn on or turn off highlighting of fields in a Word document.
- Labels:
If needed, you can change the label. Word for Microsoft 365 will update the reference if available. In this case, Word will not create a new label and a separate numbering. Be careful!
- Numbers:
DO NOT edit caption numbers! If you change a number:
- In some cases, Word will update it, and you will lose your changes,
- Otherwise, the caption number may stop updating automatically.
- Text:
To add or modify a caption text, click on it and change what you need, like in a regular paragraph.
Do not forget to format a caption according to the requirements you use!
Delete a caption and an unnecessary label
If you need to remove some caption, select the caption paragraph (full line or several lines) and press Delete. Do not forget to update fields in the document!
To remove the unnecessary label, do the following:
1. Open the Caption dialog box.
2. In the Label dropdown list, select the label you want to remove.
3. Click the Delete Label to remove a custom label:

Note: You can’t delete predefined labels: Equation, Figure, and Table.
Update caption numbering
Word automatically updates references and numbering if you insert a new text. However, copying, deleting, or moving context often leads to confusion in the document. After such operations, you have to update all dependencies manually.
To update fields in the document, select the entire document by clicking Ctrl+A, and do one of the following:
- Press F9,
- Right-click on any of the fields and select Update Field in the popup menu:


Word will update all fields. You can be sure that the numbering and references are correct.
We strongly recommend checking a document at least visually after changes!