
A margin is the empty space between a document’s contents and the edges of the page. Docs’ default margins are 1 inch on each side of the page, but you can change the margins to accommodate the needs of your document.
Contents
- 1 How do you put 1 inch margins on Microsoft Word?
- 2 How many cm is 1 inch margins?
- 3 How do you put 1 margins on Google Docs?
- 4 What is standard margin?
- 5 How many margins are on a page?
- 6 Are 1 inch margins standard on Google Docs?
- 7 How do you know if your paper has 1 inch margins Google Docs?
- 8 What is document margin?
- 9 How do you margin a paper?
- 10 How do I know if my margins are 1 inch?
- 11 How do you do 2.5 margins in Word?
- 12 Where is margin in Google Docs?
- 13 How do I calculate margin?
- 14 Do resumes have to have 1 inch margins?
- 15 What is go in margin?
- 16 What’s a margin in business?
- 17 What does no margin mean?
- 18 Is gutter a margin?
- 19 What size are narrow margins?
- 20 What is an example of a margin?
How do you put 1 inch margins on Microsoft Word?
To set the top margin of all other pages to 1 inch:
- At least one line down from the top of Page 1, place cursor before or after any text in the order.
- Click Page Layout > Margins > Custom Margins.
- In the Page Setup Window, change the top margin to 1 inch.
- Select “This point forward” from the Apply to selection box.
- Click Ok.
How many cm is 1 inch margins?
2.54 cm
Note: Be careful, 1 cm = 0.3937 inch and 1 inch = 2.54 cm. By default, Word uses 1-inch margins and 2.5 cm.
How do you put 1 margins on Google Docs?
How to Set One Inch Margins in Google Docs
- Go to the File menu of your document.
- Click on Page Setup.
- A new window will open. Enter all four margin values as one.
- Press OK to apply and save changes.
What is standard margin?
The Business Dictionary defines standard margin as the balance remaining after deducting standard costs from a company’s sales.They include employee salaries, utility bills, phone bills, insurance, and fuel and vehicle maintenance costs for a business that ships or delivers products.
How many margins are on a page?
Page margins should be consistent throughout the text. Required Margins: The top, bottom, and right margins are required to be 1 inch, but the left margin can either be 1 inch or 1.25 inches.
Are 1 inch margins standard on Google Docs?
The default margins are set to one inch on each side. However, you can change them by clicking Set as Default after you change the margins. The default margins take effect whenever you create a new document. They will not affect existing documents.
How do you know if your paper has 1 inch margins Google Docs?
Note the ruler that appears near the top of the page. A slider appears on the ruler. Its position marks the document’s left margin. For instance, if the ruler’s position is at “1,” your document’s left margin is one inch.
What is document margin?
Margins are the blank spaces that line the top, bottom, and left and right sides of a document. They are important because they help make a document look neat and professional.You can change each of the four margins in the dialog box that appears.
How do you margin a paper?
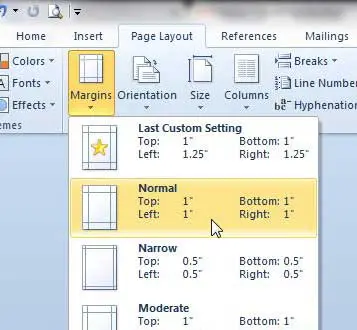
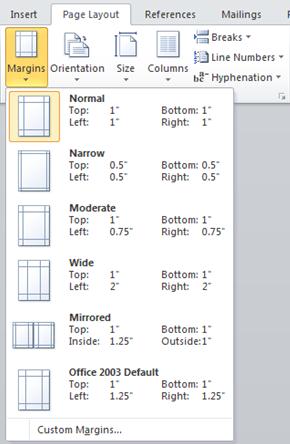
On the Page Layout tab, in the Page Setup group, click Margins. Click the margin type that you want. For the most common margin width, click Normal. Note: When you click the margin type that you want, your entire document automatically changes to the margin type that you have selected.
How do I know if my margins are 1 inch?
To be sure you have the margins set to 1-inch:
- Click on the Page Layout tab.
- Click on Margins to see a drop-down menu.
- Make sure Normal is selected.
How do you do 2.5 margins in Word?
Change margins in your document to change the layout and make sure everything fits. Select Layout > Margins. Select the margin measurements you want.
Change default margins
- Select Layout > Margins > Custom Margins.
- Set your margins.
- Select Set As Default.
- Confirm your selection.
Where is margin in Google Docs?
Set the Top, Bottom, Left, and Right Margins
Navigate to Google Docs and open a new or existing document. Select File > Page setup. Under Margins, set the Top, Bottom, Left, and Right margins to whatever you want.
How do I calculate margin?
To calculate your margin, use this formula:
- Find your gross profit. Again, to do this you minus your cost from your price.
- Divide your gross profit by your price. You’ll then have your margin. Again, to turn it into a percentage, simply multiply it by 100 and that’s your margin %.
Do resumes have to have 1 inch margins?
Resume margins should be one-inch on all sides. The resume margins can be reduced if you need more space, but they shouldn’t be less than half an inch. If the margins are too small, your resume will look crowded and be hard to read.If you make margins on your resume too narrow, your document gets crammed with text.
What is go in margin?
*The go-in margin is the initial gross margin of the item, based on the calculated wholesale price. The actual gross margin can be affected by variances in country price lists. (Excluding customer discounts and such).
What’s a margin in business?
Margin, or profit margin, is a percentage that’s used to measure the profitability of your business after expenses have been deducted from revenues. While revenue provides a good preliminary indicator of how well your business is performing, to determine actual business profit, you must consider your expenses as well.
What does no margin mean?
Key Takeaways. Non-marginable securities are not allowed to be purchased on margin at a particular brokerage, or financial institution, and must be fully funded by the investor’s cash. Non-marginable securities are put in place to mitigate risks and control costs on stocks that are volatile.
Is gutter a margin?
The gutter margin is a typographical term used to designate an additional margin added to a page layout to compensate for the part of the paper made unusable by the binding process. In a facing pages layout (Word refers to this type of layout as “mirror margins”), the gutter margin is on the very inside of both pages.
What size are narrow margins?
Narrow space is 0.5 inches all around while moderate is 1 inch at the top and bottom, 0.75 on the sides. As you change the margin size, you will discover other options and their sizes.
What is an example of a margin?
Understanding Margin
For example, if you have an initial margin requirement of 60% for your margin account, and you want to purchase $10,000 worth of securities, then your margin would be $6,000, and you could borrow the rest from the broker.
In schools and offices, the documents (assignments & reports) to be submitted are expected to follow a specific format. The specificity can be in terms of the font and font size, line and paragraph spacing, indentation, etc. Another common requirement with Word documents is the margin size on all sides of the page. To those unaware, margins are the empty white space you see before the first word and after the last word of a completed line (the space between the edge of the paper and the text). The amount of margin size maintained indicates to the reader if the author is a professional or an amateur.
Documents with small margins run the risk of printers trimming the initial and final words of every line while larger margins imply fewer words can be accommodated in the same line causing the overall number of pages in a document to increase. To avoid any mishaps while printing and provide a good reading experience, documents with 1-inch margins are considered optimal. The default margin size in Microsoft Word is set as 1 inch, although users do have the option to manually adjust the margins of every side.

Follow the below guide to change the margin size in your Word document:
1. Double-click on your word document to open it and consequently launch Word.
2. Switch to the Page Layout tab by clicking on the same.
3. Expand the Margins selection menu in the Page Setup group.

4. Microsoft Word has a number of predefined margins for various types of documents. Since a document with a 1-inch margin on all sides is the preferred format across many places, it is also included as a preset. Simply click on Normal to set 1-inch margins. The text will automatically readjust itself according to the new margins.

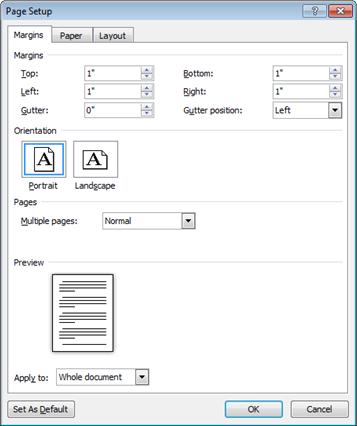
5. If you wish to only have 1-inch margins on some sides of the document, click on Custom Margins… at the end of the selection menu. A Page Setup dialogue box will come forth.

6. On the Margins tab, individually set the top, bottom, left, and right side margins according to your preference/requirement.

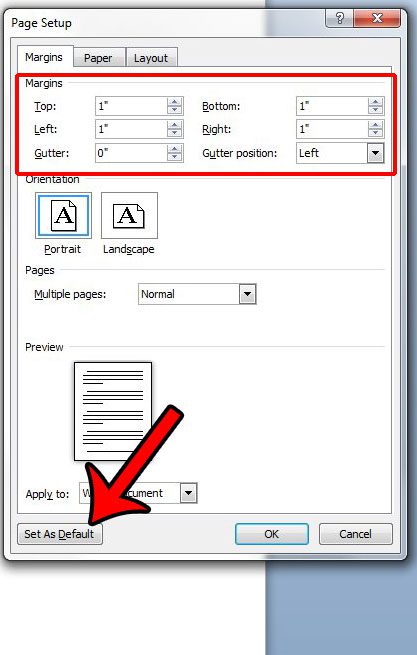
If you are going to print the document out and bind all the pages together either using a stapler or binder rings, you should also consider adding a gutter on one side. A gutter is extra empty space in addition to the page margins to ensure the text does not tuck away from the reader after bidding.
a. Click on the up arrow button to add a little gutter space and select the gutter position from the adjacent drop-down. If you set the gutter position to top, you will need to change the document orientation to landscape.
![]()
b. Also, using the Apply to option, select if you would like all pages (Whole document) to have the same margin and gutter space or only the selected text.

c. Preview the document after setting the gutter margins and once you are happy with it, click on Ok to apply the margin and gutter settings.
Also Read: How to Write Roman Numbers in Word
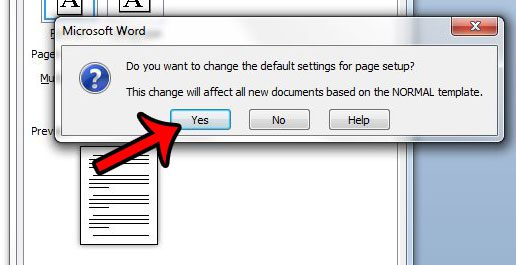
If your workplace or school requires you to print/submit documents with custom margins and gutter size, consider setting them as the default for every new document you create. This way you won’t have to worry about changing the margin size before printing/mailing the document. Open the Page Setup dialogue box, enter the margin and gutter size, select a gutter position, and click on the Set as Default button at the bottom-left corner. In the following pop-up, click on Yes to confirm and change the default page setup settings.

Another way to quickly adjust the margin size is by using the horizontal and vertical rulers. If you are not able to see these rulers, go to the View tab and check/tick the box next to Ruler. The shaded portion on the ends of the ruler indicates the margin size. Drag the pointer inwards or outwards to adjust the left and right side margins. Similarly, drag the shaded portion pointers on the vertical ruler to adjust the top and bottom margins.

Using the ruler one can eyeball the margins but if you need them to be accurate, use the Page Setup dialog box.
Recommended:
- How to Draw in Microsoft Word in 2021
- What are some of the best Cursive Fonts in Microsoft Word?
- How to Delete a Section Break in Microsoft Word
We hope this article was helpful and you were able to set up 1 inch margins in duplicate pages in Microsoft Word. you have any doubt or confusion regarding this article then feel free to write it down in the comment section.
If you are creating a document in Microsoft Word for school or work, then you might need to make sure that you are using one-inch margins in that document.
This is a requirement of institutions that utilize the MLA or APA style guides, and it can help to improve readability as well as provide a reader with space to write edits in the margins.
You can set 1 inch margins in a Microsoft Word document by clicking the Page Layout tab, selecting Margins, then choosing Normal.
- Click the Page Layout tab.
- Click the Margins button in the Page Setup section of the ribbon.
- Click the Normal option.
Our article continues below with additional information and pictures for these steps. We also discuss changing your Word settings so that all future new documents will have one inch margins by default.
Last update on 2023-04-13 / Affiliate links / Images from Amazon Product Advertising API
| As an Amazon Associate, I earn from qualifying purchases.
It’s common for schools or workplaces to have specific requirements for the documents that you create, and one of those requirements might involve margins.
Since Microsoft Word is still one of the most popular ways that you could create a document, that makes it likely that you will need to know how to set 1 inch margins in Word.
If you are in high school or college, then you have probably had to write a lengthy paper in Word 2010. Your teacher or professor probably also has a format that they prefer for these documents, and one of the requirements will usually involve the size of the margins.
In most cases this is meant to combat students that attempt to artificially inflate the size of a paper by making small changes to the layout of the document. So continue reading below to learn how to set up 1 inch margins in Microsoft Word 2010.
Occasionally you might need to add a sheep to a slide instead of a text box or a picture. Our guide on how to make a circle in Google Slides will show you how.
How to Make 1 Inch Margins in Word 2010 (Guide with Pictures)
Note that you can change the size of your margins at any time while the document is open. The margin change will be applied to every page of your document, so you don’t need to worry about manually adjusting the margins on every page of a multi-page paper.
Step 1: Open Microsoft Word 2010, or double-click your existing Word document to open it in Word 2010.
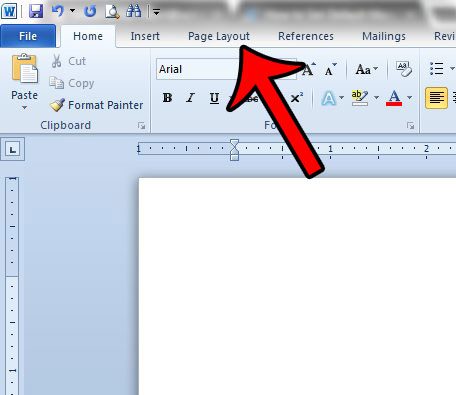
Step 2: Click the Page Layout tab at the top of the window.
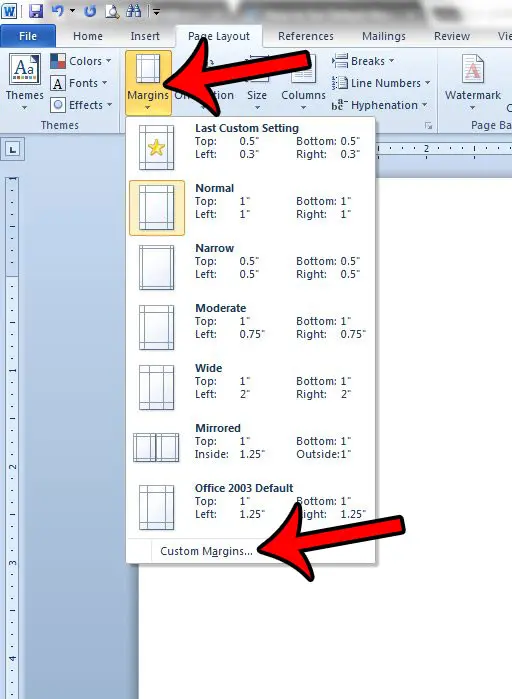
Step 3: Click Margins in the Page Setup section of the window, then click the Normal option.
Since this is a very common document layout, Microsoft has provided an easy way to set it up. But if you need to set up your document so that the margins are 1 inch on just some of the sides, but not all of them, then you need to use custom page margins. You can read this article to learn more about custom page margins.
You can also change the margins in your document by adjusting the guides that appear on the ruler at the top and left of the document.
If you don’t see the ruler then you can display it from the View tab.
How to Set 1 Inch Margins as the Default in Word 2010
If every document that you create in Word 2010 requires 1-inch margins, then it might be easier to set those as the default page margins for every new document that you create. You can do this by following these steps.
Step 1: Click the Page Layout tab at the top of the window.
Step 2: Click the Margins button, then click Custom Margins at the bottom of the list.
Step 3: Confirm that the current margin settings are what you wish to use as the defaults, then click the Set As Default button at the bottom of the window.
Step 4: Click the Yes button to confirm that you wish to change the default settings.
This setting will be applied to each new document that you create which uses the Normal template. Existing documents, or documents that you receive from others, will not use your default settings.
Quick summary – How to set one inch margins in Word 2010 by default
- Click the Page Layout tab.
- Click Margins, then click Custom Margins.
- Enter your desired default margins into the Top, Left, Bottom, and Right fields, then click Set as Default.
- Click Yes to confirm the new default margins.
If you’re setting up a research paper to turn in for school, then you might also be interested in learning how to remove the page number from your title page. Click here to learn how.
Read this article to change your margins from inches to centimeters in Word 2010.
1 Inch Margins in Word Infographic

Matthew Burleigh has been writing tech tutorials since 2008. His writing has appeared on dozens of different websites and been read over 50 million times.
After receiving his Bachelor’s and Master’s degrees in Computer Science he spent several years working in IT management for small businesses. However, he now works full time writing content online and creating websites.
His main writing topics include iPhones, Microsoft Office, Google Apps, Android, and Photoshop, but he has also written about many other tech topics as well.
Read his full bio here.
Change margins

In Word, each page automatically has a one-inch margin. You can customize or choose predefined margin settings, set margins for facing pages, allow extra margin space to allow for document binding, and change how margins are measured.
-
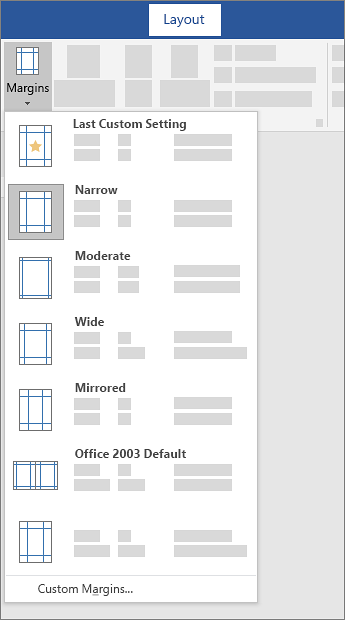
Select Layout > Margins.
-
Select the margin configuration you want, or select Custom Margins to define your own margins.
Important:
Office 2010 is no longer supported. Upgrade to Microsoft 365 to work anywhere from any device and continue to receive support.
Upgrade now
What would you like to do?
-
On the Page Layout tab, in the Page Setup group, choose Margins and the Margins gallery appears.

-
Choose the margin type that you want to apply.
Note: If your document contains multiple sections, the new margin type will only be applied to the current section. To apply the new margin type to multiple sections, be sure to select each one.
3. Make your new margin settings the default for your template. Each new document based on that template will automatically use the new margin settings.
-
Choose Margins after you select a new margin, and then choose Custom Margins.
-
In the Page Setup dialog box, choose Set As Default.
-
On the Page Layout tab, in the Page Setup group, choose Margins and the Margins gallery appears.
-
At the bottom of the Margins gallery, choose Custom Margins.
-
In the Page Setup dialog box, enter new values for the margins.
More tips about margins
-
Change the margins for only a section of a document by selecting the text and entering the new margins in the Page Setup dialog box. In the Apply to box, click Selected text. Microsoft Word automatically inserts section breaks before and after the text with new margin settings.
-
Most printers require a minimum width for margin settings. If your settings are too narrow, Microsoft Word displays the message One or more margins are set outside the printable area of the page. Click Fix to automatically increase the margin width. If you ignore the message, Word will display another message asking whether you want to continue.
-
Minimum margin settings for printing depend on your printer, printer driver, and paper size. To learn about your minimum settings, check your printer manual.
Use mirror margins to set up facing pages for double-sided documents, such as books or magazines. When you choose mirror margins, the margins of the left page are a mirror image of those on the right page. The inside margins are the same width, and the outside margins are the same width.
-
On the Page Layout tab, in the Page Setup group, click Margins >Mirrored.
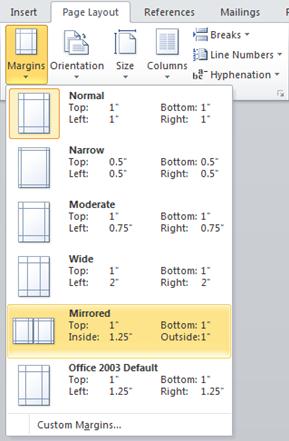
Note: To change margin widths, click Custom Margins at the bottom of the Margins gallery. Enter new values in the Inside and Outside boxes.
A gutter margin adds extra space to the side margin, top margin, or inside margins of a document that you plan to bind to help ensure that text isn’t obscured by binding.
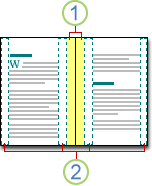
1. Gutter margins for binding
2. Mirror margins for facing pages
To set the gutter margin
-
On the Page Layout tab, in the Page Setup group, click Margins.
-
Click Custom Margins.
-
In the Gutter box, enter a width for the gutter margin.
-
In the Gutter position box, click Left or Top.
Note: The Gutter position box is not available when you use the Mirror margins, 2 pages per sheet, or Book fold option. For those options, the gutter position is determined automatically.
Word can display lines in your document to represent text boundaries.
-
On the File tab, click Options.
-
Click Advanced, and then select the Show text boundaries check box under Show document content.
The page margins appear in your document as dotted lines.
Note: You can view page margins in either Print Layout view or Web Layout view, and the text boundaries don’t appear on the printed page.
Important:
Office 2007 is no longer supported. Upgrade to Microsoft 365 to work anywhere from any device and continue to receive support.
Upgrade now
What would you like to do?
Microsoft Word offers several page margin options. You can use the default page margins or specify your own.
-
Add margins for binding
A gutter margin adds extra space to the side margin, top margin, or inside margins of a document that you plan to bind to help ensure that text isn’t obscured by binding.
1. Gutter margins for binding
2. Mirror margins for facing pages
-
Set margins for facing pages
Use mirror margins to set up facing pages for double-sided documents, such as books or magazines. In this case, the margins of the left page are a mirror image of those of the right page. The inside margins are the same width, and the outside margins are the same width. -
Note: You can set gutter margins for a document that has mirror margins if the document needs extra space for binding.
-
Add a book fold
Using the Book fold option in the Page Setup dialog box, you can create a booklet. Use the same option to create a menu, invitation, event program, or any other type of document with a single center fold.

1. Word inserts a single, center book fold
After you set up a document as a booklet, work with it just as you would any document to insert text, graphics, and other visual elements.
-
Most printers require a minimum width for margin settings. If you try to set margins that are too narrow, Microsoft Word displays the message One or more margins are set outside the printable area of the page. Click Fix to automatically increase the margin width. If you ignore the message, Word will display another message asking whether you want to continue.
-
Minimum margin settings depend on your printer, printer driver, and paper size. To learn about your minimum margin settings, check the printer manual.
-
On the Page Layout tab, in the Page Setup group, click Margins.
-
Click the margin type that you want. For the most common margin width, click Normal.
Note: When you click the margin type that you want, your entire document automatically changes to the margin type that you have selected.
-
You can specify your own custom margin settings. Click Margins, click Custom Margins, and then in the Top, Bottom, Left, and Right boxes, enter new values for the margins.

-
To change the default margins, click Margins after you select a new margin, and then click Custom Margins. In the Page Setup dialog box, click the Default button, and then click Yes. The new default settings are saved in the template on which the document is based. Each new document based on that template automatically uses the new margin settings.
-
To restore the original margin settings, click Margins and then click Custom Margins. Change the margins for Top, Bottom, Left, and Right to 1″. Then click the Default button and click Yes.
-
To change the margins for part of a document, select the text, and then set the margins that you want by entering the new margins in the Page Setup dialog box. In the Apply to box, click Selected text. Microsoft Word automatically inserts section breaks before and after the text that has the new margin settings. If your document is already divided into sections, you can click in a section or select multiple sections and then change the margins.
-
Click the Microsoft Office Button
, and then click Word Options. -
Click Advanced, and then click the Show text boundaries check box under Show document content.
The page margins appear in your document as dotted lines.
 , and then click Word Options.
Note: You can view page margins in either Print Layout view or Web Layout view, and the text boundaries do not appear on the printed page.
When you choose mirror margins, the margins of the left page are a mirror image of those on the right page. The inside margins are the same width, and the outside margins are the same width.
-
On the Page Layout tab, in the Page Setup group, click Margins >Mirrored.
-
Click Margins > Custom Margins, and in the Inside and Outside boxes, enter the widths that you want.
A gutter margin setting adds extra space to the side margin or top margin of a document that you plan to bind. A gutter margin helps ensure that text isn’t obscured by the binding.
-
On the Page Layout tab, in the Page Setup group, click Margins >Custom Margins.
-
In the Multiple pages list, click Normal.
-
In the Gutter box, enter a width for the gutter margin.
-
In the Gutter position box, click Left or Top.
Note: The Gutter position box is not available when you use the Mirror margins, 2 pages per sheet, or Book fold option. For those options, the gutter position is determined automatically.
-
Click on the text box you created to highlight it.
-
Click on the Format tab in the ribbon.
-
Click the small button in the lower left of the Size group.
-
In the Format Text Box window, click the Text Box tab.
-
In the Internal margin section, you can customize the margins to your desired size.
-
Click OK.
If this article did not answer your question, you can chat with a Microsoft virtual agent or a person at any time.
Need more help?
Want more options?
Explore subscription benefits, browse training courses, learn how to secure your device, and more.
Communities help you ask and answer questions, give feedback, and hear from experts with rich knowledge.
Find solutions to common problems or get help from a support agent.
Similar to the borders of a picture, margins help make your document look more professional and visually appealing.
It makes your text and objects look neat and well-organized within the main content.
Furthermore, academic and corporate documents call for particular formatting standards, including margin formats. In fact, both the APA and MLA style guides require a one-inch margin format on all pages.
Fortunately for us, MS Word offers various ways to easily change your document’s margins.

- Create a one-inch margin using the Normal preset margin
- Create a one-inch margin using the Page Setup dialogue box
- Create a one-inch margin using the ruler
Lets get started.
Method 1: Using the Normal Preset Margin
You can find the Margin toolbar containing several commonly-used margin formats under the Layout tab in the Ribbon. The Ribbon is the basic toolbar of Microsoft Word found at the top part of your window. This contains all of the functions in MS Word that you’ll ever need to process a Word document.
Here’s how you can do that.
Step 1: Open up an MS Word file.
Before we get started, go ahead and open up an MS Word file. If you’re already working on one, feel free to use that. Don’t worry about messing up your document, as you can easily undo any unwanted changes.

Step 2: Go to the Layout tab.
Now that we have our document opened, go to the Layout tab on the Ribbon and click the Margins drop-down toolbar. Then, select Normal on the list of preset margin format options.

If your version of Word is set to display measurement units in the metric system, then the Normal margin format will display 2.54 cm on all sides instead. Don’t fret because 1 inch is actually equivalent to 2.54 cm.

Congratulations! You’ve just used the Normal preset margin to create a one-inch margin in MS Word.
Method 2: Using the Page Setup Dialogue Box
In this method, we’ll show you the steps on how to access the Page Setup dialogue box to create a one-inch margin in MS Word. This is particularly useful when you have more than one margin format in your document.
Here are the steps to access the Page Setup dialogue box.
Step 1: Open up an MS Word file.
First, you’ll have to open up an MS Word document. Feel free to use your own personal document to follow the steps laid out here in this method. Otherwise, you can always create a new one. Remember to hit the CTRL + Z keys to easily revert any changes.

Step 2: Access the Page Setup dialogue box.
Once your Word document is open, go to the Layout tab found in the Ribbon. Then, click on the small box with a down arrow at the lower-right corner of the Page Setup group. This will launch the Page Setup dialogue box in the middle of your screen.

Alternatively, you can double-click the gray part of the Ruler to access the Page Setup dialogue box.

Step 3: Set all margins to one inch.
Under the Margins tab on the dialogue box, fill in the Top, Left, Bottom, and Right margin fields with the number 1. Again, if you’re using the metric system, type in 2.54 instead.

Click the OK button to proceed. Otherwise, click the Cancel button.

There you have it! You’ve just accessed the Page Setup dialogue box to create a one-inch margin in MS Word.
Method 3: Using the Ruler
This method makes use of the Ruler. The MS Word Ruler is such a powerful tool that lets you control your document’s margins, tabs, and indentations. Aside from measuring, the Ruler can also be used to accurately position text and objects.
Here’s how you can use the Ruler to create a one-inch margin in MS Word.
Step 1: Open up an MS Word document.
To get started, let’s open up a Word document first. If you have a document already prepared, feel free to use that. Otherwise, you can always create a new document. Don’t worry about ruining your document, as the steps here won’t damage it irreversibly.

Step 2: Select the main content.
Once you’ve opened your Word file, go ahead and select the entire content by pressing the CTRL + A keys on your keyboard.

Step 3: Adjust the Ruler slider.
By default, the Ruler should be visible on the left side and above your document. You’ll notice two different parts of the Ruler: 1) the gray and the white sections of the Ruler itself; 2) the left and right sliders.

If the Ruler is not visible, you can simply go to the View tab and check the Ruler checkbox under the Show group.

Now, move your cursor slightly above the middle part of the left slider until the cursor changes into a line with arrowheads. You’ll know you did it right when the Left Margin tooltip is shown. Then, click on it and slide it to the left until the number 1 on the gray part of the Ruler is right at the edge.

You may have noticed by now that there are numbers, dots, and bars on the Ruler. Note that the vertical bar between the numbers indicates a half-inch. So, each small dot between a number and a vertical bar corresponds to an eighth of an inch.
For this example, we’re using a Letter-sized document with a width of 8.5 inches. Therefore, we’ll simply repeat the process for the right slider but, this time, we’ll slide it up until the vertical bar right after the number 6. You’ll notice that the gray part on the right is now two vertical bars wide.

Finally, repeat the same steps for the top and bottom margins.

There you go! You’ve just used the Ruler to create a one-inch margin in MS Word.
Customizing Your Margin in MS Word
Customizing margins in MS Word is as easy as a walk in the park. You can easily set custom margins by launching the Page Setup dialogue box. You can also use the Ruler to quickly adjust all margins to suit your needs.
To access the Page Setup dialogue box, simply go to the Layout tab. Then, click on the small box with a down arrow icon found at the bottom right corner of the Page Setup group. This way, you can configure all margins in exact measurement units.

In addition, you can also specify different margins for each of the four margins in one document.
Meanwhile, if you chose to use the Ruler to adjust the margins, simply move the Ruler sliders. Do take note, however, that manually moving the sliders may not be as accurate compared to the other methods.
Conclusion
You’ve finally reached the end of this article. We hope we’ve helped you figure out how to create a one-inch margin in MS Word.
We hope you’ve found this article helpful!
Learn how to cerate one inch margin in Google Doc.